Code54
Well-Known Member
Lifetime Member
Club Contributor
Last week I installed power steering on our Pioneer 500.
I purchased the SuperATV (Ezsteer) system that is sold by SuperATV and several other companies. I paid $450 shipped to the house for mine if you are wondering.
I personally think the system is well made and works GREAT - one of the best additions we have made to our Pioneer. The steering is NOT speed sensitive but I found it works well at all speeds and eliminates the bump steer that is common on the P500 (especially with larger than stock tires)
When I installed it I took some photos to help people see what is involved and decide it they are up to doing their own install. I personally say it is a 2 out of 5 on my skill needed to install list. It is really fairly easy and can be done in a few hours with just some "normal" hand tools.
Overall SuperATVs instructions that they give you (and can be found online HERE) are really well done and pretty easy to follow.
The first thing is unpack all the box and make sure you have everything that should be included and double check all the parts for function and finish. Once that is completed take your hood off and set it off to the side. I did NOT remove any wheels for the install but you can remove the front drivers wheel if you feel it will help you out - your call.

Once the hood is off, I began by running my wiring. This is the most time consuming part but again not difficult. Just make sure you secure all the wiring well so it can not come loose off road. I personally use zip ties to hold everything in place. My photos show an extra red wire, this is because I ran an extra wire so I can add a small fuse panel for my LED lights and GPS power. Figured I was running wire anyway so what is one more.
When running the wires DONT HOOK THEM UP YET - just let them sit in the battery box safely away from the terminals.

I pulled my floor out to install the wires so I could make sure they are not touching anything they should not. To remove the floor just pop out the plastic rivets and a couple phillips screws and pull it up and out.


Once the wires are up under the hood and secured all the way you can put the floor back in and button it
all back up.
Now it is time to start doing the physical install of the Power steering system
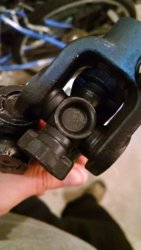
If you look closely at the shaft you can see the threads then a grove - the bolts go "through" this grove and lock the link to the shaft.


Here is what the factory shaft looks like after it is removed - stick it parts bin just incase, but hopefully you will never see or touch it again.

Here are the shafts you will be installing for the power steering - the longer shaft goes on the steering stem to the PS motor


Just get everything in place and just tighten the bolt enough so the shafts don't fall off - you want to have play in everything at this point.
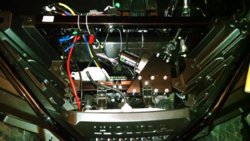
Here is the motor and how it will mount.

Take the top and bottom bracket and bolt them together with the frame/shock support bracket between them (use m8x55mm bolts), soon as that is loosely in mount the motor to the bracket with the M8x20mm bolts. When you go to put the motor on the bracket slip the bottom shaft on to the bottom motor shaft mount.

Now take the top steering shaft and slip it on the steering wheel and the top motor mount. Again don't tighten everything down yet.


You can now bolt the control box mount down tight

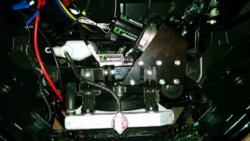
You can now mount your control box and tighten it up. After that is tight I started to tighten the 6 mounting bolts. I tighten the front 3 (closest to radiator) up a little past snug first, then the back 3, then cranked down the front three, then finished by cranking down the back ones. While doing this watch the shaft (lower) as it will want to move into the master cylinder. You need to find the right combo of tightening the bolts to keep the shaft from contacting the master cyl. It took me a few tries but the above combo worked for my machine, yours maybe different. Just make sure you have clearance or you WILL damage the master cylinder when the steering shafts turn.

Now that the mounts are tight and you have some clearance between the shafts and master cylinder go ahead and tighten ALL the bolts on shafts and make sure they do not bind.
Go ahead and install the plug in connectors into the control box - make sure they snap in and the seals are tight

The picture is taken from the hood opening looking down at the ground to try and show the gap you should have between the shaft and Master Cyl.

Now you have a little skinny white wire you need to install to a SWITCHED power source. The back of the 12v power port will work or if you have the Honda Aux harness (I have one on this machine) you can tap into the white with black stripped wire. They give you a scotch lock faster to use and it will work fine - just make sure you seal it up well. I personally use liquid electrical tape.
There is also a red Led light that is attached to the harness. It does not mount to anything but id just there if there is a problem - it blinks an error code. I just zip tied mine to the harness in case I need to see it and it kept it out of the way and away from damage.

You can now hook up your battery and button up the box.

Make sure the connections are snapped into place and go test it out!

I personally LOVE the power steering and feel it makes a already good machine great!
Shop around as there is some vendors that will give you discounts on the PS and save you some cash.
I purchased the SuperATV (Ezsteer) system that is sold by SuperATV and several other companies. I paid $450 shipped to the house for mine if you are wondering.
I personally think the system is well made and works GREAT - one of the best additions we have made to our Pioneer. The steering is NOT speed sensitive but I found it works well at all speeds and eliminates the bump steer that is common on the P500 (especially with larger than stock tires)
When I installed it I took some photos to help people see what is involved and decide it they are up to doing their own install. I personally say it is a 2 out of 5 on my skill needed to install list. It is really fairly easy and can be done in a few hours with just some "normal" hand tools.
Overall SuperATVs instructions that they give you (and can be found online HERE) are really well done and pretty easy to follow.
The first thing is unpack all the box and make sure you have everything that should be included and double check all the parts for function and finish. Once that is completed take your hood off and set it off to the side. I did NOT remove any wheels for the install but you can remove the front drivers wheel if you feel it will help you out - your call.
Once the hood is off, I began by running my wiring. This is the most time consuming part but again not difficult. Just make sure you secure all the wiring well so it can not come loose off road. I personally use zip ties to hold everything in place. My photos show an extra red wire, this is because I ran an extra wire so I can add a small fuse panel for my LED lights and GPS power. Figured I was running wire anyway so what is one more.
When running the wires DONT HOOK THEM UP YET - just let them sit in the battery box safely away from the terminals.
I pulled my floor out to install the wires so I could make sure they are not touching anything they should not. To remove the floor just pop out the plastic rivets and a couple phillips screws and pull it up and out.
Once the wires are up under the hood and secured all the way you can put the floor back in and button it
all back up.
Now it is time to start doing the physical install of the Power steering system
If you look closely at the shaft you can see the threads then a grove - the bolts go "through" this grove and lock the link to the shaft.
Here is what the factory shaft looks like after it is removed - stick it parts bin just incase, but hopefully you will never see or touch it again.
Here are the shafts you will be installing for the power steering - the longer shaft goes on the steering stem to the PS motor
Just get everything in place and just tighten the bolt enough so the shafts don't fall off - you want to have play in everything at this point.
Here is the motor and how it will mount.
Take the top and bottom bracket and bolt them together with the frame/shock support bracket between them (use m8x55mm bolts), soon as that is loosely in mount the motor to the bracket with the M8x20mm bolts. When you go to put the motor on the bracket slip the bottom shaft on to the bottom motor shaft mount.
Now take the top steering shaft and slip it on the steering wheel and the top motor mount. Again don't tighten everything down yet.
You can now bolt the control box mount down tight
You can now mount your control box and tighten it up. After that is tight I started to tighten the 6 mounting bolts. I tighten the front 3 (closest to radiator) up a little past snug first, then the back 3, then cranked down the front three, then finished by cranking down the back ones. While doing this watch the shaft (lower) as it will want to move into the master cylinder. You need to find the right combo of tightening the bolts to keep the shaft from contacting the master cyl. It took me a few tries but the above combo worked for my machine, yours maybe different. Just make sure you have clearance or you WILL damage the master cylinder when the steering shafts turn.
Now that the mounts are tight and you have some clearance between the shafts and master cylinder go ahead and tighten ALL the bolts on shafts and make sure they do not bind.
Go ahead and install the plug in connectors into the control box - make sure they snap in and the seals are tight
The picture is taken from the hood opening looking down at the ground to try and show the gap you should have between the shaft and Master Cyl.
Now you have a little skinny white wire you need to install to a SWITCHED power source. The back of the 12v power port will work or if you have the Honda Aux harness (I have one on this machine) you can tap into the white with black stripped wire. They give you a scotch lock faster to use and it will work fine - just make sure you seal it up well. I personally use liquid electrical tape.
There is also a red Led light that is attached to the harness. It does not mount to anything but id just there if there is a problem - it blinks an error code. I just zip tied mine to the harness in case I need to see it and it kept it out of the way and away from damage.
You can now hook up your battery and button up the box.
Make sure the connections are snapped into place and go test it out!
I personally LOVE the power steering and feel it makes a already good machine great!
Shop around as there is some vendors that will give you discounts on the PS and save you some cash.
Last edited by a moderator: