Has anyone done a valve adjustment on their own? I don't trust my dealer to do it when the time comes to do an adjustment. Is there good instructions in the shop manual?
You are using an out of date browser. It may not display this or other websites correctly.
You should upgrade or use an alternative browser.
You should upgrade or use an alternative browser.
I have been curious about the same thing. I think a member posted something on it awhile back. Would be nice to get a full description and or tricks to do so on the P1K3 and 5.Has anyone done a valve adjustment on their own? I don't trust my dealer to do it when the time comes to do an adjustment. Is there good instructions in the shop manual?
Eltobgi
Well-Known Member
Lifetime Member
Supporting Member
Club Contributor
I have not done mine. I have looked over the procedure in the shop manual. It does not seem difficult at all.
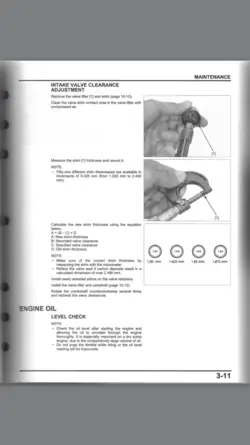
Eltobgi, when you did yours how many hours /miles did you have on it? Where the valves out of adjustment and did you notice any difference after the adjustment?I have adjusted mine! Very easy! There are 4 adjustments--the manual has very good instructions with detailed pics! 2 of the adjustment require shims where as the other 2 do not!
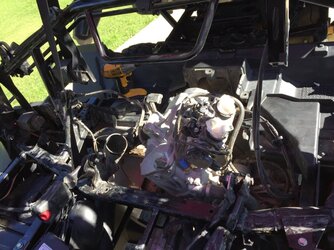
View attachment 23615
You'll want to remove seat, air filter housing, and all plastic shielding for ease of access.
S
so that people understand what is involved.... one set of valves have rockers and can be easily adjusted. the other set rid directly on the cam and have to have a shim cap placed on the stem of the valve to adjust for more/less gap.
Eltobgi
Well-Known Member
Lifetime Member
Supporting Member
Club Contributor
1200 miles...it was having trouble starting, yes I did adjust 2 of 4! The 2 shimmed did not need to be adjusted as they were within specs.Eltobgi, when you did yours how many hours /miles did you have on it? Where the valves out of adjustment and did you notice any difference after the adjustment?
Since adjustment no trouble starting
Eltobgi
Well-Known Member
Lifetime Member
Supporting Member
Club Contributor
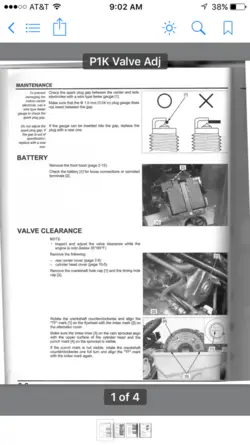
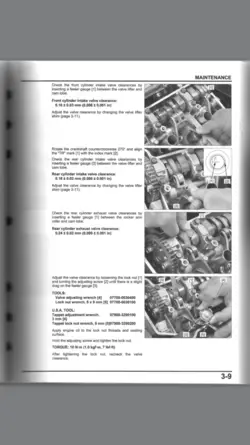
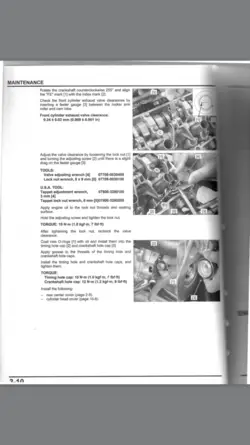
Great thank you. So what kind of starting issue? Long crank? No start? Or rough uneven idle? Just curious. Just have these questions due to my profession. HahaHere is the info from the manual shared with me by a member on this forum
View attachment 23616
View attachment 23617
View attachment 23618
View attachment 23619
advertisement
Eltobgi
Well-Known Member
Lifetime Member
Supporting Member
Club Contributor
Long crank, rough idle, stall, & smoke from exhaust smelling really rich!Great thank you. So what kind of starting issue? Long crank? No start? Or rough uneven idle? Just curious. Just have these questions due to my profession. Haha
Wow. No kidding. They must have been pretty far out of adjustment.Long crank, rough idle, stall, & smoke from exhaust smelling really rich!
Eltobgi
Well-Known Member
Lifetime Member
Supporting Member
Club Contributor
Well they were outside of the allowable margin! I should have documented it to share as a before and after! I will say that overall the adjustments were not difficult...just follow step by step instructions
Thank so again for sharing. This would be a great topic for the how to threadWell they were outside of the allowable margin! I should have documented it to share as a before and after! I will say that overall the adjustments were not difficult...just follow step by step instructions
K
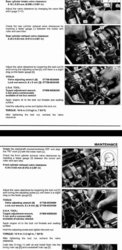
Here is the info from the manual shared with me by a member on this forum
View attachment 23616
View attachment 23617
View attachment 23618
View attachment 23619
Smitty335
Well-Known Member
Lifetime Member
Supporting Member
Did you have to adjust them?I have adjusted mine! Very easy! There are 4 adjustments--the manual has very good instructions with detailed pics! 2 of the adjustment require shims where as the other 2 do not!
View attachment 23615
You'll want to remove seat, air filter housing, and all plastic shielding for ease of access.
K
Heres the deal, the updated service manual for 2020 that is supposed to cover 2016-current calls for intake lash to be .006 and exhaust lash .012. Old service Manual was the same except exhaust lash was .009. Anyway I just did the first service and all the intakes were at .006, 3 exhaust at .009 and one at .010. I adjusted that one to .009 buttoned it up and started it up. Seemed just fine. The next day I called around to a few dealers and got mixed results with some saying .009 was correct and some, including the place I bought it from telling me .012 was correct. I readjusted them to .012 and it seems just fine. Anyway, you can access the valves by pulling the seat and backrest, shield that is in between the backrest and seat and you'll want to pull the plastic shield held on by 4 push pins off the back of the airbox so you can see timing Mark's on the camshaft gear. Anyway it's about a 2 hr job if you take your time. 3 hrs if you haven't removed any off the shielding before and had to reinstall it. You'll need a flathead screwdriver or pushpin removal tool, 10mm socket for valve cover, 8mm box wrench and 3mm tappet wrench for the valves. I used a very small crescent wrench, I don't have a 3mm tappet. A 6mm Allen to get access to the crankshaft peephole, I think it was a 22mm socket for the crankshaft cover but a larger crescent works, and it was either a 18 or 17 mm socket to turn the motor over to line up the timing markes. A feeler gauge to check lash and that's about it.Did you have to adjust them?
0
0860silverado
Well-Known Member
Lifetime Member
Now THIS...THIS is the type of reply that should be applauded. Thank you!!!Heres the deal, the updated service manual for 2020 that is supposed to cover 2016-current calls for intake lash to be .006 and exhaust lash .012. Old service Manual was the same except exhaust lash was .009. Anyway I just did the first service and all the intakes were at .006, 3 exhaust at .009 and one at .010. I adjusted that one to .009 buttoned it up and started it up. Seemed just fine. The next day I called around to a few dealers and got mixed results with some saying .009 was correct and some, including the place I bought it from telling me .012 was correct. I readjusted them to .012 and it seems just fine. Anyway, you can access the valves by pulling the seat and backrest, shield that is in between the backrest and seat and you'll want to pull the plastic shield held on by 4 push pins off the back of the airbox so you can see timing Mark's on the camshaft gear. Anyway it's about a 2 hr job if you take your time. 3 hrs if you haven't removed any off the shielding before and had to reinstall it. You'll need a flathead screwdriver or pushpin removal tool, 10mm socket for valve cover, 8mm box wrench and 3mm tappet wrench for the valves. I used a very small crescent wrench, I don't have a 3mm tappet. A 6mm Allen to get access to the crankshaft peephole, I think it was a 22mm socket for the crankshaft cover but a larger crescent works, and it was either a 18 or 17 mm socket to turn the motor over to line up the timing markes. A feeler gauge to check lash and that's about it.
K
Dealer called me today after I asked them to contact honda directly. Long story short, service manual is wrong and the correct lash for exhaust side is .009 between the cam and roller .011 between the valve and tappet.Now THIS...THIS is the type of reply that should be applauded. Thank you!!!
advertisement
Similar threads
S
- Replies
- 0
- Views
- 239
S
S
- Replies
- 0
- Views
- 199
S


