P700 Super ATV power steering Install.

swsebek

swsebek

Red,White And Blue Collar Soul
Lifetime Member
May 4, 2014
2,854
5,835
113
pa
Ownership

  1. 700-4
Ok,first of all.It wasn't that bad...I ordered the kit Thursday at 7ish and it arrived Saturday at 10 am... Why the hell cant Amazon learn from them...I initially was not going to remove the fender.... But remove it!!!! It makes it so much easier.... The steering wheel can just be pulled up once the clip is off.But you don't have to take it out.... If you have a large floor jack then use it.cause it makes getting to stuff easier. If you have to get in hood part then let it down. While you are taking bolts out of the upper and lower universals then lift tires off ground and this will allow you to get to the bolts easier....And you can just push tires to turn bolt towards yourself.
IMG 3543
lay everything out on table and make sure it's all there...The instructions are pretty good I think.But they didn't make the pictures bright enough. They are shadowed and a few things are removed from the machine in them that they don't talk about.
IMG 3545
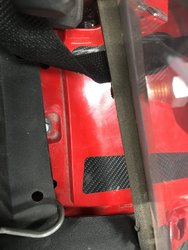
The fender is easy to take off.. but 3 areas are tricky...Below pic shows driverside headlight plastic housing has two Small Philip head screws that you can only see from under fender looking up.
IMG 3551
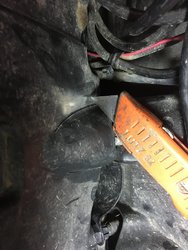
And there is this fellow here that is hidden under here that is tricky to get to..
IMG 3555
It's right under here.Taking the bolt out is not as bad as putting the little tird back in..
IMG 3556
Now with fender off you can see whats going on. And the pics in the direction booklet show you with the fender off...
IMG 3557
The little plastic clips come out with two flat screwdrivers very fast.....BUT LET ME WARN YOU!!! Every bolt or clip or anything you drop falls clean down and lands on the skid plate for you to look for... If machine is clean it helps a lot too...Above-Left-Bottom you see an L-bracket that is because I have mudd busters fender flares.
 
Last edited:
  • Like
Reactions: jinx and bigbruse
swsebek

swsebek

Red,White And Blue Collar Soul
Lifetime Member
May 4, 2014
2,854
5,835
113
pa
Ownership

  1. 700-4
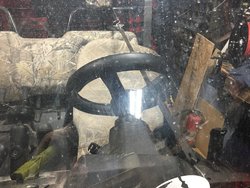
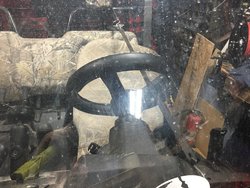
This is below below steering wheel Behind dash.Pull rubber boot down by hand.Then you will see snapring with large washer behind it.
IMG 3550
Pop off the snapring with snapring pliers and it will slide down.
IMG 3558
Now loosen and remove all the bolts on the universals on the stem.I put a couple extensions on my ratchet and used 10 mm..
IMG 3564
Below is right above the rack and pinion shaft... It stays.You could use a wrench but this way no busted nuckles.
IMG 3568
IMG 3560 IMG 3562
 
Last edited:
  • Like
Reactions: jinx and Bad_bowtie
B

bigbruse

Member
Jun 28, 2016
88
37
18
va
Ownership

  1. 700-4
Ok first of all It wasn't that bad...I ordered the kit Thursday at 7ish and it arrived Saturday 10 am... Why the hell cant Amazon learn from them...I initially was not going to remove the fender.... But remove it!!!! It makes it so much easier.... the steering wheel can just be pulled up once the clip is off.But you don't have to take it out.... If you you have a large floor jack then use it.cause it makes getting to stuff easier. If you have to get in hood part then let it down. While you are taking bolts out of the upper and lower universals then lift tires off ground and this will allow you to get to the bolts easier....And you can just push tires to turn bolt towards yourself.View attachment 64093lay everything out on table and make sure it's all there...The instructions are pretty good I think but they didn't make the pictures bright enough. They are shadowed and a few things are removed from the machine in them that they don't talk about.View attachment 64095The fender is easy to take off.. but 3 areas are tricky...Below pic shows driverside headlight plastic housing has two Small Philip head screws that you can only see from under fender looking up. View attachment 64098 And there is this fellow here that is hidden under here that is tricky to get to..View attachment 64099 It's right under here.Taking off is not as bad as putting the little tird back in..View attachment 64100Now with fender off you can see what going on. And the pics in the direction show you with it off... View attachment 64101 The little plastic clips come out with two flat screwdrivers very fast..... LET ME WARN YOU!!! Ever bolt or clip or anything you drop falls clean down and lands on the skid plate for you to look for... If machine is clean it helps a lot too...Above-Left-Bottom you see an L-bracket that is because I have mudd busters flares.
More to come I have to do this in parts....
Swsebek,
awesome details so far!!
 
swsebek

swsebek

Red,White And Blue Collar Soul
Lifetime Member
May 4, 2014
2,854
5,835
113
pa
Ownership

  1. 700-4
IMG 3566
Now above The stock steering shaft is laying.I also layed out all the bolts from fender cause I never had it off before this...I mark my stuff cause my brain gives out from time to time...:(
IMG 3567
The kits bolt package is very nice and well labeled
IMG 3560
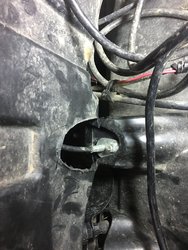
The directions show that you have to cut out this little area that is bumped out.So I did.
IMG 3561
Scored it several times and popped it off
IMG 3562
Too bad it was the wrong side...hahaha. But luckily it didn't matter because this whole piece has to come out. Piece below is behind the fan and its angled to keep mudd and stuff from coming up in under hood...
IMG 3569
I didn't take the whole thing out. Just enough to get the steering motor mount plate on...
 
Last edited:
  • Like
Reactions: jinx and Bad_bowtie
swsebek

swsebek

Red,White And Blue Collar Soul
Lifetime Member
May 4, 2014
2,854
5,835
113
pa
Ownership

  1. 700-4
  • Put lower shaft on andconnect it to rack and pinion shaft. Then mount motor to plate and bump it in..... But it goes..
    IMG 3570
    That stock plastic wire holder below gets cut off
    IMG 3571
    You can see it bolted now.. all bolts are loose.. except motor 3 bolts... I tightened them...It's tricky fishing it in place because you have to wiggle it in and the same time line splines up with shaft on motor and lower universal.Install lower universal bolt that holds splined shaft in... leave all bolts loose again.
    IMG 3573
    Now Install upper shaft to motor and to steering stem....Remember to slide on washer, clip and rubber boot.... I didn't the first timeo_O also have machine front wheels off ground and straight.check steering wheel so it not crooked... I mean so your Honda logo on it reads straightforward with wheels...
    IMG 3576
    There is paint on splines so some encouraging taps are required...Once on,put in bolts to hold shafts... leave loose..
    IMG 3578
    Above is the plastic plate I cut out. It doesn't tell you in instructions at all... But you will notice quick
    IMG 3579
    You have to cut this little piece on the fender to have clearance for motor plate... also You have to cut out bumped area above the floor brake spring
    IMG 3580
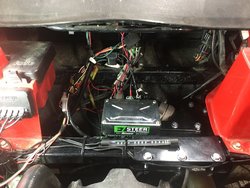
    Above is the electronic module mounted. Where four plugs that go into it.They are all shaped different. So very easy...
 
Last edited:
swsebek

swsebek

Red,White And Blue Collar Soul
Lifetime Member
May 4, 2014
2,854
5,835
113
pa
Ownership

  1. 700-4
Ok !!The kit has three wires.. two for the battery and one white one for key on power.They plug into the electronic box and run down along frame
IMG 3583
IMG 3584
down under footwell on passenger side On top of frame
IMG 3581
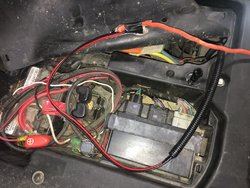
Above I shoved this orange thingy down from top in battery compartment.
IMG 3585
And here it is on bottom of SXS. Now take you positive and ground and tape them to your thingy.:D It's tough to get them through without something to snake them up through.Be careful and pull them up with.You might have to jockey from top to bottom. Wiggle some and do some pulling and some more wiggling but they will go..
IMG 3586
IMG 3587
 
Last edited:
  • Like
Reactions: jinx and Bad_bowtie
swsebek

swsebek

Red,White And Blue Collar Soul
Lifetime Member
May 4, 2014
2,854
5,835
113
pa
Ownership

  1. 700-4
Now hook them on battery and splice into a wire under hood that is only Hot with key on. Now tighten all the bolts...Now you are ready to put fender back on. The top bolt above the e- brake is a prick... but after you get it clipped on do this
 
Last edited:
  • Like
Reactions: jinx and Bad_bowtie
swsebek

swsebek

Red,White And Blue Collar Soul
Lifetime Member
May 4, 2014
2,854
5,835
113
pa
Ownership

  1. 700-4
IMG 3589
Use a bungy cord and pull toward seat with another one..... now you can put that bolt in...I didn't have extra hands or help.Also it is better to have plastic kind of warm. I have learned in the past that plastic may be brittle and brake if too coldATTACH=full]64142[/ATTACH]
IMG 3592
And there you have it.Ziptie the wires all the way back. The unit has an led red light that lets you know it's ok when key is turned on...I'm no electrician so don't laugh at my wiring.:D
I must say that everything is way worth the money... My garage floor is fiber webbing and when the machine is just sitting there you can not turn the wheels before at all.. with this unit hooked up I can cut the wheel easily and you can hear the treads ripping... I haven't tested yet... IMG 3592 IMG 3589 IMG 3589 IMG 3590 IMG 3590
 
Last edited:
swsebek

swsebek

Red,White And Blue Collar Soul
Lifetime Member
May 4, 2014
2,854
5,835
113
pa
Ownership

  1. 700-4
The whole Install took me 4 hours by myself and taking my time. There is a lot there for 500 bucks... I will give a ride report as soon As I can...
 
  • Like
Reactions: Bad_bowtie
Bad_bowtie

Bad_bowtie

Huge member
Lifetime Member
Jun 29, 2016
2,549
15,704
113
East Tennessee
Ownership

  1. 1000-5

  2. Talon X4
Excellent write up! I didn't realize that the install on the P700 was that much more involved than on the P5.
 
  • Like
Reactions: Mudder
advertisement
jinx

jinx

Well-Known Member
Sep 27, 2017
565
528
93
Missouri
Ownership

  1. 700-4
Great write up and glad I bought a deluxe lol.
I was at Home Depot earlier looking at those orange thingys you used. NiteIze gear ties? If I had read this write up beforehand it would've changed my decision that I didn't really need some bendy thingy lol
 
  • Like
Reactions: swsebek
tjoreo

tjoreo

Well-Known Member
Lifetime Member
Feb 18, 2015
1,025
1,975
113
Southern Idaho
Ownership

  1. 1000-5
Very good write up and thank you for doing it for everyone in the future. I'm sure you will love it.
 
  • Like
Reactions: swsebek
swsebek

swsebek

Red,White And Blue Collar Soul
Lifetime Member
May 4, 2014
2,854
5,835
113
pa
Ownership

  1. 700-4
IMG 3607
As I searched for tips on the Web. I came across my old post from That other place in 2015....I laughed back then and said I guess I can live without it....I wished I wouldn't have listened to that guy....boy was Jimbo right....
 
jinx

jinx

Well-Known Member
Sep 27, 2017
565
528
93
Missouri
Ownership

  1. 700-4
I test drove with/without power steering before making our purchase and easily leaned towards the deluxe.
I enjoy the power steering before even getting out of the garage because the rig is generally parked offset from the door and takes some jockeying around to get out.
Welcome to the limp wrist club lmao
 
allgm1

allgm1

Well-Known Member
Lifetime Member
Mar 7, 2015
1,049
1,484
113
New Hampshire
great write up @swsebek , it is really one of those "not nessesary " upgrades but it sure make life a little easier.
 
  • Like
Reactions: swsebek and chadbo
swsebek

swsebek

Red,White And Blue Collar Soul
Lifetime Member
May 4, 2014
2,854
5,835
113
pa
Ownership

  1. 700-4
IMG 3621
When I ordered the kit, I didn't know you got 20 extra dollars off for joining their email list.BigBruse told me So I hurried and texted them about it.I asked for some stickers for my windshield I'm making and They sent me this.They called it "The Swag Bag"5 drink holders 4 large stickers and a very nice book
Super ATV is one heck of a company..
 
advertisement

About us

  • Our community has been around for many years and pride ourselves on offering unbiased, critical discussion among people of all different backgrounds. We are working every day to make sure our community is one of the best.

User Menu

Buy us a beer!

  • Lots of time and money has gone into making sure the community is running the best software, best designs, and all the other bells and whistles. Care to buy us a beer? We'd really appreciate it!

    Beer Fund!

    Club Membership!