P500 The early Torq-lockers, the burr and axle removal woes.

pFive

pFive

Well-Known Member
May 3, 2016
668
1,256
93
Greenwood IN
Ownership

  1. 500
EDIT TO ADD: I don't think there is/was a burr, just a steep-short bevel ramp.

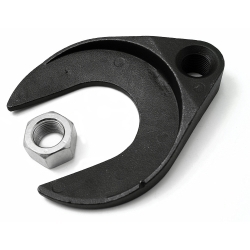
So, during initial locker testing I tore out the upper rear A-Arm mount,I was nose down in a ravine and trying to K-Turn and that may have finished that off. Anyway, now I am starting the tear down of the front half of the machine for repairs and bracing, however the Rhino axle just pulled the inner CV apart instead of pulling out the axle. I have no choice now but to open the boot on an otherwise perfect axle and see about some sort of puller to get this out, if its even possible. How bad is this gonna be? I hope I can get this thing out, as it is even if I do I will need to remove that locker and see about the burr, I wonder if it needs a chamfer.
 
Last edited:
RydeAK

RydeAK

Well-Known Member
Aug 20, 2016
103
296
63
Alaska
Ownership

  1. 500
I believe Torq Locker issued a statement about "re-pinching" the axle clips when reinstalling. If you don't pinch them down they stick out further and bind on axle removal.

Also, more info on what happened? Pictures? Seems like honda's welds on the suspension mounts are an increasingly common failure point.
 
pFive

pFive

Well-Known Member
May 3, 2016
668
1,256
93
Greenwood IN
Ownership

  1. 500
I did not get that memo via email at all, ever. My locker was installed prior to the thread here about pinching it due to that burr. I got the passenger side out, there is just enough room to use a long chisel to knock the cup out of the diff, it marred the outside of the cup really bad but it may be reusable. Now the drivers side is doing the same thing, and there is no way to use a chisel on this one. I have to weld some hooks onto the CV cup and use a slide hammer I guess. I will no longer recommend Rhino brand axles from SATV, they have absolutely no surface to use a puller on, and it's nearly deliberate how they did that... Just enough bevel to eliminate your using jaw pullers on the outside, and no pocket for the specific CV cup removal tool exists.
 
Last edited:
pFive

pFive

Well-Known Member
May 3, 2016
668
1,256
93
Greenwood IN
Ownership

  1. 500
FYI. I had to grind down 3 flats inside the CV boot groove for the 3 jaw slide hammer teeth to bite into, then used a big hose clamp to hold it in place while I hit it hard a few times and the drivers side came out. I don't see any bits of the drivers side axle cir-clip, this is kind of a big problem, you dont want to leave crap in your diff. Realistically the diff and locker need to come apart anyway to fix this issue, Axles need to be easily removable, period. Those axles were pristine and just re-installed when the locker went in and that was under 3 miles of use and it took several hours to get it apart. When I took it down to install the locker it was easy to get them out, "Crimping down the cir-clip" aint a solution for this issue, the bevel may be wrong on the locker. I will take it apart this week and see if I have a burr, but I am more concerned that I don't at this point. We can deal with a burr at home in pretty much any DIY garage, but if the bevel is wrong replacing a torn boot could cause issues.
 
pFive

pFive

Well-Known Member
May 3, 2016
668
1,256
93
Greenwood IN
Ownership

  1. 500
Also, more info on what happened? Pictures? Seems like honda's welds on the suspension mounts are an increasingly common failure point.
I don't know if it was sudden or cumulative, I really cant blame the machine here, it happens to all brands. Heck, I have seen arctic cats tear off entire arms, and PoPo aftermarket has gusset kits available. I should have been pro-active and used JWB's gusset idea.

OneDrive

Honda used bushings with rubber bonded to the inside of the arm, and then added teeth to the inner sleeve to bite against the mount tabs, that really makes the bushings act like a torsion bar or torsilastic suspension like the original Cooper Mini used and some light weight trailers. If you ride hard those teeth grind into the tabs if they slip, or work harden the tabs when they don't slip. Everyone really needs to mod those bushings to grind off those tiny friction teeth and then use a simple washer and/or longer bolts with a nylock to avoid any tension on that mount. That will let the thing ride better and flex more.

Video demonstration of how they behave stock.
VID_20180722_111213746.mp4
 
Yota87

Yota87

Active Member
Lifetime Member
Nov 17, 2017
73
178
33
Ga
Ownership

  1. 500
FYI. I had to grind down 3 flats inside the CV boot groove for the 3 jaw slide hammer teeth to bite into, then used a big hose clamp to hold it in place while I hit it hard a few times and the drivers side came out. I don't see any bits of the drivers side axle cir-clip, this is kind of a big problem, you dont want to leave crap in your diff. Realistically the diff and locker need to come apart anyway to fix this issue, Axles need to be easily removable, period. Those axles were pristine and just re-installed when the locker went in and that was under 3 miles of use and it took several hours to get it apart. When I took it down to install the locker it was easy to get them out, "Crimping down the cir-clip" aint a solution for this issue, the bevel may be wrong on the locker. I will take it apart this week and see if I have a burr, but I am more concerned that I don't at this point. We can deal with a burr at home in pretty much any DIY garage, but if the bevel is wrong replacing a torn boot could cause issues.
Sorry you having Therese problems I’ve already been through it with my Torq locker but I did manage to get it apart with just the cost of a circlip and of course I had to pull front diff back apart to remove all debris from the circlip it did chew up some teeth on the outside of the circlip but did not Evan leave so much has a scratch on the locker... and I did squeeze the circlip to gether and fit the cam back on axle to see if it could be easily removed and it did work for me.you just want to squeeze it enough so the circlip is not hanging down past the chamfer.
 
  • Like
Reactions: JWB and pFive
snuffnwhisky

snuffnwhisky

Village Idiot
Lifetime Member
Supporting Member
Sep 21, 2016
3,308
18,181
113
Cullman, AL
Ownership

  1. 1000-5

  2. Other Brand
So, during initial locker testing I tore out the upper rear A-Arm mount,I was nose down in a ravine and trying to K-Turn and that may have finished that off. Anyway, now I am starting the tear down of the front half of the machine for repairs and bracing, however the Rhino axle just pulled the inner CV apart instead of pulling out the axle. I have no choice now but to open the boot on an otherwise perfect axle and see about some sort of puller to get this out, if its even possible. How bad is this gonna be? I hope I can get this thing out, as it is even if I do I will need to remove that locker and see about the burr, I wonder if it needs a chamfer.
I had a visegrip attachment for my slide hammer that I had to clamp on the shell to get one of mine off.
 
pFive

pFive

Well-Known Member
May 3, 2016
668
1,256
93
Greenwood IN
Ownership

  1. 500
I ground 3 flats onto the cup in the groove for the boot and it worked out with a 3 jaw and a hose clamp to hold the jaws in place. I tried a stock axle in the locker component while I had it apart and it worked out a bit better, but the axle was vertical and that kept the cir-clip from hanging down any.. Breaking a cir-clip to change a boot is bad juju, i will make the ring smaller, but this cant happen again. If it does I am grinding a longer bevel onto the inner edge when I take it out again to get a broken piece out.
 
  • Like
Reactions: Yota87
Yota87

Yota87

Active Member
Lifetime Member
Nov 17, 2017
73
178
33
Ga
Ownership

  1. 500
I used a slide hammer and bearing separater .. as you can see in the pics on the locker the circlip goes out pass the chamfer so there for you have to sheer it off to get the axle out.. in the oem spider gear it has a ridge in it to keep the circlip from doing that... the locker does not but you can squeeze together and slide the locker on and off and just adjust to where it will still hold but pop out with applied pressure before putting it back together.
3BE60E37 D001 4B6D 8A65 CCDCEDF01D5C
151E10CF 7C59 44E2 AF9C 3CB32CC771B8
88F73071 3441 4AA4 8CE7 BBAEF4646450
C6960C09 B48D 4782 B3FB E751216E06A6
 
  • Like
Reactions: Eltobgi and JWB
advertisement
pFive

pFive

Well-Known Member
May 3, 2016
668
1,256
93
Greenwood IN
Ownership

  1. 500
I found that if I squeezed too much the clip did nothing, so keep that in mind. I had to open the clip back up up a bit to get any retention at all with the locker bits slid over the clip. I found that while holding the CV cup vertical I could pull pretty hard, but a quick snap compressed the cir-clip and it came off by hand. I hope it works that well when it's horizontal, but the ID of the clip should work out. I feel a bit more bevel may help, but I am willing to put it all back together and be mindful of the clip size. I just wish I had known the first time around. I tried the bearing tool, but I had no luck getting it around the cup, mine is a little different. Also, I would like to see the next batch of lockers have that honda step/chamfer design.
 
Seg

Seg

Well-Known Member
Feb 18, 2016
189
322
63
Notre-Dame de la Salette, Qc, Canada
Ownership

  1. 500
I found that if I squeezed too much the clip did nothing, so keep that in mind. I had to open the clip back up up a bit to get any retention at all with the locker bits slid over the clip. I found that while holding the CV cup vertical I could pull pretty hard, but a quick snap compressed the cir-clip and it came off by hand. I hope it works that well when it's horizontal, but the ID of the clip should work out. I feel a bit more bevel may help, but I am willing to put it all back together and be mindful of the clip size. I just wish I had known the first time around. I tried the bearing tool, but I had no luck getting it around the cup, mine is a little different. Also, I would like to see the next batch of lockers have that honda step/chamfer design.
That's the risk being a early adapter! Did you write to TorqMaster for the product enhancement?
 
sthomp54

sthomp54

Well-Known Member
Jun 11, 2015
356
375
63
I havent installed my locker yet, but is this also an issue with stock axles or just aftermarket? Im trying to understand the issue but not clear on what the problem is. Will probably make more sense when I take it apart and have it in my hands but want to be prepared beforehand.
 
  • Like
Reactions: JWB and Yota87
Mudder

Mudder

NTC Ambassador of Walls
Lifetime Member
Oct 1, 2016
11,691
88,487
113
Georgia
Ownership

  1. Other Brand

  2. 500
Just trying to understand all this good info.
So for those who did the installation prior to circlip info, is there anything specific we should be watching for? Leaking, separation, or just a potential snag if a future axle removal is needed? Have not noticed any problems so far, just improved traction. Thanks in advance.
 
Yota87

Yota87

Active Member
Lifetime Member
Nov 17, 2017
73
178
33
Ga
Ownership

  1. 500
It’s a problem with any axle and it will not cause any kind of side effects it’s just going to be a pain to remove axles if you did not squeeze on the circlip making it smaller in diameter and pre fit to insure it will release but also keep axle held in place I stretched a o-ring around the groove where the circlip goes to keep it centered on the axle so it can not sag down pass the chamfer.
 
  • Like
Reactions: JWB and Mudder
sthomp54

sthomp54

Well-Known Member
Jun 11, 2015
356
375
63
It’s a problem with any axle and it will not cause any kind of side effects it’s just going to be a pain to remove axles if you did not squeeze on the circlip making it smaller in diameter and pre fit to insure it will release but also keep axle held in place I stretched a o-ring around the groove where the circlip goes to keep it centered on the axle so it can not sag down pass the chamfer.

Ok I think I understand now, thanks.
 
  • Like
Reactions: JWB and Yota87
pFive

pFive

Well-Known Member
May 3, 2016
668
1,256
93
Greenwood IN
Ownership

  1. 500
I'm starting to wonder if anyone with the locker installed might want to consider adding this mod too...
Here's the other control arm mount reinforcement video: Top control arm mount reinforcement.mp4
I just finished my mount gussets today, I basically braced the back side of the upper rear mount across it's back with a piece of 90º steel (notched to go around top tube) and then gusseted it to the top cross tube. I tried what you did, and no way can metal sit flat across even 3 of those bracket points. Not on either side. And one side still looked perfectly straight, the drill rod slid in perfect. I also ground off the teeth on the Arm bushings and used washers between the arms and the mounts. View media item 3310
 
Last edited:
  • Like
Reactions: JWB
advertisement

About us

  • Our community has been around for many years and pride ourselves on offering unbiased, critical discussion among people of all different backgrounds. We are working every day to make sure our community is one of the best.

User Menu

Buy us a beer!

  • Lots of time and money has gone into making sure the community is running the best software, best designs, and all the other bells and whistles. Care to buy us a beer? We'd really appreciate it!

    Beer Fund!

    Club Membership!