Plumber101010
Well-Known Member
Lifetime Member
You have heard it your whole life. Batteries of the exact same size, batteries of the exact same make, isolators, blah blah blah.
I cannot think of any after market mod, maybe short of a winch, light bar, and of course, the never ending quest for tires and wheels, that is more universally desired by the four wheeling community, as well as full-size truck owners than a dual battery setup!
Conversely, unlike winches and stuff, this subject matter to most has been made so thoroughly complicated and so ridiculously confusing, it has downright scared off all but the most daring DIY types, to the point that they will never do it, regardless of how bad they want it! And even till this day, people are STILL unaware they can do it this way!
Now let me be the first say that not only have I been using this system for well over 20 years, installing this setup in literally every single vehicle I have owned without it ever breaking down or failing me, I have to also be very honest in saying I have never ONCE had to utilize it either.
That is to say that I have never been in a position where I would've been left stranded had this system not been in place. There is little that a dual battery system can do when it comes to the concept of having a dead battery and being left stranded, that a portable battery jumper cannot! I own one of those too and it stores nicely in the back of any truck.
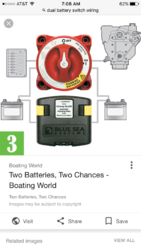
So here we go. Go on Amazon or any place you want and buy a marine battery switch. As with anything, they have cheap ones and more expensive ones but I have personally found little difference, but some are definitely better made.
Some of the nicer units will have a face plate so you can cut out a hole in the dash and place the switch inside the cab, behind and under the dash with only the mechanism sticking out accessible, for a nice custom look.
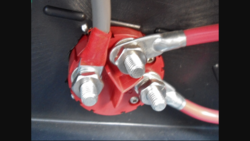
Or you can buy the cheap one that you see in the picture and put it on the outside of the dash and just use 3 nice looking screws! Actually prefer the one in the picture because if you have to do any maintenance or removal it makes it super simple.
Now by no means do you have to install this inside the truck or the cab, though I do highly recommend it. Not only is a real cool looking accessory, but the convenience of having it right there within hands reach is a very nice thing when you are switching functions.
Let me stop right here and bring up a very important point. The longer the run of the cable, the thicker the cable needs to be, which means the more money you are going to spend.
If you want a super cheap install, knowing aesthetics or convenience is not your thing, just mount the switch directly under the hood between the two batteries. Then go buy a couple cheap, pre-made 4 gauge battery cables at Walmart for eight bucks and you can be completely done with this project in no time, with a total cost, INCLUDING the battery (cheap one) for about $75. Doesn't get much cheaper than that folks!
Realistically though, assuming you're going to get a nicer switch, a nicer battery and going to do an in-cabin install, you can plan on $125-$150. Most of the money is in the cable itself as when you start doing longer, in cab runs (applies to full-size trucks not UTV's) you're going to want to get down to 0 or 1 size battery cable which I do not recommend buying premade, too expensive. Buy a length of it and take the hammer type terminals where you can just crimp it by bashing it with a hammer to the end of the battery cable. Super secure that way.
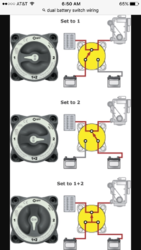
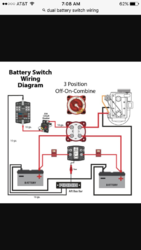
So the back of this thing is monkey simple to figure out and install. There's 3 bolts with nuts. Labeled battery 1, battery 2 and feed, which means to your starter.
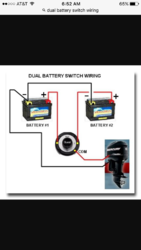
Hopefully so far you're following the pure simplicity of this system. Mount your new battery, run a positive cable to the "BAT 2" terminal on the switch. (I like labeling battery one as the original and battery two as the ad on) and run the negative to any ground you choose.
Now take the original battery and run a new cable from the positive to the first terminal labeled "BAT1" (The ground you do not have to touch because it's already hooked up)
Then take the original cable that was running to the positive post on the original battery and attach it to the middle of the switch or the feed.
Depending on your location you may or may not need to add additional cable but sometimes you can reroute it to come up in a different location and get a lot of extra length. This will probably be the case on a UTV and you won't have to extend or buy a longer cable.
Now keep in mind that the original cable running to the starter that was on the battery will have a post on the end, so that has to be cut off and replaced with a regular open round hole terminal so it will slide over the bolt.
There you have it everyone. Your install is done. So to simplify, it's three easy steps.
1. Install your new battery in its new location and run one cable to ground and one cable to the bat2 post on the switch.
2. Run a new cable from the positive of the original battery to the BAT1 post on the switch.
3. Take the original positive cable running to the original battery and and attach it to middle terminal on the switch. Or feed, however they have it labeled.
That's it. No complication, no confusion, no never ending questions about isolators and this and that!
Now some tips to keep in mind. For those who do not know. I recommend buying a battery post that has a stud and wing nut sticking out of it so that you can more easily attach accessories to the battery as well as this switch.
This comes in extremely handy if you want to buy the premade battery cables because you then you can buy a pre-made cable with BOTH ends being an open round loop that just slides on top of the bolt and secure. They are not called battery cables, but a starter cable, usually sold on the same rack or area. See pic below.
So then one will slide over the post sticking out of the battery switch and the other and will slide over the post of your new battery terminal.
Really, it just makes life easy not to mention when adding all other accessories like lights and such, you can just unscrew the wingnut, attach wire and clamp down because it already has two ends that are nothing more than a circle with a hole in it.
These are all the many pros (List doesn't end here) of using this system versus the isolator system.
1. The obvious, which is this system is much cheaper and much easier to install, as such, it shouldn't scare absolutely anyone away from doing the project they have always wanted! This is as simple as simple can get.
2. In some cases when an isolator fails, it will actually draw power from the extra battery and you can wind up with two dead batteries and be left stranded!!! This basically means that the second battery does nothing at all to assist you. It is dead as well as the main battery. That kind of defeats the whole reason for having another battery!
3. YOU are in command of the system and you choose what battery at what time to do what YOU want
4. The OFF function is something that is exclusive to the switch and you won't find anywhere else. How many times have you read to disconnect the battery and wait 30 minutes to reset the computer system on any vehicle? Going to install a stereo? Going to install any aftermarket accessories? Simply turn the switch to off and instantly shut down the entire electrical system!
5. You can choose both batteries OR individual batteries to run each component. This comes in really handy when you are running say a 2500 watt inverter like I do, to run lights at night, being able to run it to the point that the battery is dead, while always keeping your main, primary starting battery safe, charged and untouched.
6. Winching yourself up a hill and hear the battery start to drag? Turn the switch to both and instantly double battery power on command! Then turn it off as soon as you're over the hump.
7. Leave the headlights on all night and have a dead battery? Who needs a battery charger!!! Simply turn the switch to battery 2, start the vehicle, then put the switch back to dead battery 1 and let the engine do the charging for you. You not only have a "jumper battery" ready to go, but a "built-in battery charger" as well.
8. The switch breaks on you and goes south? No problem. The malfunctioning of the switch, unlike the malfunctioning of an isolator system which no one is going to have a spare of laying around and could possibly leave you stranded, has absolutely nothing to do with the ability of the batteries!! Turn the switch around, take a nut and bolt or black electrical tape for that matter, and touch the two terminal ends together and you have completely bypassed the switch and you are now rolling along as if nothing ever happened..with BOTH BATTERIES.
9. You can use two totally different types of batteries, using the second battery as a deep cell to run things off long term, as opposed to regular automotive battery that is all about a lot of amp for a short amount of time.
There's absolutely not one negative thing to this system and I don't think anyone else would be able to bring up a negative to it either. It ranks supreme in the dual battery world and allows many and much better options than the isolator way.
The only other thing I could add, is don't be surprised if users of the isolator system defend their way of doing it while disparaging this method. It's not that there is really a disagreement as much as this option has never been presented before and is not really thought of as an option.
When the community at large has been doing something a certain way for such a long time, it's very hard to get them to adapt to a new way of doing things
The ONLY time you have to be extremely careful and safe, is when you are doing an in cab install on a full-size truck and you are drilling through the firewall!
You do NOT want that cable to chafe whatsoever up against the sheet-metal because then you could actually have a fire. I do not think this will apply whatsoever on any UTV, still, if that were to turn out to be the case, ONLY use rubber grommets there AND use several protective sheaths and wraps around the cable itself to ensure that will never happen!
I hope this helps many others achieve their desire to now have dual batteries in a very simple, affordable and durable way.
Last edited:


