BOX1

Homemade front lift

slowdryrider

slowdryrider

Well-Known Member
Lifetime Member
Club Contributor
Jul 14, 2013
562
751
93
Canada
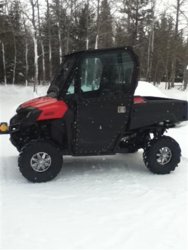
I started playing around with getting the front end up a bit higher.First I jacked up the front of the Pioneer and removed the lower shock bolt to the upper a-arm. I then let the tire drop down as far as it would go,and found out that it would only go so far,and then the axle bottoms out.If you turn the wheel by hand you'll see the tire go up and down a bit as the cv-joints bottom out at two different spots. I used the highest wheel height as my starting point.From there I lifted up the tire 3/4" of a inch higher and designed my lift at that tire/wheel height.I did this to make sure that the cv-joints would never be stressed out. First I made a template out of cardboard,then once I had it figured out I cut and drilled holes into some 3/16" plate that I had laying around.I cut the plate and shaped and drilled it to match the cardboard templates.Looking from the front of the Pioneer to, the back I placed the back plate on the inside of the oem shock mount and the front plate on the front of the shock mount.The front plate is at the bottom is bent towards the front of the machine just a bit in order for it to sit flat against the oem mount and clear the weld at the a-arm. I bolted it all into place and spun the tire/wheels to make sure that the cv-joints weren't binding. All looked good so I let the jack down and to my delight the Pioneer had 12" ground clearance under the front.It looked kinda funny because the back had only 11". I then jacked it up again and turned the wheels to the right full lock,to my disappointment there was 1/4" clearance between the left tire and the front mount,I turned the wheel to full lock left and again had no clearance between the right tire and front mount. When I say no clearance I mean that when I spin the wheel , the tire actually touched the mount.I'am going to be putting different rims on so with alum. rims having a 1" greater offset I'am hoping it will correct my clearance issues.The back plate has to be on the inside of the oem mount because there's no place to put it on the outside of that mount because it hangs over the edge of the a-arm and doesn't get any support. The other thing I'am going to try to do is to shape the front mount a bit different and recheck my holes.The plates were copied from the left front so maybe I'll have to check and see whats different on the right front,I'am hoping that by maybe drilling the holes a bit different in the right one that it will give me a 1/4" of tire to plate clearance as well.I do know that the clearance issue is only in the full lock position with the wheels right off the ground.When the machine is sitting on the ground there's plenty of clearance.This is what I've ended up with for now.I'll have to play around with this a bit more before I can say that it works. :lol: I'll keep you posted on the changes that I make.Back to the drawing board untill I get it right. LOL

Pioneer lift 001 Small Pioneer lift 002 Small Pioneer lift 003 Small
 
Hondasxs

Hondasxs

Club Founder
Staff member
Lifetime Member
Supporting Member
Feb 13, 2013
17,954
62,642
113
Charlotte, NC
HondaSxS.com
Ownership

  1. 1000-5
Now this is a custom project I can do in my small shop. I have made many lift kits for all my buddies back in the day.

Ya, I see how it is rubbing.
I think because you moved it out is the problem. If you could keep the bolt hole at the original angle of the shock you could shave more off the outside. Or like you said. a extra inch offset tire may fix it.

I like your walk through on how to insure you do not rub the CV cup. We just tried to replace a boot on a Rincon back in spring. It rubbed so much we could not replace the boot. Just decided to run it until it breaks.
 
  • Like
Reactions: Islander
slowdryrider

slowdryrider

Well-Known Member
Lifetime Member
Club Contributor
Jul 14, 2013
562
751
93
Canada
I moved them outwards so that it would help with bottoming out plus give better lift.The further away from the pivot the less force is required to help with lift and bottoming. [Te- teer, totter effect] . Where it rubs is actually right at the shock not lower down. I'am planning on redrilling the upper holes more in line with the oem one plus cutting some of the front mount off that's near the tire.If I'am able to get 1/2" clearance with stock rims I'll be happy.I do have the alum ones [had them since black Friday] just haven't put them on yet.
 
  • Like
Reactions: Islander
slowdryrider

slowdryrider

Well-Known Member
Lifetime Member
Club Contributor
Jul 14, 2013
562
751
93
Canada
Who hoo the front lift works,I have 11 3/4" ground clearance now. What I did was to weld in the upper holes and redrilled them in a slightly differnet spot.The new holes are 1/2 a hole lower down and about 1/2 a hole closer to the center. The other thing that I did was to move the back bracket closer to the back of the machine and the front bracket is now on the inside of the oem shock bracket. I also cut the front bracket into a different pattern. I also bent the back bracket a bit different to give it more contact area on the a-arms. Now by doing this I now have a 1" clearance between the tire and the mount. The only time that there was a issue with them rubbing is when the wheels were turned full lock either way and the tire's lifted off the ground.I know that doesn't happen that often but I didn't want any problems ever. Now by doing the changes there will never be any issues, I'am happy with how it turned out. Just finished painting them and will install and try them out in a couple hrs or so. :lol:

Pioneer lift 006 Small Pioneer lift 007 Small
 
  • Like
Reactions: Islander
slowdryrider

slowdryrider

Well-Known Member
Lifetime Member
Club Contributor
Jul 14, 2013
562
751
93
Canada
This is what the Pioneer looks like with the lift and new rims.
 

Attachments

  • IMG_0105 (Small).jpg
    IMG_0105 (Small).jpg
    35.5 KB · Views: 1,254
bigc

bigc

Moderator
Moderator
Lifetime Member
Supporting Member
Sep 16, 2013
421
93
28
looks good what rims and tires do you have
 
slowdryrider

slowdryrider

Well-Known Member
Lifetime Member
Club Contributor
Jul 14, 2013
562
751
93
Canada
bigc said:
looks good what rims and tires do you have
Tires are what came with the Pioneer. The rims are Motor Sports Alloys style name: Pilot 12x7 Black Barrel Silver Face is whats marked on the box's.The Rims took the Pioneer from 60" to 62" wide.
 
Hondasxs

Hondasxs

Club Founder
Staff member
Lifetime Member
Supporting Member
Feb 13, 2013
17,954
62,642
113
Charlotte, NC
HondaSxS.com
Ownership

  1. 1000-5
You can tell it has a lift on it. Looks good. I may have to look into doing this also. Thanks.
 
F

farmer700

New Member
Dec 7, 2013
80
4
0
slowdryrider said:
This is what the Pioneer looks like with the lift and new rims.
Looks good. I may copy this idea and make me one. Don't have a lot of tools but I have a hand saw, grinder, and drill. I think that will get the job done just fine. Thanks.
 
BOX2
box3

About us

  • Our community has been around for many years and pride ourselves on offering unbiased, critical discussion among people of all different backgrounds. We are working every day to make sure our community is one of the best.

User Menu

Buy us a beer!

  • Lots of time and money has gone into making sure the community is running the best software, best designs, and all the other bells and whistles. Care to buy us a beer? We'd really appreciate it!

    Beer Fund!

    Club Membership!