Looking to add a winch to my 1000-5. Of the mount options I've read about on here (OEM, KFI, SuperATV, EMP & Moose), I like the winch orientation and cable exit angle of the EMP and Moose mounts. I haven't actually seen any pictures of either of those though. I was hoping anyone using either mount could comment on any pro/cons/impressions and maybe provide some pictures. Right now I'm planning to go with the SuperWinch Terra 45-SR.
You are using an out of date browser. It may not display this or other websites correctly.
You should upgrade or use an alternative browser.
You should upgrade or use an alternative browser.
I pulled my KFI mount and ended up with the Moose winch mount and it is much better. Great mount and highly recommended. Have not used the EMP mount, so I can not comment on that one.
Viper Elite #5,000 widespool winch on a viper mount. It mounts the winch upside down and pretty high up U-bolted to the frame. It's almost a straight line out through the Hawse fairlead. The line exiting the winch is probably an inch lower than the fairlead opening on a horizontal line. Pretty solid and universal mount. Viper Elite widespool comes with a 65' synthetic line and a wireless remote.


Given that the KFI seems to be pretty popular, I'm happy to hear that you rank the Moose above it, a little surprised even. Thank you!I pulled my KFI mount and ended up with the Moose winch mount and it is much better. Great mount and highly recommended. Have not used the EMP mount, so I can not comment on that one.
Viper Elite #5,000 widespool winch on a viper mount. It mounts the winch upside down and pretty high up U-bolted to the frame. It's almost a straight line out through the Hawse fairlead. The line exiting the winch is probably an inch lower than the fairlead opening on a horizontal line. Pretty solid and universal mount. Viper Elite widespool comes with a 65' synthetic line and a wireless remote.
Would the Viper mount fit the Superwinch you think?
Last edited:
J
JTW
Guest
Would the Viper mount fit the Superwinch you think?
From their website: For use with the standard spool, 4-bolt mounting pattern (3" x 4 7/8") and wide spool, 4-bolt mounting pattern (3" x 6.67"). So if a Superwinch has that bolt pattern you are good, which I thought were fairly standard.
PIONEER Winch Mount | Moto Alliance
Superwinch Terra 45 SR, 1145230
J
Let us know how this works for you and the winch. Any mounting issues, bolting it down into the Honda frame, winch cable feed, binding etc?I went ahead and ordered the Moose mount last night. I'll let y'all know what I think when I get it installed. I'll see about doing a write up and post some pictures too. I appreciate the info guys!
We are always looking for a better application

Sent from my SM-T818V using Tapatalk
advertisement
I finally finished getting the winch installed yesterday. The Moose mount was simple and seems very solid, I'm happy with it so far.
Here's how the install went:
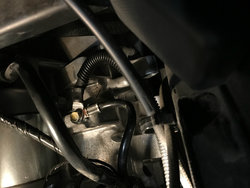
First I ran a 4ga ground wire to the engine ground location that the factory battery uses. Since my 2016 P1000M5 is new and still has a warranty, I thought it best to mimic the factory winch install as much as possible. I plan to add an aux battery in the future and can reuse this wire for the planned ground buss bar. I removed the seat, seat back (which ended up being unnecessary), and the plastic panel between the two to gain better access to the ground bolt. The bolt is painted yellow and is on the crank case below the intake.
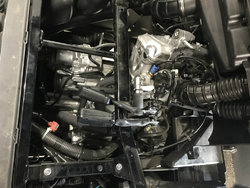
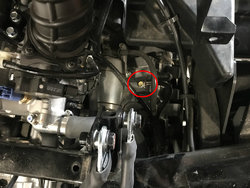
I routed the wire along the factory harness, zip-tying near the factory anchors. Unlike the factory winch instructions, that have you pull nearly every body panel off the machine, I just dropped the front skid plate and had sufficient access for running and securing the wire.
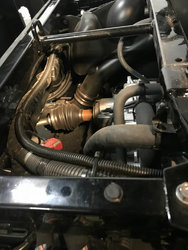
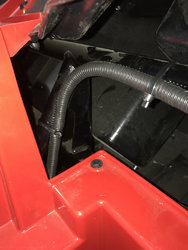
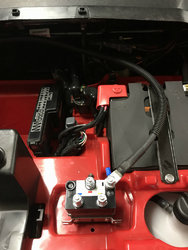
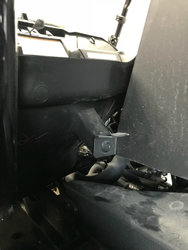
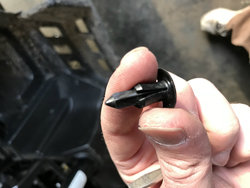
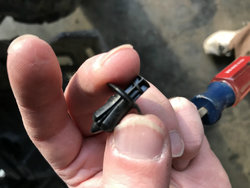
I was originally going to fab up a bracket to mount the solenoid in the factory location, but ended up mounting to the right of the battery as others have done by drilling two holes and using a piece of 1-1/2" wide aluminum cut to length for a backer plate. When removing the plastic panel between the seat bottom and back, there's an extra push pin to the rear on the driver's side that's unlike the rest of the factory pins. It was troublesome to remove, so here's some pictures if it helps anyone else trying to pull it.
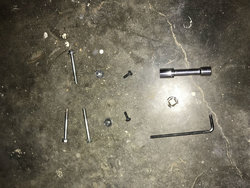
Next, I removed the front bumper. Of the four upper bolts, one was missing and one was installed cross-threaded. I bought some class 10.9 replacement bolts and used one in the forward hole on both sides since those go through the Moose mount.
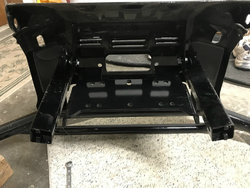
I attached the mount to the forward mounting holes, and attempted to align it before tightening. Upon reassembly, I found out it had moved, so just bear in mind that no matter how much effort you give to aligning the mount, it'll shift once the winch is mounted. The gap in the mount to the rear concerned me, until I realized that was to clear the nuts welded to the frame.
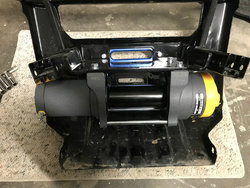
I turned the bumper up-side-down to mount the winch. I seem to have an issue with over-torquing fasteners and ended up ruining one of the bolts included with the winch (hence one missing in the pic). Since I had to buy replacement bolts for the frame above, I bought 4 class 10.9 bolts (I bought these 5mm longer than original), flat washers, split washers and nuts for the winch. I went ahead and replaced the four square captured nuts in the winch too, which wasn't fun, but I feel better about the mounting (especially since it hangs). I had to insert screwdrivers in the space with the nuts to prevent them from spinning since hex nuts were smaller than the original square ones.
Once the bumper was back in place [quick note - I ended up using 2 long extensions, 1 short, and a knuckle to get the rear nuts on to secure the mount per the instructions], I mounted the solenoid and circuit breaker, tapped the aux wire for the switch, routed the yellow and blue winch wires, and wired everything together.
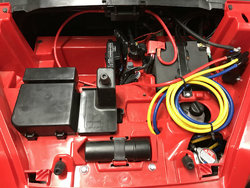
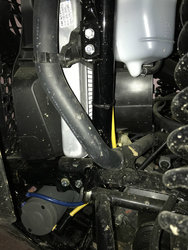
I'll cut the blue and yellow wire to length once I acquire some 6ga ring lugs. I also plan to use some HD velcro to mount the circuit break over the battery and then cut the positive wires to length. Until I get to dash-mounting switches, I'm using the included rocker switch that I mounted to the ROPS above and to the left of the steering wheel, ran the wire down the bar and back to under the hood.I ran the yellow and blue wires to the winch down the frame bar left of the radiator (driver's side), being carefull that its clear of the fan and not touching the radiator.
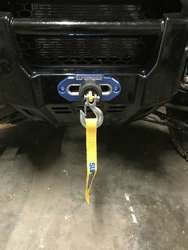
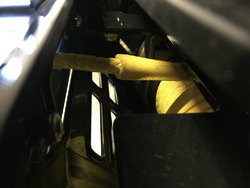
I'm happy with the final product, and will be even happier once I get the wiring situation cleaned up. The angle of the winch cable is almost completely straight. Its a tight spot, but I got the best picture I could. The rope does angle up slightly, in fact it touched the mount ever so slightly. The hole in the bumper is pretty tall, so I think I'll end up moving the hawse down 3/4" to an inch, as far as I can, drill new holes, and that should eliminate an remaining angle.
Here's how the install went:
First I ran a 4ga ground wire to the engine ground location that the factory battery uses. Since my 2016 P1000M5 is new and still has a warranty, I thought it best to mimic the factory winch install as much as possible. I plan to add an aux battery in the future and can reuse this wire for the planned ground buss bar. I removed the seat, seat back (which ended up being unnecessary), and the plastic panel between the two to gain better access to the ground bolt. The bolt is painted yellow and is on the crank case below the intake.


I routed the wire along the factory harness, zip-tying near the factory anchors. Unlike the factory winch instructions, that have you pull nearly every body panel off the machine, I just dropped the front skid plate and had sufficient access for running and securing the wire.


I was originally going to fab up a bracket to mount the solenoid in the factory location, but ended up mounting to the right of the battery as others have done by drilling two holes and using a piece of 1-1/2" wide aluminum cut to length for a backer plate. When removing the plastic panel between the seat bottom and back, there's an extra push pin to the rear on the driver's side that's unlike the rest of the factory pins. It was troublesome to remove, so here's some pictures if it helps anyone else trying to pull it.


Next, I removed the front bumper. Of the four upper bolts, one was missing and one was installed cross-threaded. I bought some class 10.9 replacement bolts and used one in the forward hole on both sides since those go through the Moose mount.

I attached the mount to the forward mounting holes, and attempted to align it before tightening. Upon reassembly, I found out it had moved, so just bear in mind that no matter how much effort you give to aligning the mount, it'll shift once the winch is mounted. The gap in the mount to the rear concerned me, until I realized that was to clear the nuts welded to the frame.

I turned the bumper up-side-down to mount the winch. I seem to have an issue with over-torquing fasteners and ended up ruining one of the bolts included with the winch (hence one missing in the pic). Since I had to buy replacement bolts for the frame above, I bought 4 class 10.9 bolts (I bought these 5mm longer than original), flat washers, split washers and nuts for the winch. I went ahead and replaced the four square captured nuts in the winch too, which wasn't fun, but I feel better about the mounting (especially since it hangs). I had to insert screwdrivers in the space with the nuts to prevent them from spinning since hex nuts were smaller than the original square ones.

Once the bumper was back in place [quick note - I ended up using 2 long extensions, 1 short, and a knuckle to get the rear nuts on to secure the mount per the instructions], I mounted the solenoid and circuit breaker, tapped the aux wire for the switch, routed the yellow and blue winch wires, and wired everything together.

I'll cut the blue and yellow wire to length once I acquire some 6ga ring lugs. I also plan to use some HD velcro to mount the circuit break over the battery and then cut the positive wires to length. Until I get to dash-mounting switches, I'm using the included rocker switch that I mounted to the ROPS above and to the left of the steering wheel, ran the wire down the bar and back to under the hood.I ran the yellow and blue wires to the winch down the frame bar left of the radiator (driver's side), being carefull that its clear of the fan and not touching the radiator.

I'm happy with the final product, and will be even happier once I get the wiring situation cleaned up. The angle of the winch cable is almost completely straight. Its a tight spot, but I got the best picture I could. The rope does angle up slightly, in fact it touched the mount ever so slightly. The hole in the bumper is pretty tall, so I think I'll end up moving the hawse down 3/4" to an inch, as far as I can, drill new holes, and that should eliminate an remaining angle.


Last edited:
Similar threads
N
- Replies
- 1
- Views
- 173
- Replies
- 1
- Views
- 424
S
- Replies
- 24
- Views
- 1K
D
- Replies
- 4
- Views
- 289
P
- Replies
- 3
- Views
- 547
P

