Y
You are using an out of date browser. It may not display this or other websites correctly.
You should upgrade or use an alternative browser.
You should upgrade or use an alternative browser.
rustyneversleeps
Well-Known Member
Supporting Member
I'm glad you posted this haha because I have them sitting in the garage ready to be installed...was going to tackle it this week. I messaged @pappyo, as he seems to be pretty handy with those sort of things.Just wondering if anyone has installed the Pioneer 520 soft doors yet? It seems the instructions say to remove the hard doors and not put them back on with the soft door. Anyone have any experience putting these on? thank you
Here is a link to the install instructions.....looks a little involved
Y
yes mine are in the garage as well. i have looked at the instructions and they do seem a bit involved. if you have a chance, can you look at the instructions and see if you think the solid doors that are on the machine need to be removed and do not go back on with the soft doors?
rustyneversleeps
Well-Known Member
Supporting Member
yes mine are in the garage as well. i have looked at the instructions and they do seem a bit involved. if you have a chance, can you look at the instructions and see if you think the solid doors that are on the machine need to be removed and do not go back on with the soft doors?
I'm pretty sure the original lower doors need to be removed....step #3:
Y
ok that's what i thought. just seems weird. i know the 500 doors are not removed and work with the soft doors. the 520 doors are supposed to fit better. i will tackle this as the weather turns - along with the rear panel which seems pretty straight forward.
1st. Welcome yankeezone from Upstate N.Y
Red was the 1st color all other colors followed Honda & hopes they sell.
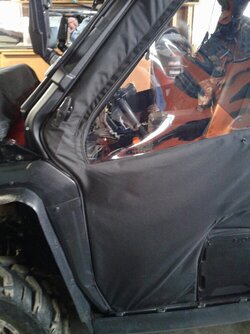
Have P520 Doors on P500.
Much better fit & user friendly. ( than the P500 doors that I took off & SOLD )
Lower P500 plastic door -- is taken off & NOT REUSED. ( Keep the latch from the plastic door to reuse with the P520 door )
If your looking to hold Heat there will be some gaps to seal up.
I used 1sided sticky Foam & foam garage door bottom seal.
The hardest task is removing OEM Hinge Screws Use Caution they Come Out Hard.
I pulled the hinge pin & door 1st. to gain better access to the hinge Screws.
The install is easy enough just takes TIME & Patients ( must be able to read the PICTURES ).
Note the Talon side mirrors ( found on ebay ) moved forward for viewing through windshield ( poor vision through waves in plastic side windows.)
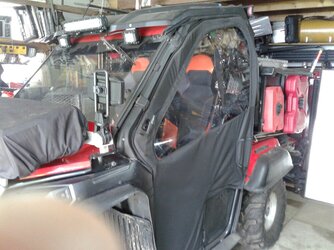

Last edited:
Y
Y
Hey Pappyo, after looking at your photo i am wondering how the OPS covers install. Do they go under the windshield mounts? Also, it looks like they mount on TOP of the OPS A pillar bar? Any tips on this installation is appreciated.
Y
Over rollcage & NOT under windshield Mounts ( windshield Mounts are not disturbed ) the bubble in the plastic fits Over OEM Honda Windshield Clamps.
Once you get them in your hand & try to place them on it Will come together what has to be done.
Pay attention to the instructions & pictures when placing all straps & clamps on properly saves changing them later.
I heat my cab --- filled the air gaps with 1 Sided Sticky Foam Tape before installing.
Approach this as a simple installation & it will be. ( 1 step at a time process.)
Once you get started you Will understand what you need to do next.
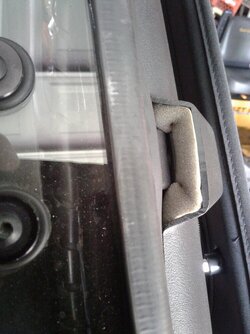
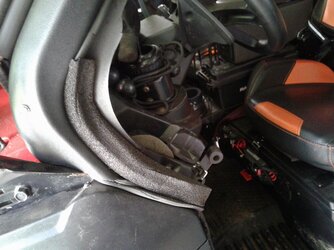
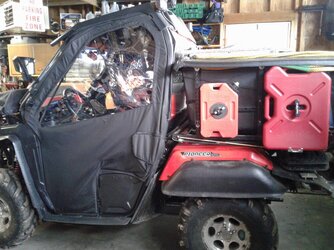


advertisement
Y
Wow great pics. And by the way.............you have alot of stuff going on - on that 500! Looks great though.
rustyneversleeps
Well-Known Member
Supporting Member
What size torx/Allen did you use to remove those screws?? I can't find anything that will remotely fit snug in the head. I've been sitting here staring at them debating on just taking it into the dealer and paying them to install the doors...I have the Honda manual, install instructions, and the owners manual in front of me and I cannot for the life of me figure out what size these bolt heads are.The hardest task is removing OEM Hinge Screws Use Caution they Come Out Hard.
I pulled the hinge pin & door 1st. to gain better access to the hinge Screws.
rustyneversleeps
Well-Known Member
Supporting Member
PJ1
FIREBALL P-500
Lifetime Member
Supporting Member
Looks like a sucky job. I would try drilling them out a bit first then the extractor. Good luck.I would advise taking it to the dealer lol...hopefully they can get this focking thing off...couldn't get it even with screw extractor. These factory tightened screws with weird bits are driving me bonkersView attachment 293520
View attachment 293522
rustyneversleeps
Well-Known Member
Supporting Member
It was brutal...spent a long time slowly trying to work the extractor in using multiple smaller drill bits. So weird...some of the screws previously have come out fairly easy, while others seemed like they were tightened by satan himself. Frustration nation over here - waiting on a call back from the service guys at the dealer now to see about labor cost to have them installed. I'm also going to ask if they have some sort of special bit I can also get for the screw heads.Looks like a sucky job. I would try drilling them out a bit first then the extractor. Good luck.
NEVER SLEEP???
You must have been - NAPPING - when I sent you the PM you requested.
I see you DID Find Out They Come Out Hard.
To Remove the Door - Remove the CLIP AT THE Bottom of the hinge pin - pull the pin up & out.
A size 5 Aallen Metric Socker ( 3/8 drive drive ) is what I used .
Lots ofPRESSURE pushing in & SLOW Firm PRESSURE to turn Ratchet. ( forget any power tool for this screw removal )
As for the stripped Head - Drill a small hole in the center - then Drill the Head OFF - the remaining threads will be much easier to deal with - after Bolt Head PRESSURE is released.
rustyneversleeps
Well-Known Member
Supporting Member
Haha I saw your PM...but it was already too late. I spent almost 2 hrs trying to get the 1 door hinge screw out -I'm doubtful that even if I would have gotten the hinge pin out, that it would have helped....and wasted a full day of hunting dicking around with it. (#nohomo)NEVER SLEEP???
You must have been - NAPPING - when I sent you the PM you requested.
I see you DID Find Out They Come Out Hard.
To Remove the Door - Remove the CLIP AT THE Bottom of the hinge pin - pull the pin up & out.
A size 5 Aallen Metric Socker ( 3/8 drive drive ) is what I used .
Lots ofPRESSURE pushing in & SLOW Firm PRESSURE to turn Ratchet. ( forget any power tool for this screw removal )
As for the stripped Head - Drill a small hole in the center - then Drill the Head OFF - the remaining threads will be much easier to deal with - after Bolt Head PRESSURE is released.
Called the dealer this morning...$170 for them to install the doors. Dropping it off, picking it up, and done thinking about this debacle (they can deal with the stripped screw)
Similar threads
- Replies
- 4
- Views
- 463
E
- Replies
- 1
- Views
- 667
H
- Replies
- 1
- Views
- 645

