Resource icon

Honda Pioneer 500 Oil Change Guide

HUCK

HUCK

Well-Known Member
Lifetime Member
Jun 21, 2016
1,047
2,314
113
ARIZONA
Ownership

  1. 500

  2. Talon X
NO DIRTY OIL WITH MILES SO LOW
 
Buford

Buford

Well-Known Member
May 9, 2016
362
586
93
U.S.A.
I read on here buying some extra fender clips is a good idea. What size are they ? I punch in fender clips and a few size show up.
Also how many buy a fender clip tool and how many just improvise ?

They are 8mm or 5/16".
 
F

Fox500

New Member
Mar 12, 2017
12
24
3
WV
Ownership

  1. 500
View attachment 2829

Tools needed:
  • Flat Head Screw Driver or Fender Clip Removal Tool to remove the clips
  • Phillips Screw Driver for the Screws
  • 17mm Ratchet for Oil Drain Plug
  • 8mm Ratchet for Oil Filter Cover
  • Torque wrench
  • Small end funnel

Supplies needed:
  • Filter Part Number - 15412-HM5-A10 - Buy Here
  • Oil Reqired - 4 Liters (3.2 required) - Pro Honda GN4 4-Stroke Motor Oil Buy Here
  • A Few Rags
  • Oil Catch Pan

Optional Parts
  • Large Cover O-RING (54X2.4), Part#91302-KF0-003
  • Small Cover O-RING (11X1.9), Part#91303-HA0-004
  • SPRING, Part#15414-KF0-000
  • BOLT, FLANGE (6X18), Part#96001-06018-00
  • DRAIN PLUG BOLT (12MM), Part# 92800-12000
  • DRAIN PLUG WASHER (12MM), Part# 94109-12000
  • Fender Clips, Part# 90653-HC4-900

Prepare the work area and the SxS:
Locate a safe and level spot to park the SxS.
Operate the SxS long enough to engage the 4x4.
Drive to selected spot.
Engage the park brake. Because it is in 4x4 the front wheels will break.


Seat Removal:
Bottom Seat: Pull the rear bottom of the seat upward then slide slightly backward and set to the side.
Back Cushion: Pull the bottom of the cushion outward the push up and set to the side
View attachment 2811


Seats removed. There are hooks on the outside part of the seats and grommets on the inside.
View attachment 2813

Cab without Seats.
View attachment 2814

Remove Under Seat Panels:
Remove the Rear Center Panel
View attachment 2818


Remove the Right Seat Bottom Cover from the passenger side of the cab..
View attachment 2815

The clips and screws must be removed. There should be 13 clips and 3 screws that need to be removed.
View attachment 2812

Not a bad idea to buy a fender clip removal tool to remove those stubborn clips. This tool can be bought at most auto part stores. You may also want to purchase some additional clips. They can be purchased at your local dealer or online here: Honda Fender Clips

Once the clips and screws are removed you can flip up the tray under the passenger seat to access the filter cover and filter. Be very careful with the ECU, it should flip up with the tray.
View attachment 2816

Draining the OIL:
Jack the rear of the SXS500M2 to gain easy access to the oil drain plug.
Open the oil fill dip stick to help with the drain.
Place your oil drain pan under the plug and remove the plug with a 17mm ratchet. Allow oil to drain. Replace the washer drain plug and sealing washer. Torque the plug to 25N.m (2.5 kgf, 18 lbf.ft)
View attachment 2819

Replacing the Filter:
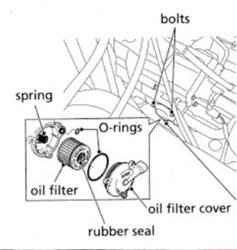
Under the passenger seat place an old rag under the cover, oil will leak. Remove the three bolts on the oil filter cover.
View attachment 2820

Remove the filter and dispose of properly. Replace with new filter in the correct order. Wet the O-rings with a light coating of oil.
View attachment 2817

Re-install filter cover and torque the Oil Filter Cover Bolts to acceptable specs.
WARNING: Book states a torque of 9 lbf.ft (12N.m , 1.2 kgf.m), yet users have reported this may be incorrect and too much for the bolt causing it to break. Recommended using personal judgement and checking back often.

Replacing the OIL:
Replacing the Oil with the recommended oil
View attachment 2831

After Draining/Filter Change = 3.2 Liters

Remove the jack so the SXS500M2 is level.
Place a funnel in the oil fill/dipstick hole under the drivers seat and refill with 3.2 Liters of the recommended oil as shown above.
View attachment 2830

Checking the Oil
Park SxS on level surface, Start and run the engine at idle for 3-5 minuets. Stop the engine and allow to sit for 2-3 minuets.
Check the oil level is filled properly using the dip stick.
View attachment 2832
Remove the dip stick and wipe clean. Insert the dip stick into the hole without screwing it in. Remove after 1/2 second.
Check level by looking for oil between the UPPER and LOWER mark as shown below.
View attachment 2827

If low, re-do the check. If still low, add oil until reading is between the UPPER and LOWER marks. DO NOT OVER FILL!
Install dip stick.
Be sure to check back to insure there is no leaks.

The last step Maintenance Minder Indicator
The Maintenance Minder Indicator will appear in the main display when you have reached a maintenance period suggested by the Honda maintenance schedule.
The wrench will appear in the display at the following periods:

  • Initial Maintenance – 100 miles
  • Regular Maintenance Interval 1 – 600 miles
  • Regular Maintenance Interval 2 – 600 miles after interval 1 is displayed
View the full Maintenance Schedule HERE

View attachment 2828

Resetting it
To shut the Maintenance Minder Indicator Off
Place the ignition switch in the off position. Hold the mode button on the display down and move the ignition switch to the on position. Remain holding the mode button until the wrench starts to flash (2 seconds) and the Maintenance Minder will disappear.

Now you are all set and ready to hit the trail.
Good luck and be safe.

*If you see a error please let me know.

Props to Pauly for helping put this together.
THANK YOU @pauly
Thanks.
Thanks for putting this together. I used this post for the pictures and owners manual for torque specs. May I suggest putting the warning about 9 # torque on oil filter cover at the beginning ? All was going well till the torque wrench wouldn't click. Bolts didn't break off ,but looked like twisted taffy when I backed them out. Was able to match some bolts up at Ace to finish up. Me and the boys hit a few trails and thankfully no leaks. Planning on changing differentials next weekend. Thanks again for great forum. The information available on this forum was the reason we went with the P500.
 
Hondasxs

Hondasxs

Club Founder
Staff member
Feb 13, 2013
18,037
63,558
113
Charlotte, NC
HondaSxS.com
Ownership

  1. 1000-5

  2. Talon R
Thanks @Fox500,
I will look at making it a louder message. This problem has claimed a many 500's.
I recommend not using a torque wrench at all. But, understand many people don't have the touch and feel for a overtightened bolt. It seems you did and stopped just in time. Thanks for the feedback.
 
Hondasxs

Hondasxs

Club Founder
Staff member
Feb 13, 2013
18,037
63,558
113
Charlotte, NC
HondaSxS.com
Ownership

  1. 1000-5

  2. Talon R
Added louder warning and torque specs near top of page.
Torque Specs **** WARNING **** WARNING **** WARNING ****
  • Drain plug at 25N.m (2.5 kgf, 18 lbf.ft)
  • Oil cover bolts at (WARNING) - 9 lbf.ft (12N.m , 1.2 kgf.m),
  • WARNING - Do not torque oil cover bolts!!!. Many reports of incorrect specs in the manual and breaking of bolts!!! Use judgement, if needed phone a friend.
 
  • Like
Reactions: Chooglin
R-Lamm

R-Lamm

Active Member
Lifetime Member
Sep 27, 2017
315
242
43
South Carolina
Ownership

  1. 500
Added louder warning and torque specs near top of page.
Just wanted to say thanks for everyone who contributes in this forum! Nothing better than having a one stop shop to go to for all our Pioneer needs. I have always been leery on what to believe when looking up "how to" stuff on the internet...but I never once question the suggestions on here....ok...well maybe if @JTW says something...then I may think twice about it...but other than that...all is good! ;) Seriously...thanks everyone for all you do on here!!!
 
advertisement
Rustneversleeps

Rustneversleeps

Well-Known Member
Oct 30, 2018
302
582
93
Talon,New Brunswick,Canada
Ownership

  1. 500
t

First oil change, almost lost the little o ring, lucky it was laying on the skid plate. Be careful!

Can you tel me what o-Ring your referring to...

I also did my Oil change and should have read about the misprinted torque specs.The bottom bolt torq ok, but the 2 tops bolts kept turning till i figure to should stop..It on snugly and no leaks so far finger cross..will definitely keep and eye out on that..
 
Eltobgi

Eltobgi

Well-Known Member
Lifetime Member
Supporting Member
Club Contributor
Mar 21, 2016
4,599
15,186
113
North Dakota
Ownership

  1. 500

  2. 1000-5
Can you tel me what o-Ring your referring to...

I also did my Oil change and should have read about the misprinted torque specs.The bottom bolt torq ok, but the 2 tops bolts kept turning till i figure to should stop..It on snugly and no leaks so far finger cross..will definitely keep and eye out on that..

C3ED9893 5E51 45F9 A3F6 E91034845BCC
 
  • Like
Reactions: Rustneversleeps
Rustneversleeps

Rustneversleeps

Well-Known Member
Oct 30, 2018
302
582
93
Talon,New Brunswick,Canada
Ownership

  1. 500

Yes i see it now..I hope it stayed on the bike..would that have stayed on the engine side or fallen off losely...OCD tells me that i might have to take it all apart to check to see if it there...Man-O-Man....
Did take it out for a ride for to test.Did about 25 Kms and the oil is right at the top line full mark,run 3-5 mins check after 2-3 mins and no leaks by the filter cover...You think i should be ok..
I also despise the fact that we have to run it,let stand,to check the oil..
 
Eltobgi

Eltobgi

Well-Known Member
Lifetime Member
Supporting Member
Club Contributor
Mar 21, 2016
4,599
15,186
113
North Dakota
Ownership

  1. 500

  2. 1000-5
Just performed the oil change myself recently and didn’t mess with the small o ring but pulled and cleaned the large as well as the cover. Never used torque wrench on the three bolts just snugged them up! Good luck with yours!
 
Last edited by a moderator:
G

GreatNorth

Member
May 24, 2021
53
83
18
Canada
Ownership

  1. 520
Thanks for the write-up! I just did the initial oil change on a Pioneer 520. A couple of the passenger side cover screws were very tight, but snapped out okay with the right size Philips bit on a 1/4" socket with good down pressure. I put a touch of anti-seize on them during reassembly and torqued to about 5.9 ft-lb per manual which doesn't feel overly tight like the ones I removed.

Before final torque, I put the filter cover bolts in finger tight while pressing the filter cover in somewhat evenly by hand, and then tightened bolts to just snug without the torque wrench to make sure everything was aligned right.

I used a Precision dial torque wrench on the filter cover bolts, and torqued them all to 8-9 ft-lb. It's a bit of a pain to see the dial, but with the little needle that remembers the highest value I could confirm I had each bolt in that range.
Torque Wrench

I was paying close attention after the warning. By feel I would've gone almost as tight, but wouldn't have wanted to go tighter. I don't think I'd trust most click type torque wrenches with this job. A lot of them need recalibration if you want them accurate and this job doesn't seem to leave much room for error.

I've got a decent feel for tightening things without going too far after learning the hard way breaking bolts, but I'm not wrenching routinely, so I like to recalibrate my arms with a torque wrench when it's handy. Trying to explain the feel to my son, the best I came up with was, "When it all of a sudden gets harder to turn (after the initial snug), it's time to stop." Checking the one's he's done that way by feel, they seem to be pretty close to what I would do. Hope that saves someone breaking off a bolt in an engine! Oh, and if it's a bolt with oil passages drilled in it, stop sooner... found that out the hard way too years ago. :oops:
 
M

mikedsayers

New Member
Nov 18, 2021
1
4
3
West Winfield, NY
Ownership

  1. 500
silvertrd09

silvertrd09

Well-Known Member
Lifetime Member
Feb 17, 2018
227
1,261
93
Texas
Ownership

  1. 500
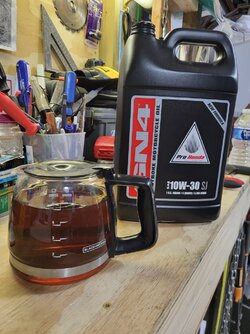
Change the oil and oil filter today in the p5. Owners manual calls for 3.2 qt. I bought a 1gal jug/4quarts/3.785 liters of the Pro Honda GN4 10W 30. And was thinking how the heck am I going to figure out 3.2qts. out of this?

1 gal is 128oz
3.2 quarts is 102oz

So just pour 26oz out of the gal and the rest goes in the p5.

Note to self, don't drink that coffee.
And somebody should probably check my math.

20230326 230522
 
trigger

trigger

Old Ironsides
Vendor
Lifetime Member
Supporting Member
Feb 13, 2016
21,169
156,744
113
Bay City, Michigan
www.quickshieldutv.com
Ownership

  1. 500
Change the oil and oil filter today in the p5. Owners manual calls for 3.2 qt. I bought a 1gal jug/4quarts/3.785 liters of the Pro Honda GN4 10W 30. And was thinking how the heck am I going to figure out 3.2qts. out of this?

1 gal is 128oz
3.2 quarts is 102oz

So just pour 26oz out of the gal and the rest goes in the p5.

Note to self, don't drink that coffee.
And somebody should probably check my m
It's actually 3.2 liters which is 3.38 quarts. Just add that last third a little at a time and don't overfill.
 
Hib

Hib

Well-Known Member
Lifetime Member
Jan 1, 2021
73
276
53
Far N.E. Iowa
Ownership

  1. 500
  • Like
Reactions: silvertrd09
advertisement

About us

  • Our community has been around for many years and pride ourselves on offering unbiased, critical discussion among people of all different backgrounds. We are working every day to make sure our community is one of the best.

User Menu

Buy us a beer!

  • Lots of time and money has gone into making sure the community is running the best software, best designs, and all the other bells and whistles. Care to buy us a beer? We'd really appreciate it!

    Beer Fund!

    Club Membership!