Basic Simplified Dual Battery Kit Instructions for Honda Talon.

Hondasxs

Hondasxs

Club Founder
Staff member
Lifetime Member
Supporting Member
Feb 13, 2013
18,511
67,234
113
Charlotte, NC
HondaSxS.com
Ownership

  1. 1000-5

  2. Talon R
With the 100's of youtube videos and online writeups I still get questions about how to wire up a dual battery kit for the Honda Talon.
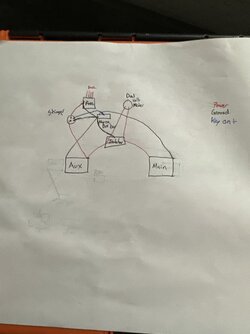
So I figured I'd draw up the basic diagram. You really can't get any simpler than this.
Please keep in mind this is the dual battery only and does not cover adding accessories which you should do after you complete this step.

We now also have a dual battery kit specifically made for the Talon along with battery trays in the club store.

To install your dual battery kit you need:

INSTRUCTIONS.
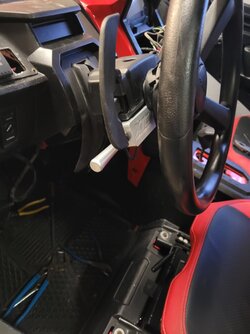
  1. Locate the large gauge Red and Black wires with blue tape under the driver's dash around the settering column.
  2. Hook the factory large gauge positive to the main side of the isolator.
  3. Use the provided red large gauge wire with the Talon Kit, connect the isolator to the second battery.
  4. Hook the factory large gauge ground to the second battery.
  5. Hook the small black wire to ANY GROUND, frame, or battery.
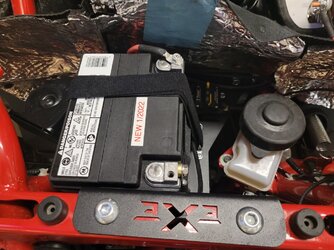
  6. In the factory battery box, locate red wire with blue tape hidden behind it, Hook it to the primary battery.
CONGRATULATIONS... YOU HAVE INSTALLED A SECOND BATTERY AND ISOLATOR!

Once completed, you can begin adding accessories such as a fuse box, stinger, and winch to the second battery.

Talon dual battery
 
Hondasxs

Hondasxs

Club Founder
Staff member
Lifetime Member
Supporting Member
Feb 13, 2013
18,511
67,234
113
Charlotte, NC
HondaSxS.com
Ownership

  1. 1000-5

  2. Talon R
Will this work on a talon

View attachment 372073
This will work.


Yet, the added bus bar adds complexity.
If your running the stinger to be "key-on" then the entire fuse box is a key-on source.
So why do you need the bus bar?

Just my thoughts on it.. lol
Lots of people run bus bars.
 
F

Ffjray

New Member
Jan 28, 2023
2
2
3
Kentucky
Ownership

  1. Talon R
This will work.


Yet, the added bus bar adds complexity.
If your running the stinger to be "key-on" then the entire fuse box is a key-on source.
So why do you need the bus bar?

Just my thoughts on it.. lol
Lots of people run bus bars.
It’s the xtc key on bus bar for talon
 
CID

CID

Well-Known Member
Lifetime Member
Supporting Member
Oct 27, 2019
5,496
25,276
113
SE Denver-ish
Ownership

  1. Talon R
It’s the xtc key on bus bar for talon
I have the XTC 35 amp, key on bus bar for a Talon, works fine for the basics. (four terminals, top, right of center)

1675048241022


After the 2nd battery and True Isolator -
1675048502453
 
Last edited:
  • Like
Reactions: Smittyp
J

JumptChaneAZ

Guest
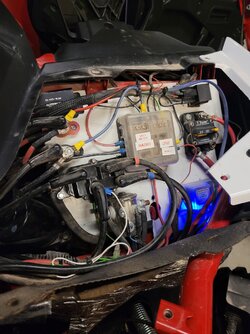
Here is a sytem I've been working on, not exactly simplified. Went with a lithium battery 18 Ahr battery for the size and weight. Tested just this part of the system (Installed, but not connected) in Mexico last weekend and no issues.

Resize20


Resize21


Resize22


With that part tested, I've moved on to the fuse blocks and block mounting plate fabbed from 1/8" 6061 aluminum plate. Going to get it in the car tomorrow and start the process of wiring it all up. One block will be keyed on of the aux battery and one will be key off coming off the aux battery. I will run a set of pods off the keyed on side and my particle spearator, key off side will be stereo and whip lighting.

Resize23


Moved the dash to steering column and went in an cleaned up lall the wire routing to get ready to mount the fuse block plate.

Resize24


I have a wiring schematic, but it isn't exactly basic.
 
advertisement
CID

CID

Well-Known Member
Lifetime Member
Supporting Member
Oct 27, 2019
5,496
25,276
113
SE Denver-ish
Ownership

  1. Talon R
Nicely done. 👍 Welcome from the once great state of Colorado. 😎

The link in my sig will take you to some basic Talon information if you haven't seen it. It looks like you're well past basic info but ya never know. It's also a sticky in the General Talon 1000 Discussion forum making it easier to find - New Talon Owners - First Things to Know and Check.
 
  • Like
Reactions: Smittyp
Smittyp

Smittyp

Well-Known Member
Lifetime Member
Supporting Member
Dec 3, 2020
619
4,260
93
Morgan co. Tennessee
Ownership

  1. Other Brand

  2. Talon R LV
Here is a sytem I've been working on, not exactly simplified. Went with a lithium battery 18 Ahr battery for the size and weight. Tested just this part of the system (Installed, but not connected) in Mexico last weekend and no issues.

View attachment 372459

View attachment 372460

View attachment 372461

With that part tested, I've moved on to the fuse blocks and block mounting plate fabbed from 1/8" 6061 aluminum plate. Going to get it in the car tomorrow and start the process of wiring it all up. One block will be keyed on of the aux battery and one will be key off coming off the aux battery. I will run a set of pods off the keyed on side and my particle spearator, key off side will be stereo and whip lighting.

View attachment 372463

Moved the dash to steering column and went in an cleaned up lall the wire routing to get ready to mount the fuse block plate.

View attachment 372466

I have a wiring schematic, but it isn't exactly basic.
Welcome from Tennessee
Nice work you have more patience than me
 
scottkooch

scottkooch

Active Member
Lifetime Member
Supporting Member
Apr 26, 2021
66
240
33
SO MN
Ownership

  1. Talon X4 LV
Here is a sytem I've been working on, not exactly simplified. Went with a lithium battery 18 Ahr battery for the size and weight. Tested just this part of the system (Installed, but not connected) in Mexico last weekend and no issues.

View attachment 372459

View attachment 372460

View attachment 372461

With that part tested, I've moved on to the fuse blocks and block mounting plate fabbed from 1/8" 6061 aluminum plate. Going to get it in the car tomorrow and start the process of wiring it all up. One block will be keyed on of the aux battery and one will be key off coming off the aux battery. I will run a set of pods off the keyed on side and my particle spearator, key off side will be stereo and whip lighting.

View attachment 372463

Moved the dash to steering column and went in an cleaned up lall the wire routing to get ready to mount the fuse block plate.

View attachment 372466

I have a wiring schematic, but it isn't exactly basic.
Very nicely done. I did my dual battery basically the same way, except I didn't use a second fuse block for the un-switched power. The steering column is a great place to put the fuse blocks, except you have to take off the cowl every time you want to add any powered accessories. Right now mines off adding a set of cube lights, a rear light, and changing my XTC turn signal switch from the momentary switch on dash to the turn lever on the column.

Battery Turn Plate
 
  • Like
Reactions: Remington
J

JumptChaneAZ

Guest
Thanks for the replies. There probably are an infinite number of ways to do it and as long as it works, none of them are wrong. My Talon came with the Honda accessory harness, but it can get to be quite the mess behind the rocker panel in the dash, which it was. I have decided to keep the horn and the particle separator on that circuit. Ordered some blanks from Digi-Key to fill in the spots that used to be occupied by the whip light and pod light rocker switches, which are being relocated.

Was able to get the dual volt meter installed with the new harnesses for the relay and meter and got that back in place.

Resize25


I do know the xtc horn harness needs to be about a foot, or so, longer to reach that panel, or else it is way too tight and can't be routed like it should be, if the connector is left attached to the frame tab. It's a pain to lengthen it, as 4 wires need to be cut and extended, which is what I did yesterday. That is a lot of extra fiddling around with connectors and soldering. I did add in 2 connectors so that the switch leg of the harness can be disconnected from the horn leg.

My soldering gun has decided it didn't want to remain in the workforce any longer....so the project is at a standstill until my new Weller D650 shows up. You used to be able to buy these industrial grade guns off the shelf at big box stores, but now you have to order them.
 
J

JumptChaneAZ

Guest
Had a buddy in town over the weekend, so it was all partyin' and no working. He hit the road yesterday afternoon and I decided to get back at it.

Got the extended horn harness wrapped up and functioning. Mounted up the fuse block mounting plate and got the two fuse blocks and the whip controller mounted up.

Resize27


The plate and the spacers worked out pretty decent and I started putting all the wiring together.

Resize28


Today I continued choogling away at the wiring and got all of the ground wires completed and hooked up. Finished the relay wiring for the dual battery volt meter.

Resize29


Going to be using the OEM winch wire to get to the True Isolator, fabbed up a little mount and got the 50A auto reset circuit breaker installed and the main battery side wire connected.

Resize30


finsihed off the afternoon by getting the new switch plate installed

Resize31


Tomorrow I'll be waiting around for some crimp connectors to arrive, ran out of #10 screw x 8 AWG ring connectors and had to order some. Once they arrive, I can wrap up the power wiring for the fuse blocks and maybe get cracking on getting the accessory harenesses built and hooked up.
 
J

JumptChaneAZ

Guest
Got it all wrapped up, but I have to be honest. Worked out the first time I tested it out, but I completely spaced out one thing that I had to go back and reconfigure......

I used the SXS Club store quick switch connectors, which are awesome. Without thinking too much about it, I just wired them up and called it good. I got slapped in the face when it came to the key off, always powered, switches. The lower text stayed lit, with no way to turn it off.....whoops, kinda glossed right over that.

Ended up disconnecting the jumper wire from the #2 to #6 switch pins. This required releasing the terminals from the connectors and running a new wire to only the #2 pin. I then fabricated a separate harness from the keyed on fuseblock to power the lower text lighting when the engine is running. The image on the switches illuminates when the switch is toggled on, so I didn't have to do anything with that.

Resize41


Other than that, everything else functions as planned.

20230208 150233


Excuse the dust and debris from cutting the new XTC switch plate in 😅

Resize35


Resize37


Resize38


I installed the DEI firewall heat shield to protect everything

Resize39


I also ordered some 1/16" silicone sheet, 55 durometer, to fabricate a shield to protect the negative bus bar and the battery box from stuff potentially being thrown up by the front tire.

Resize12


I'll post up the end result of that, once the sheet arrives and I get it placed.
 
Last edited:
J

JumptChaneAZ

Guest
After a very substandard first attempt at installing a shield/mudguard to protect the new battery box, I finally took the time and did it right. The first attempt was done in a hurry and it looked like it. Material was too small, the mounting method was terrible, and it generally looked like crap. So I ponied up and spent the cash to get a 24"x24"x1/8" sheet of EPDM rubber and some cage clamps from Axia Alloys.

This was the problem, negative bus bar and the battery box were open to the wheelwell and susceptible to getting hit with stuff coming up off the tire.

Resize12


So, I started mounting, marking, removing, and trimming the sheet, until I ended up with this:

Resize46


20230226 123151


Utilized some existing clip locations and added a few more to get it solidly mounted.

Resize50


For the top, I used a couple Axia Allloy 1.25" cage clamps, added some aluminum hardware from ProBolt

Resize49


Attached it like this:

Resize45


Ended up like this:

20230226 140104


It is definitely a better fit than this was:

Resize48


It now looks like a factory piece and there are no zip ties involved, which is a pet peeve of mine. Gonna give it a proper test this week in Mexico, but I'm confident it will stand up to the task. The first attempt was embarrassing, to say the least.
 
Last edited:
CID

CID

Well-Known Member
Lifetime Member
Supporting Member
Oct 27, 2019
5,496
25,276
113
SE Denver-ish
Ownership

  1. Talon R
@JumptChaneAZ - “The first attempt was embarrassing, to say the least.”

Prototyping rarely shows our best work, it shows proof of concept. Don’t be so hard on yerself. :cool:
 
J

JumptChaneAZ

Guest
@JumptChaneAZ - “The first attempt was embarrassing, to say the least.”

Prototyping rarely shows our best work, it shows proof of concept. Don’t be so hard on yerself. :cool:
Well, it's time for confession....If you haven't seen the price of 1/8" thick silicone or rubber sheets lately, I attempted to do it on the cheap. 6"x6', 12"x12", and 12"x18" sheets are not expensive, however, anything of quality above those sizes gets spendy in a hurry. So, I cheaped out thinking I could make it happen with a 12"x18" sheet.

When I got into it, I quickly realized that 12"x18" wasn't going to get it, due to the layout of the attachment points. So, I basically cobbed it together and only succeeded in wasting a nice sheet of material and demonstrating how to make a proper mess of things. With all the zip ties, it ended up looking like Dr. Frankenstein had stitched it together. That pissed me off, so I put my head down, put together a better design idea and ordered the right materials.
 
CID

CID

Well-Known Member
Lifetime Member
Supporting Member
Oct 27, 2019
5,496
25,276
113
SE Denver-ish
Ownership

  1. Talon R
Prototyping is a series of guesses and by-golly’s but it’s how we got men on the Moon, robots on Mars and Voyager leaving the Solar System. 😍 Unfortunately, there’s a lot of material waste lost during the process. $$$ 😢 Keep up the imaginative work. 👍 👍
 
advertisement

About us

  • Our community has been around for many years and pride ourselves on offering unbiased, critical discussion among people of all different backgrounds. We are working every day to make sure our community is one of the best.

User Menu

Buy us a beer!

  • Lots of time and money has gone into making sure the community is running the best software, best designs, and all the other bells and whistles. Care to buy us a beer? We'd really appreciate it!

    Beer Fund!

    Club Membership!