P1000 Darby's "Top Gun Edition"

D

Darby

Active Member
Lifetime Member
May 4, 2016
88
194
33
Salem, Oregon
Ownership

  1. 1000-3
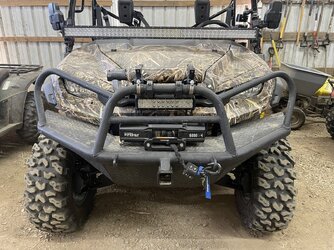
So I picked up my new 2024 Pioneer(3) 1000 March 2nd.... and it's been a bit over 2 months of on and off working on getting this rig set up just the way I want it. This is a picture of the "Before", after just picking it up.
IMG 6623


I had LOTS to do, to get it where I wanted. I honestly wanted a camo edition... but of course, you have to buy the Forest Edition to get that... which was not available to me locally at the time, and I already had a 5000 lb winch I was moving over... so went with what I had available. Same color and options of my original 2016 Pioneer.

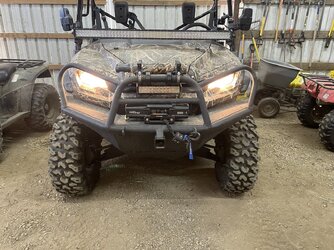
Here is what it now looks like, after all the Mods (which I will explain later)..:

IMG 6991
IMG 6992


I had plenty of ideas and good, and bad, experiences to work from with my existing 2016 Pioneer(3) 1000 - that has been a great rig. I really liked that they hadn't changed the design of the Pioneer very much at all.... so I could move most of the really good stuff from my old rig, to my new rig. Items such as my :
  • Tough Country bumper with front stinger
  • Elka Stage 5 shocks
  • Trail Armor 1/2" full skid plates
  • Viper Elite 5000# winch w/wireless remote (since replaced with new Viper V2 Wide 6000# winch w/wireless remote)
  • Rear Bumper
  • Throttle Maxx Pedal
  • Garmin Montana GPS
  • 50" Front LED
  • Rear LED Lights
  • Tusk Jack
  • STI Beadlock Rims
  • 2nd Battery w/True Isolater
  • Hand Grabs
  • Fire Extinguisher
  • Additional Bed Tiedowns
  • Rear A-Arm Guards (Front A-Arms have changed, and couldn't move front guards)
  • Upright Gun Rack
  • Orchard pruner attachment
  • Hunting Box and Attachments (only mounted during hunting season)
What I bought "New"... as either upgrades from old Pioneer, or "additions"... :

  • All electrical powered with "key on" - with "bypass button" to power Stereo and USB when want without key
  • NOAM 4 channel Bluetooth Amp/Speakers
  • Dual Voltmeter with bypass button to test with no key
  • Honda Fuse Box & Mount
  • Wired for Battery Tender - Main & Aux
  • Side LED lights
  • Positive BUS Bar
  • Negative BUS Bar
  • MossyOak Camo wrap (Shadow Grass Habitat) - did myself
  • MossyOak Camo Lettering for Tailgate
  • "Pioneer 1000" vinyl lettering for sides
  • "Top Gun Edition" vinyl lettering for sides
  • Viper V2 Wide 6000lb Winch w/wireless remote
  • Extended cables for tailgate (so lays flat)
  • Upgraded door bushings
  • Under Hood light & switch
  • Horn w/lighted switch
  • white painted raised letters on dash
  • Light on dash when key on - to see switches at night prior to turning on lights
  • Interior lights & Switch
  • dash lights as well as glovebox light when headlights are engaged
  • Front A-Arm Guards (Ricochet)
  • Glove Box custom "Pioneer" "Top Gun Edition" 3d sign
  • Roctane T4 28x10x14 tires
    IMG 6623
    IMG 6991
    IMG 6992
    IMG 6966
    IMG 6967
    IMG 6968
    IMG 6970
    IMG 6971
    IMG 6973
    IMG 6974
    IMG 6975
    IMG 6977
    IMG 6979
    IMG 6982
    IMG 6984

Here are a few more pictures....
 
DRZRon1

DRZRon1

Well-Known Member
May 11, 2019
1,014
3,370
113
PA
Ownership

  1. Talon X
So I picked up my new 2024 Pioneer(3) 1000 March 2nd.... and it's been a bit over 2 months of on and off working on getting this rig set up just the way I want it. This is a picture of the "Before", after just picking it up. View attachment 428829


I had LOTS to do, to get it where I wanted. I honestly wanted a camo edition... but of course, you have to buy the Forest Edition to get that... which was not available to me locally at the time, and I already had a 5000 lb winch I was moving over... so went with what I had available. Same color and options of my original 2016 Pioneer.

Here is what it now looks like, after all the Mods (which I will explain later)..:

View attachment 428831View attachment 428832


I had plenty of ideas and good, and bad, experiences to work from with my existing 2016 Pioneer(3) 1000 - that has been a great rig. I really liked that they hadn't changed the design of the Pioneer very much at all.... so I could move most of the really good stuff from my old rig, to my new rig. Items such as my :
  • Tough Country bumper with front stinger
  • Elka Stage 5 shocks
  • Trail Armor 1/2" full skid plates
  • Viper Elite 5000# winch w/wireless remote (since replaced with new Viper V2 Wide 6000# winch w/wireless remote)
  • Rear Bumper
  • Throttle Maxx Pedal
  • Garmin Montana GPS
  • 50" Front LED
  • Rear LED Lights
  • Tusk Jack
  • STI Beadlock Rims
  • 2nd Battery w/True Isolater
  • Hand Grabs
  • Fire Extinguisher
  • Additional Bed Tiedowns
  • Rear A-Arm Guards (Front A-Arms have changed, and couldn't move front guards)
  • Upright Gun Rack
  • Orchard pruner attachment
  • Hunting Box and Attachments (only mounted during hunting season)
What I bought "New"... as either upgrades from old Pioneer, or "additions"... :


Here are a few more pictures....
wow - awesome !!!!

now gonna need a turbo added to offset the HP loss by not being red

Enjoy
 
JACKAL

JACKAL

Ancient Honda fanboi
Moderator
Lifetime Member
Supporting Member
Club Contributor
Jun 11, 2015
39,463
268,288
113
Pioneer, TN
Ownership

  1. Other Brand

  2. 1000-5
So I picked up my new 2024 Pioneer(3) 1000 March 2nd.... and it's been a bit over 2 months of on and off working on getting this rig set up just the way I want it. This is a picture of the "Before", after just picking it up. View attachment 428829


I had LOTS to do, to get it where I wanted. I honestly wanted a camo edition... but of course, you have to buy the Forest Edition to get that... which was not available to me locally at the time, and I already had a 5000 lb winch I was moving over... so went with what I had available. Same color and options of my original 2016 Pioneer.

Here is what it now looks like, after all the Mods (which I will explain later)..:

View attachment 428831View attachment 428832


I had plenty of ideas and good, and bad, experiences to work from with my existing 2016 Pioneer(3) 1000 - that has been a great rig. I really liked that they hadn't changed the design of the Pioneer very much at all.... so I could move most of the really good stuff from my old rig, to my new rig. Items such as my :
  • Tough Country bumper with front stinger
  • Elka Stage 5 shocks
  • Trail Armor 1/2" full skid plates
  • Viper Elite 5000# winch w/wireless remote (since replaced with new Viper V2 Wide 6000# winch w/wireless remote)
  • Rear Bumper
  • Throttle Maxx Pedal
  • Garmin Montana GPS
  • 50" Front LED
  • Rear LED Lights
  • Tusk Jack
  • STI Beadlock Rims
  • 2nd Battery w/True Isolater
  • Hand Grabs
  • Fire Extinguisher
  • Additional Bed Tiedowns
  • Rear A-Arm Guards (Front A-Arms have changed, and couldn't move front guards)
  • Upright Gun Rack
  • Orchard pruner attachment
  • Hunting Box and Attachments (only mounted during hunting season)
What I bought "New"... as either upgrades from old Pioneer, or "additions"... :


Here are a few more pictures....
Nice looking rig! I believe those are Stage 5 Elka shocks? How do you like them, and about how long was the lead time to get them & from which vendor or direct?
 
  • Like
Reactions: Remington and TxDoc
advertisement
D

Darby

Active Member
Lifetime Member
May 4, 2016
88
194
33
Salem, Oregon
Ownership

  1. 1000-3
Nice looking rig! I believe those are Stage 5 Elka shocks? How do you like them, and about how long was the lead time to get them & from which vendor or direct?
They are... i absolutely love them. I bought them a couple years ago, and ran them on my 2016 Pioneer... and moved them over to this rig without any modifications... They are overkill for someone like me, who doesn't play with the myriad of adjustments available - but at the time there was a sale going on, and the 5's were like the same price as the 3's. I bought them through iShock.com .... (Darren McGarvie) they asked a bunch of questions about weight / type of riding / etc... to tune the shocks prior to shipping for me. I'm not a shock expert... but the ride was incredibly improved. I had the shocks in 2 weeks from ordering.
 
JACKAL

JACKAL

Ancient Honda fanboi
Moderator
Lifetime Member
Supporting Member
Club Contributor
Jun 11, 2015
39,463
268,288
113
Pioneer, TN
Ownership

  1. Other Brand

  2. 1000-5
They are... i absolutely love them. I bought them a couple years ago, and ran them on my 2016 Pioneer... and moved them over to this rig without any modifications... They are overkill for someone like me, who doesn't play with the myriad of adjustments available - but at the time there was a sale going on, and the 5's were like the same price as the 3's. I bought them through iShock.com .... (Darren McGarvie) they asked a bunch of questions about weight / type of riding / etc... to tune the shocks prior to shipping for me. I'm not a shock expert... but the ride was incredibly improved. I had the shocks in 2 weeks from ordering.
Thanks for the impressions and answers. Definitely looking at going with Stage 3 versions.
 
D

Darby

Active Member
Lifetime Member
May 4, 2016
88
194
33
Salem, Oregon
Ownership

  1. 1000-3
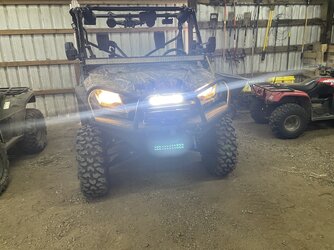
Just added another "mod"... the Honda SxS club store's Plug & Play "High Beam Trigger wire" along with Nilight's 12" Spot/Flood - that greatly increases the light on high Beam. Simple to install - the mounting the light was the bigger challenge... with the brackets I utilized - mounted above the winch, and below the fire extinguisher... was a tight fit, but looks, and works, great.
 
P

packer58

Well-Known Member
Jun 17, 2021
310
932
93
N. Cali
Ownership

  1. 1000-3
@Darby ,
Very nice, i'd like to hear some details on your wrap. Especially how you got the wrap to stay in the fastener pockets .....
 
  • Like
Reactions: TxDoc
D

Darby

Active Member
Lifetime Member
May 4, 2016
88
194
33
Salem, Oregon
Ownership

  1. 1000-3
Just added another "mod"... the Honda SxS club store's Plug & Play "High Beam Trigger wire" along with Nilight's 12" Spot/Flood - that greatly increases the light on high Beam. Simple to install - the mounting the light was the bigger challenge... with the brackets I utilized - mounted above the winch, and below the fire extinguisher... was a tight fit, but looks, and works, great.
here some pictures... mounting / low beam / high beam

IMG 7129 IMG 7130 IMG 7131
 
  • Like
Reactions: TxDoc
D

Darby

Active Member
Lifetime Member
May 4, 2016
88
194
33
Salem, Oregon
Ownership

  1. 1000-3
@Darby ,
Very nice, i'd like to hear some details on your wrap. Especially how you got the wrap to stay in the fastener pockets .....
I knew absolutely nothing a out vinyl wrapping when i got the SxS... but saw it was possible from many on this site. So I watched a bunch of You Tube video's on vinyl wrapping... and figured I could pull it off.
Basically... here were my steps switching from Honda Red to Mossy Oak Shadow Grass Camo:
1) wash thoroughly
2) used a 70% IPA solution for final step of cleaning
3) removed all side panels and hood for applying vinyl (front end would be a nightmare to remove, so I did not... and while that scared me - as the deluxe model has red now down around headlights and front bumper (earlier models had black there - so no need to camo wrap as much)... turns out, not that big a deal, as actually easier to wrap from the standpoint of you panel not moving - it stays stationary)
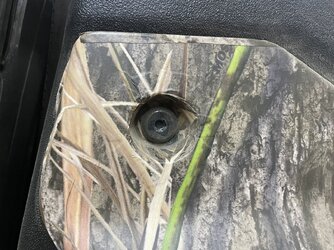
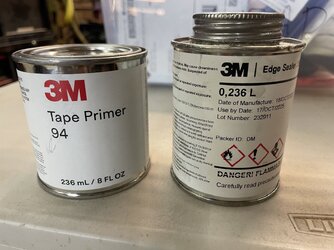
4) BEFORE doing the large flat panel wrapping... on any of the fastener pockets - i cut small pieces to pre-line the pockets. then I would use 3M Tape Primer (#94 - in picture below) to "prime" the area. On the deep pockets - that entailed a circle for the bottom of the pocket, and a longer rectangular piece i used to wrap the wall of the deep pocket. The shallow pockets i just cut a oversized circle. After the primer would dry for a few minutes, I would then line them with the small pieces. Then when Larger, flat area was covered... just ran straight over the fastener area, cut an "X", and overlapped the small pieces already in place.
5) on large areas, with creases... i would use the Tape Primer #94 in areas that looked likely to try to pull away... typically the valley areas of the panels.
6) On the hood and front light areas... the beauty of a "camo Pattern", is You don't have to worry about "seams" showing... it all blends very well... so can easily use a number of small pieces, and not try to do it all at once.
7) the final step I would utilize, especially in the fastener areas, was using the 3M "Edge Sealer".

Hope that helps You.... again, remember, This was my first, and only, wrap job - I'm sure a good installer would look at mine and go "WTF?" as there are lots of imperfections... to the untrained eye (and most SxS enthusiasts), it looks great, especially from a distance... but to an expert... they would see lots of imperfections I'm sure!)

IMG 7132 IMG 7133