P1000 Decided to Vinyl Wrap

kaspar139

kaspar139

Active Member
May 10, 2021
40
103
33
Conroe, TX
Ownership

  1. 1000-3
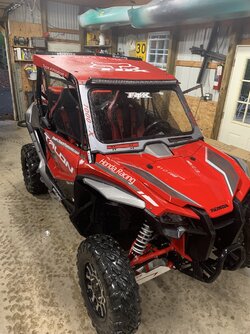
Hey everyone. I have decided I want to convert my 2020 P1000-3 Deluxe from WHITE to Camo.

The journey...
  1. Doing the research with Partzilla and local Honda dealer (Cycle Shack of North Houston), to buy the replacement Camo panels is over $2000! Primarily due to the licensing agreement with the "lost camo" provider no doubt.
  2. So, I then I found some local vinyl wrap companies, and the cost do take it and have it done is again $1500+ from 3 different quotes.... so I stopped there.
  3. Finally landed on the DIY project.
I bought the Mossy Oak Graphics kit for $250 off Amazon. It's a (4' x 12') sheet of vinyl that you plastic prime, cut a panel, apply, stretch, squeegee, heat gun, etc... This is gonna be brutal.

Anyone else done this themselves and have any tips/tricks? Or worse, you used the Mossy Oak Graphics kit and it was a disaster and I should return it before I start 🙃
 
Remington

Remington

POIDH Enforcement Officer
Lifetime Member
Supporting Member
Jul 24, 2016
20,253
115,818
113
Michigan
Ownership

  1. 1000-5

  2. Talon X
Use one of our venders Creative UTV Graphics. Walter in down in your area.
We try to suport our venders when we can.
Walter is also very helpful in helping you with the installation process
 
DRZRon1

DRZRon1

Well-Known Member
May 11, 2019
1,248
3,981
113
PA
Ownership

  1. Talon X
Hey everyone. I have decided I want to convert my 2020 P1000-3 Deluxe from WHITE to Camo.

The journey...
  1. Doing the research with Partzilla and local Honda dealer (Cycle Shack of North Houston), to buy the replacement Camo panels is over $2000! Primarily due to the licensing agreement with the "lost camo" provider no doubt.
  2. So, I then I found some local vinyl wrap companies, and the cost do take it and have it done is again $1500+ from 3 different quotes.... so I stopped there.
  3. Finally landed on the DIY project.
I bought the Mossy Oak Graphics kit for $250 off Amazon. It's a (4' x 12') sheet of vinyl that you plastic prime, cut a panel, apply, stretch, squeegee, heat gun, etc... This is gonna be brutal.

Anyone else done this themselves and have any tips/tricks? Or worse, you used the Mossy Oak Graphics kit and it was a disaster and I should return it before I start 🙃
Ive learned the hard way, dabbled with it and it drove me nuts..

then bought that Rapid Tac, life got easier and the job went much much better - would recommend it....

no runs, no drips, no bubbles, no errors on my roof...
 
P

packer58

Well-Known Member
Jun 17, 2021
312
945
93
N. Cali
Ownership

  1. 1000-3
@kaspar139, Before I had my panels dipped I thought about wrapping vinyl. I'll be interested to see how all this turns out, my biggest concern when i was going to wrap was the fastener pockets and how in the heck to keep the vinyl adhered in fastener pockets.
 
  • Like
Reactions: ChadD and TxDoc
Hillbillytnt

Hillbillytnt

Well-Known Member
May 2, 2020
552
2,030
93
Ky
Ownership

  1. 1000-3
I wrapped a 1k3 base model. I just bought a roll from mossy oak about 125-150$ if I remember then gave a buddy of mine that paints cars a 100 bucks to help me put it on. For what I have in it I’m happy with it. It has a few wrinkles and a bubble here or there. Mine lives outside so the goal was to stop the red from turning pink and I wanted to see if I could do it. It’s still an experiment i did it last summer and it held up through deer season if it makes it through turkey season this spring I will call it a success. I did have a little trouble getting the hood off on a frosty morning. I think the frost had connected between where the two pieces of wrap meet under there but a little coaxing with a popsicle stick and it was lose with no damage. May have just been frozen. It took two days and two 12 packs to do a base model 3 with no panels. I did it on a 90 degree day. I used a hair dryer but a real heat gun would have been faster. I do have one spot that I cut to narrow and the red shows through a kit would have probably avoided that.

IMG 0722 71571807062  689C69E5 65BF 4BFA 819E 163BC3CB9E29 IMG 0724 IMG 0716
 
Ridinfool

Ridinfool

NTC’ s special Ed student of the year
Lifetime Member
Supporting Member
Mar 20, 2020
36,144
386,046
113
Western North Carolina
Ownership

  1. 1000-5
Hey everyone. I have decided I want to convert my 2020 P1000-3 Deluxe from WHITE to Camo.

The journey...
  1. Doing the research with Partzilla and local Honda dealer (Cycle Shack of North Houston), to buy the replacement Camo panels is over $2000! Primarily due to the licensing agreement with the "lost camo" provider no doubt.
  2. So, I then I found some local vinyl wrap companies, and the cost do take it and have it done is again $1500+ from 3 different quotes.... so I stopped there.
  3. Finally landed on the DIY project.
I bought the Mossy Oak Graphics kit for $250 off Amazon. It's a (4' x 12') sheet of vinyl that you plastic prime, cut a panel, apply, stretch, squeegee, heat gun, etc... This is gonna be brutal.

Anyone else done this themselves and have any tips/tricks? Or worse, you used the Mossy Oak Graphics kit and it was a disaster and I should return it before I start 🙃
As someone that has a sign shop and we do a lot of vinyl graphics from letting to full printed sheets although we don’t do wraps (for good reason) I have lettered many box trucks and enclosed trailers what you are about to do is probably gonna be a major PITA… but if you do decide this is the way to go, I would first go to a local sign shop and ask to purchase a felt squeegee and a bottle of application fluid, the felt squeegee will not scratch the print on the vinyl.
The application fluid will let you move/adjust the vinyl when applying it.
You might find both items on the Zon.
You will want to start from the centers and work the app fluid out to the edges.
Don’t worry, the app fluid will dry and actually help the vinyl stick better. You will more than likely invent new cuss words in the process.
Good luck and remember
Pics Or It Didn’t Happen
 
DRZRon1

DRZRon1

Well-Known Member
May 11, 2019
1,248
3,981
113
PA
Ownership

  1. Talon X
As someone that has a sign shop and we do a lot of vinyl graphics from letting to full printed sheets although we don’t do wraps (for good reason) I have lettered many box trucks and enclosed trailers what you are about to do is probably gonna be a major PITA… but if you do decide this is the way to go, I would first go to a local sign shop and ask to purchase a felt squeegee and a bottle of application fluid, the felt squeegee will not scratch the print on the vinyl.
The application fluid will let you move/adjust the vinyl when applying it.
You might find both items on the Zon.
You will want to start from the centers and work the app fluid out to the edges.
Don’t worry, the app fluid will dry and actually help the vinyl stick better. You will more than likely invent new cuss words in the process.
Good luck and remember
Pics Or It Didn’t Happen
Those kits with the fluid and squugee are life savers. Buy extra material as well as it will get screwed up at some point - a large dose of patience and a proper heat gun and it will go good plus’s about 4 hours of YouTube training……I did the underside of my roof without the fluid and it got done with no bubbles but it took me hours - the roof was like 1/2 hour with the fluid.

IMG 4953 IMG 5525
 
N

nsmitch

Member
May 28, 2020
14
71
13
Spruce Grove, AB Canada
Ownership

  1. 1000-5
I did the Mossy Oak wrap a couple of years ago and I am still very happy with the results. Watch a few videos on how to wrap and buy the tool kit from Amazon. Took about 2 hours and has held up very well. Go for it. It is not that difficult.
 
  • Like
Reactions: kaspar139 and ChadD
someguy1313

someguy1313

Well-Known Member
Mar 5, 2021
237
518
93
SouthEast
Ownership

  1. 1000-5
Any pics or tips on filling in/contouring the screw holes in the doors?

Following!
 
  • Like
Reactions: ChadD
advertisement
kaspar139

kaspar139

Active Member
May 10, 2021
40
103
33
Conroe, TX
Ownership

  1. 1000-3
Will definitely post pics. Still waiting on delivery of the wrap material. I already received the primer, liquid and squeegee kit. So, I am traveling this weekend, and this will likely be a "next" weekend thing. I PROMISE I will post pictures and share success/horror stories 🙃

I have watched the Mossy Oak Graphics installation video, and it makes sense. Seems to be more of a patience job, as well as being surgical with the exacto knife. It also seems like the heat gun (which I have) is a crucial element as it relates to conforming to the curves/angles.
 
kaspar139

kaspar139

Active Member
May 10, 2021
40
103
33
Conroe, TX
Ownership

  1. 1000-3
From Walter at Creative UTV Graphics?
No, I bought it from Amazon, but it's the brand "Mossy Oaks Graphics". It appears that Creative UTV is selling the Mossy Oaks Graphics as their camo line. The cost was more than double on Creative UTV Graphics page. And, The Creative page uses the same demonstration video for installation.

From Creative UTV: Honda Pionner 1000 Camowraps
From Amazon: https://www.amazon.com/dp/B00I0T0H2O?tag=sxsweb24-20
From Mossy Oak: https://www.mossyoakgraphics.com/mossy-oak-camo-utv-side-by-side-wrap
 
  • Sad
  • Like
Reactions: ChadD and Remington
Remington

Remington

POIDH Enforcement Officer
Lifetime Member
Supporting Member
Jul 24, 2016
20,253
115,818
113
Michigan
Ownership

  1. 1000-5

  2. Talon X
No, I bought it from Amazon, but it's the brand "Mossy Oaks Graphics". It appears that Creative UTV is selling the Mossy Oaks Graphics as their camo line. The cost was more than double on Creative UTV Graphics page. And, The Creative page uses the same demonstration video for installation.

From Creative UTV: Honda Pionner 1000 Camowraps
From Amazon: https://www.amazon.com/dp/B00I0T0H2O?tag=sxsweb24-20
From Mossy Oak: https://www.mossyoakgraphics.com/mossy-oak-camo-utv-side-by-side-wrap
But did u contact walter and tell him your a member here? Would have givin u the @SuperATV 5 finger discount lol
No a forum discount, maybe beat Amazon and u get his impeccable service (basically if u F it up lol) all while supporting the forum🤷🏻‍♂️
But ok….
 
Remington

Remington

POIDH Enforcement Officer
Lifetime Member
Supporting Member
Jul 24, 2016
20,253
115,818
113
Michigan
Ownership

  1. 1000-5

  2. Talon X
Oh man! New guy here, didn't know about the discounts! Next time, for sure will keep that in consideration.
No worries. Ultimately its your choice!
As they say You cant hide money! 🤣
Anyone in our vender section will typically give u a forum discount. We like to support them to help this great community going. All good. Im sure it will look great.
Oh man! New guy here,
Dont forget to tag or hit reply, I just stumbled back here and seen u said something from my last post.
 
  • Like
Reactions: ChadD
kaspar139

kaspar139

Active Member
May 10, 2021
40
103
33
Conroe, TX
Ownership

  1. 1000-3
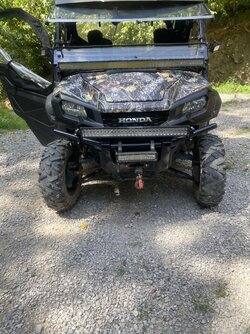
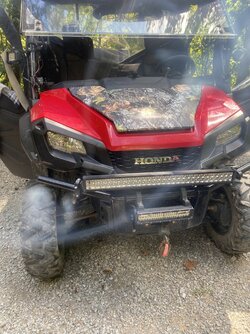
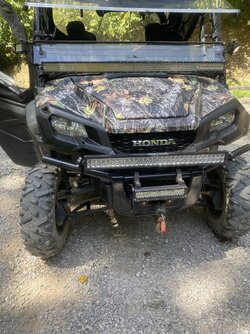
Thanks @Remington, appreciate the info. And for all above who provided input and gave me the desire to "DIY". I got it done, FINALLY, this weekend.

In the end, it looks fantastic. Just don't look closely :-D In all honesty, doing it yourself saved a lot of $$$, but it truly was a PAIN IN THE REAR. Working with the vinyl is as much art as it is science. The reality is it's a SXS so it's gonna get roughed up. I love the camo, glad I did it.

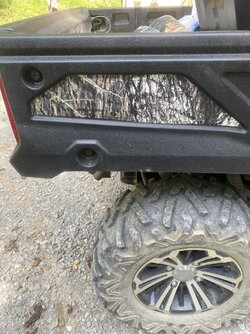
For those who were asking about the screw holes... here is what I did.
  1. On the back/bed panels that have the deep pockets... I cut small pieces and lined the holes. Then overlaid the holes with the sheet of camo. Then simply cut an "X" and pushed in the 4 corners into the hole.
  2. On all the shallow holes, I just overlaid the sheet, used a need to poke a hole and pushed screws through to is would create a tear. After heating/pressing the vinyl into the recesses, it worked great.
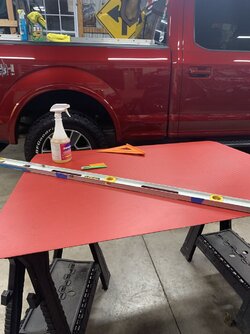
I removed all the panels and worked with them on a table top. Working on the hood/front section was the hardest as it was the only piece I couldn't remove.

Honda camo wrap
 
NTCPrezJB

NTCPrezJB

Retiring Member
Lifetime Member
Supporting Member
Jan 30, 2018
113,000
976,675
113
Hidden
Ownership

  1. 1000-5
Thanks @Remington, appreciate the info. And for all above who provided input and gave me the desire to "DIY". I got it done, FINALLY, this weekend.

In the end, it looks fantastic. Just don't look closely :-D In all honesty, doing it yourself saved a lot of $$$, but it truly was a PAIN IN THE REAR. Working with the vinyl is as much art as it is science. The reality is it's a SXS so it's gonna get roughed up. I love the camo, glad I did it.

For those who were asking about the screw holes... here is what I did.
  1. On the back/bed panels that have the deep pockets... I cut small pieces and lined the holes. Then overlaid the holes with the sheet of camo. Then simply cut an "X" and pushed in the 4 corners into the hole.
  2. On all the shallow holes, I just overlaid the sheet, used a need to poke a hole and pushed screws through to is would create a tear. After heating/pressing the vinyl into the recesses, it worked great.
I removed all the panels and worked with them on a table top. Working on the hood/front section was the hardest as it was the only piece I couldn't remove.

View attachment 417303
Looks like it turned out good for ya. Congrats!
 
JenElio

JenElio

NTC's NoMo Chupacabra Caliente!!....
Lifetime Member
Oct 31, 2019
75,058
677,176
113
Loxahatchee, florida
Ownership

  1. Other Brand

  2. 1000-5
Thanks @Remington, appreciate the info. And for all above who provided input and gave me the desire to "DIY". I got it done, FINALLY, this weekend.

In the end, it looks fantastic. Just don't look closely :-D In all honesty, doing it yourself saved a lot of $$$, but it truly was a PAIN IN THE REAR. Working with the vinyl is as much art as it is science. The reality is it's a SXS so it's gonna get roughed up. I love the camo, glad I did it.

For those who were asking about the screw holes... here is what I did.
  1. On the back/bed panels that have the deep pockets... I cut small pieces and lined the holes. Then overlaid the holes with the sheet of camo. Then simply cut an "X" and pushed in the 4 corners into the hole.
  2. On all the shallow holes, I just overlaid the sheet, used a need to poke a hole and pushed screws through to is would create a tear. After heating/pressing the vinyl into the recesses, it worked great.
I removed all the panels and worked with them on a table top. Working on the hood/front section was the hardest as it was the only piece I couldn't remove.

View attachment 417303
Looks good 👍

....... can't even see it......
 
Remington

Remington

POIDH Enforcement Officer
Lifetime Member
Supporting Member
Jul 24, 2016
20,253
115,818
113
Michigan
Ownership

  1. 1000-5

  2. Talon X
Thanks @Remington, appreciate the info. And for all above who provided input and gave me the desire to "DIY". I got it done, FINALLY, this weekend.

In the end, it looks fantastic. Just don't look closely :-D In all honesty, doing it yourself saved a lot of $$$, but it truly was a PAIN IN THE REAR. Working with the vinyl is as much art as it is science. The reality is it's a SXS so it's gonna get roughed up. I love the camo, glad I did it.

For those who were asking about the screw holes... here is what I did.
  1. On the back/bed panels that have the deep pockets... I cut small pieces and lined the holes. Then overlaid the holes with the sheet of camo. Then simply cut an "X" and pushed in the 4 corners into the hole.
  2. On all the shallow holes, I just overlaid the sheet, used a need to poke a hole and pushed screws through to is would create a tear. After heating/pressing the vinyl into the recesses, it worked great.
I removed all the panels and worked with them on a table top. Working on the hood/front section was the hardest as it was the only piece I couldn't remove.

View attachment 417303
Very nice work!
 
advertisement

About us

  • Our community has been around for many years and pride ourselves on offering unbiased, critical discussion among people of all different backgrounds. We are working every day to make sure our community is one of the best.

User Menu

Buy us a beer!

  • Lots of time and money has gone into making sure the community is running the best software, best designs, and all the other bells and whistles. Care to buy us a beer? We'd really appreciate it!

    Beer Fund!

    Club Membership!