K
Howdy folks -
This thread is detailing the windshield I cobbled together for my 2022 Pioneer 1000-5. For me, a windshield is bittersweet. I have had multiple retina detachment repair surgeries in both eyes. Both were random occurrences and both eyes needed more than one surgery to get my vision back. G*d was probably mad at me, but then again I know he loves me because I can see. I know what the blackest of black looks like. The cold air on my optical sensors is a no-no, and yes I do know about goggles. Even the beer kind! It's hard to keep a windshield clean and my set-up would not be practical for some serious "muddin'".
Back to the homemade windshield mod -
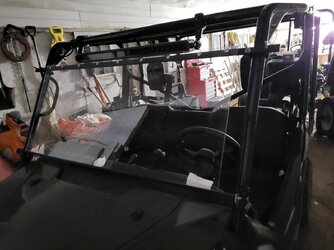
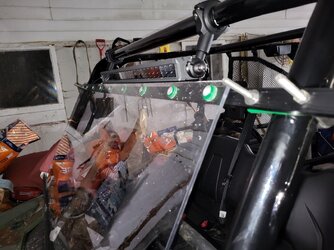
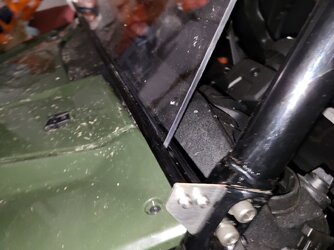
See the three pics (attached) for reference and sorry for the barn kitty muddy paw prints.
The lower 3/16" plate aluminum brackets are sandwiched between the front cage posts and mounts. Spanning between these two mounts is a piece of 2080 Aluminum Extrusion (part# 1050) with the groove up and lined with a strip of cork/rubber gasket (I'm sure it's FEL-PRO). The ends of this 2080 are tapped for cap screws, two on each end. The top support (another 2080 Aluminum Extrusion) is fastened to the roll cage by SS U-bolts - which are larger in U size than the roll cage tubing for some clearance. I cut pieces of fuel line to slide on and gasket the U-bolts from scratching the powder coat of the roll cage. I made a drill jig out of a piece of scrap steel to evenly space the rivet holes for the upper windshield attachment and I cut out green urethane washers with a hole saw. I started my first hole from center-line so a tape measure or ruler wasn't a show stopper for the rest of the hole locations. The urethane washers did a great job insulating the vibration of the Lexan with the upper span. Unfortunately, with the lower edge of the Lexan in the lower span groove, vibration dampening is not so much. I remediated this with shimming with availlabe spent farm material (folded piece of envelope from the last power bill) - also known as "Ranchy." However, the windshield has stayed put through multiple wrecks (see my introduction post!). The Pop-rivets are aluminum with a large head and I think they were 5/32" diameter. A word of advice is to apply a couple layers of duct tape on the end of the pop rivet tool to keep it from scratching your workpiece when the mandrel goes snap.
Pros - This didn't cost much (+/- $200?) and I probably had 3-4 hours of time in it. I would imagine a factory made windshield would take as long to install and might even cost more in simple, brilliant and possible foul language because there are higher expectations with such a purchase. I procured a whole 4'x8' sheet of Lexan, 1/4" thick, and cut it with the skillsaw against a straight edge to make multiple replacements in the event it got all scratched to H*ll.
Cons - It got all scratched to H*ll. In all honesty - not really. What happened was my daughter took it for a joy ride with my wife shortly after installation and hit a low lying branch and you guessed it - the scratch embeded is in the worst possible location for the driver's field of view. It's been two years now and it is the only scratch. I purchased some platic polish, but I haven't tried that yet.
I think a folding windshield is a really good idea, so that is the next iteration. When I finally make that happen I'll post an update.
Thanks for the read and G*d Bless.


