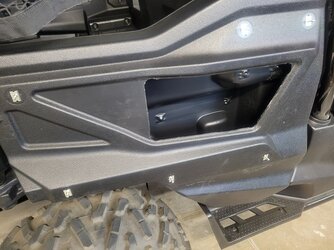
Just got a 2021 P1K-5, want to add rear door storage but need direction before getting where I can't fix a mistake. I cut the opening on the door and received my Hood Pins from amazon Amazon.com: Gangmu Tec Pack of 8 Universal Aluminum Vehicle Hood Pins - License Plate Lock Clip, Push Button Bonnet, Quick Release Lock Latch Bumper, Diameter 1.25 inch (Black, Pack of 8): Automotive . My door has molded nut plates in the door. The hood pins thread into them fin but long. I can cut them but, the quick release caps are about 1/2 to 3/4 inch deep. The door panel will not snug up to the door as is. Do the molded nut plates need to be removed and drilled? My engineering degree expired soon before I was born. Any help (pictures/videos would be appreciated.
You are using an out of date browser. It may not display this or other websites correctly.
You should upgrade or use an alternative browser.
You should upgrade or use an alternative browser.
A little late to the table on this one, but then I just did this today. Didn't take any videos, installed on one of the rear doors on my '21 P1000-5 SE, so can maybe answer some of your questions.
1) I cut my opening by first using a hole saw to make the corner holes - this provides a nice radius. I used an angle grinder with cutoff wheel to cut the straight lines.
2) Held panel up to mounting check alignment of upper 3 mounting brackets - they were centered nicely. Then concentrated on mounting the top three first. I used a step-drill to drill the 3/4" holes in the panel. The step drill gives the advantage, besides making nice holes, of allowing one to use lateral force going through the smaller sizes to correct center - i.e. don't drill to size in one go, stop and hold panel up to door to check if centering is still good - apply lateral force to bit as necessary to center hole.
3) As you found, the panel hole recesses) at least on my SE, are way to deep and this does not allow the push button retaining nut to fully engage the threads on the button body. I removed material from the back (inside surface) first using a small sanding disk but then reverting to an oscillating multi-tool with a common offset saw blade that was about 1-1/4" wide. This allowed me to precisely shave off material from the inside of the attach hole, the goal being to have the nut fully engage the button threads, (going further won't get the panel any closer due to the width of the nut). I thought this process would enlarge the 3/4" hole - it didn't, though slight enlargement would still be okay so long as it doesn't get bigger than the retaining nut.
One might move the color panel in closer to the door, as you suggested, by heating the plastic area adjacent to the female threaded nut attach points. I may try this. If I do I will use a heat gun to warm the plastic, and use a wooden dowel with hole in it centered to fit over ball end of pin. Heat, push inward, use spray bottle of water and/or compressed air to speed cooling. Should be able to do one at a time that way.

Last edited:
Similar threads
E
P1000
Under “hood” pics needed
- elarson6772
- Pioneer 1000 Accessories and Modifications 2
- Replies
- 29
- Views
- 550
C
- Replies
- 1
- Views
- 249
- Replies
- 3
- Views
- 464
- Replies
- 13
- Views
- 1K

