P500 P500 Snorkel - 2" Dual - specs and detailed photos

  • Thread starter Deleted member 3748
  • Start date
D

Deleted member 3748

Guest
Here's my dual intake snorkel solution that uses 2" PVC pipe all the way to the intake tube and no rubber adapter or reducer.

Materials


(1) 2" PVC 10' to make the other pieces. May have gotten away with 8' - $6.99

(1) 2" PVC @ 3" long taper one end
(3) 2" PVC 90 degree elbows - $1.79 ea $3.58 total
(2) 2" PVC 60 degree elbows - $1.79 ea $3.58 total
(1) Wye adaptor with 90 degree - $2.79
(3) 2" PVC @ 1 1/2" long
(1) 2" PVC @ 11 1/2" long
(1) 2" PVC @ 2 1/2" long
(2) 2" PVC @ 21" long
Total $ 16.94
I already had the rest of it.

PVC primer and cement ~ $7 or $8
Hose clamps ~ $10
Paint ~$5
Zip Ties ~ $1

Approx. $41 for the whole thing.

This is going to be a long post... I may turn it into a video.

The above material list looks like this prior to fitting and gluing. The 21" pieces can be whatever you want and I don't show them in the photo below. I also don't show the 90 degree elbows I used at the top because it's your preference.
7


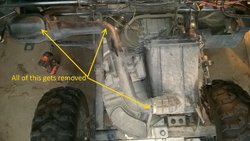
Remove rear rack and plastic by removing the 8 bolts that mount the rack to the frame. Remove the plastic dart that holds the factory intake tube to the rear fender. Unplug the brake light harness located just above the battery box.

Remove the factory "snorkel" but not the rubber intake tube.
1

1 1/2" PVC is too small to fit into the factory intake tube. 2" is a little too big. I used my belt sander mounted upside down (you can also put a belt sander in a vise) and sanded one end of the PVC pipe for 10 minutes until it fit into the factory intake tube. It's a very snug fit and works great. This is the same thing you have to do for the intake mod on an F150.

2


It's a tight fit into the intake tube.
3

Dry fit all pieces to make sure everything fits. Partially reinstall the rear rack because it's a tight fit between the rack and the roll bar and you need to make sure the snorkel is out of the way. I used a Sharpie to mark and number all pieces to align them during gluing.
4

5


I leveled the PVC to intake tube connection. I'm not sure if that's important but it seemed like it could be.
6


I glued some of it on ground and some of it in place to make sure everything fits. Here it is all glued up.
8


After the PVC cement dried, I applied silicon caulk to all joints. After everything dried I sprayed it with Krylon plastic paint.
9


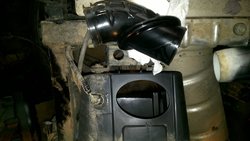
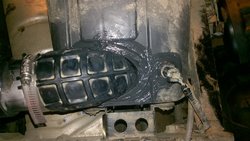
I ran into a snag. The intake tube came loose trying to wrestle the 3" tapered piece in. I noticed a thin film of something that looked like a waterproof seal. I cleaned the tube and surfaces and applied Permatex black around the air box hole. I put the tube back in then blobbed Permatex black all around including around the sensor next to the intake tube.
10

11

Even being one big piece, it installed pretty easily. I used temporary zip ties to get everything level and lined up.
12


Lots of zip ties and a few hose clamps to hold it securely to the roll bars. As mentioned above, I had to use a larger hose clamp on the factory intake tube.

13


I installed the rear rack and checked the fitment. Plenty of room, however, the plastic tray that used to sit in front of the air box no longer fits. I'm going to have to cut it up.

14


And done!
15
 
Last edited by a moderator:
trigger

trigger

Old Ironsides
Vendor
Lifetime Member
Supporting Member
Feb 13, 2016
23,834
178,025
113
Bay City, Michigan
www.quickshieldutv.com
Ownership

  1. 500
Here's my dual intake snorkel solution that uses 2" PVC pipe all the way to the intake tube and no rubber adapter or reducer.

Materials


(1) 2" PVC 10' to make the other pieces. May have gotten away with 8'

(1) 2" PVC @ 3" long taper one end
(3) 2" PVC 90 degree elbows
(2) 2" PVC 60 degree elbows
(1) Wye adaptor with 90 degree
(3) 2" PVC @ 1 1/2" long
(1) 2" PVC @ 11 1/2" long
(1) 2" PVC @ 2 1/2" long
(2) 2" PVC @ 21" long

PVC primer and cement

This is going to be a long post... I may turn it into a video.

The above material list looks like this prior to fitting and gluing. The 21" pieces can be whatever you want and I don't show them in the photo below. I also don't show the 90 degree elbows I used at the top because it's your preference.
View attachment 49180

Remove rear rack and plastic by removing the 8 bolts that mount the rack to the frame. Remove the plastic dart that holds the factory intake tube to the rear fender. Unplug the brake light harness located just above the battery box.

Remove the factory "snorkel" but not the rubber intake tube.

View attachment 49174

1 1/2" PVC is too small to fit into the factory intake tube. 2" is a little too big. I used my belt sander mounted upside down (you can also put a belt sander in a vise) and sanded one end of the PVC pipe for 10 minutes until it fit into the factory intake tube. It's a very snug fit and works great. This is the same thing you have to do for the intake mod on an F150.

View attachment 49175

It's a tight fit into the intake tube.
View attachment 49176
Dry fit all pieces to make sure everything fits. Partially reinstall the rear rack because it's a tight fit between the rack and the roll bar and you need to make sure the snorkel is out of the way. I used a Sharpie to mark and number all pieces to align them during gluing.
View attachment 49177
View attachment 49178

I leveled the PVC to intake tube connection. I'm not sure if that's important but it seemed like it could be.
View attachment 49179

I glued some of it on ground and some of it in place to make sure everything fits. Here it is all glued up.
View attachment 49181

After the PVC cement dried, I applied silicon caulk to all joints. After everything dried I sprayed it with Krylon plastic paint.
View attachment 49182

I ran into a snag. The intake tube came loose trying to wrestle the 3" tapered piece in. I noticed a thin film of something that looked like a waterproof seal. I cleaned the tube and surfaces and applied Permatex black around the air box hole. I put the tube back in then blobbed Permatex black all around including around the sensor next to the intake tube.
View attachment 49183

View attachment 49189

Even being one big piece, it installed pretty easily. I used temporary zip ties to get everything level and lined up.
View attachment 49185

Lots of zip ties and a few hose clamps to hold it securely to the roll bars. As mentioned above, I had to use a larger hose clamp on the factory intake tube.

View attachment 49186

I installed the rear rack and checked the fitment. Plenty of room, however, the plastic tray that used to sit in front of the air box no longer fits. I'm going to have to cut it up.

View attachment 49187

And done!
View attachment 49188

Looks BA Piston! All the way back, you took the hard road man. Proper though, nice job. Just a thought on the last 90's, cut a piece of pipe short with a 15 or 22 1/2 degree to give them a tip with a slight hood.
Ironside rear
 
D

Deleted member 3748

Guest
I added materials pricing to the OP. It was even cheaper than I thought!
 
  • Like
Reactions: trigger
HUCK

HUCK

Well-Known Member
Lifetime Member
Jun 21, 2016
1,047
2,319
113
ARIZONA
Ownership

  1. 500

  2. Talon X
Looks great Piston ! Nice job and a great photo instruction manual ! Here we would have to put filters on the intakes because our culprit is dust/dirt .
 
  • Like
Reactions: Deleted member 3748
D

Deleted member 3748

Guest
Thanks! I have two K&N prechargers on the way for the ends of the snorkels. It's really dusty here too. :(
 
  • Like
Reactions: Eltobgi and HUCK
rocmar

rocmar

Where Eagles & Angels....Dare to Fly...
Lifetime Member
Dec 21, 2014
4,741
5,776
113
4 CORNERS
Ownership

  1. 500
Here's my dual intake snorkel solution that uses 2" PVC pipe all the way to the intake tube and no rubber adapter or reducer.

Materials


(1) 2" PVC 10' to make the other pieces. May have gotten away with 8' - $6.99

(1) 2" PVC @ 3" long taper one end
(3) 2" PVC 90 degree elbows - $1.79 ea $3.58 total
(2) 2" PVC 60 degree elbows - $1.79 ea $3.58 total
(1) Wye adaptor with 90 degree - $2.79
(3) 2" PVC @ 1 1/2" long
(1) 2" PVC @ 11 1/2" long
(1) 2" PVC @ 2 1/2" long
(2) 2" PVC @ 21" long
Total $ 16.94
I already had the rest of it.

PVC primer and cement ~ $7 or $8
Hose clamps ~ $10
Paint ~$5
Zip Ties ~ $1

Approx. $41 for the whole thing.

This is going to be a long post... I may turn it into a video.

The above material list looks like this prior to fitting and gluing. The 21" pieces can be whatever you want and I don't show them in the photo below. I also don't show the 90 degree elbows I used at the top because it's your preference.
View attachment 49180

Remove rear rack and plastic by removing the 8 bolts that mount the rack to the frame. Remove the plastic dart that holds the factory intake tube to the rear fender. Unplug the brake light harness located just above the battery box.

Remove the factory "snorkel" but not the rubber intake tube.

View attachment 49174

1 1/2" PVC is too small to fit into the factory intake tube. 2" is a little too big. I used my belt sander mounted upside down (you can also put a belt sander in a vise) and sanded one end of the PVC pipe for 10 minutes until it fit into the factory intake tube. It's a very snug fit and works great. This is the same thing you have to do for the intake mod on an F150.

View attachment 49175

It's a tight fit into the intake tube.
View attachment 49176
Dry fit all pieces to make sure everything fits. Partially reinstall the rear rack because it's a tight fit between the rack and the roll bar and you need to make sure the snorkel is out of the way. I used a Sharpie to mark and number all pieces to align them during gluing.
View attachment 49177
View attachment 49178

I leveled the PVC to intake tube connection. I'm not sure if that's important but it seemed like it could be.
View attachment 49179

I glued some of it on ground and some of it in place to make sure everything fits. Here it is all glued up.
View attachment 49181

After the PVC cement dried, I applied silicon caulk to all joints. After everything dried I sprayed it with Krylon plastic paint.
View attachment 49182

I ran into a snag. The intake tube came loose trying to wrestle the 3" tapered piece in. I noticed a thin film of something that looked like a waterproof seal. I cleaned the tube and surfaces and applied Permatex black around the air box hole. I put the tube back in then blobbed Permatex black all around including around the sensor next to the intake tube.
View attachment 49183

View attachment 49189

Even being one big piece, it installed pretty easily. I used temporary zip ties to get everything level and lined up.
View attachment 49185

Lots of zip ties and a few hose clamps to hold it securely to the roll bars. As mentioned above, I had to use a larger hose clamp on the factory intake tube.

View attachment 49186

I installed the rear rack and checked the fitment. Plenty of room, however, the plastic tray that used to sit in front of the air box no longer fits. I'm going to have to cut it up.

View attachment 49187

And done!
View attachment 49188
Very good post...
very deailed....
props...
one question....
why didn't you use..ABS
blackpipe....
just askig...
 
  • Like
Reactions: Mudder
D

Deleted member 3748

Guest
Very good post...
very deailed....
props...
one question....
why didn't you use..ABS
blackpipe....
just askig...
Couldn't find black abs around here. I looked all over
 
advertisement
rocmar

rocmar

Where Eagles & Angels....Dare to Fly...
Lifetime Member
Dec 21, 2014
4,741
5,776
113
4 CORNERS
Ownership

  1. 500
I'm gonna do mine...but being
in the desert...not a must...
Re-doing my lights...properly
running electric. .to black box
...changing some stuff I did...
but now don't want...or a better
way...
 
Last edited:
  • Like
Reactions: Deleted member 3748
Shadesmn

Shadesmn

Well-Known Member
Lifetime Member
Aug 19, 2015
505
959
93
Ramsey, MN
Ownership

  1. 500
Very nice @PistonHonda. Only thing ive found to not like on mine, and i assume you may have the same problem is its a bit tight and tricky getting the airbox open.
 
  • Like
Reactions: Deleted member 3748
D

Deleted member 3748

Guest
Very nice @PistonHonda. Only thing ive found to not like on mine, and i assume you may have the same problem is its a bit tight and tricky getting the airbox open.
I'm not having any trouble with the airbox, I just have to get it from the passenger side now. The tray that used to mount in front of the airbox is a problem though. I'm going to cut it up tomorrow and see if I can get most of it back in there.
 
  • Like
Reactions: Shadesmn
Redrocket

Redrocket

Member
Lifetime Member
Oct 15, 2017
56
58
18
Lake City FL
Ownership

  1. 500
Hey piston Honda, just wondering if cut oem air tube at rear fender and 90 up from there keeping same diameter do you think that will work?
 
D

Deleted member 3748

Guest
Hey piston Honda, just wondering if cut oem air tube at rear fender and 90 up from there keeping same diameter do you think that will work?
I'm pretty sure other people have done that. Your method will keep the original sound chambers intact and not make the snorkels super loud in the winter when the rear window panel is on.
 
  • Like
Reactions: trigger
Redrocket

Redrocket

Member
Lifetime Member
Oct 15, 2017
56
58
18
Lake City FL
Ownership

  1. 500
Okay thanks
I'm pretty sure other people have done that. Your method will keep the original sound chambers intact and not make the snorkels super loud in the winter when the rear window panel is on.
I'm going to try this first it's mainly just in case I misjudge water hole unintentionally.thanks you for your quick response!
 
advertisement

About us

  • Our community has been around for many years and pride ourselves on offering unbiased, critical discussion among people of all different backgrounds. We are working every day to make sure our community is one of the best.

User Menu

Buy us a beer!

  • Lots of time and money has gone into making sure the community is running the best software, best designs, and all the other bells and whistles. Care to buy us a beer? We'd really appreciate it!

    Beer Fund!

    Club Membership!