***CABLE SUMMARY***
Here's the run down on these cables folks....per the Honda Service Manual....
Two Spots of adjustment, they do two different things.
1: Shift Lever Adjustment (P-N-H-L)
2: Drive Mode Lever Adjustment (2WD-TURF...ect)
BOTH of mine very much needed adjustment at 20hrs/100miles...cables always stretch when new.
Shift Lever:
Very important, does your SxS lurch, pop out of gear, late clutch engage/disengage?
This adjusts under the hood, under the battery, very important.
1: Remove hood, battery, and the black access panel underneath battery.
2: You will then see the cable, sitting in its "stay", 19mm lock nuts holding its position.
3: Place SxS in Neutral & 2WD.
4: Loosen both holding nuts, got back to the SxS cab.
**Do not shift from N**
5: With out leaving N, check the Shift Lever's "vertical free play" (wobble), it should be CENTERED.
-------------Not favoring the up(Park) direction, or down(High) direction.
-------------Mine was heavily favoring the up direction, toward park...
6: Adjust the lock nuts until the free-play is centered, I needed to tighten the top nut.
7: Once happy, tighten the lock nuts 20ft-lbs and re-check.
This solved all the little issues my SxS had developed at break in. It was lurching when taking off from a stop, very annoying when pulling onto trailer or into garage. And when braking to a stop the clutch was disengaging late.
Drive Mode Lever:
1: Place SxS levers in
Park and
2WD.
2: Jack one side off ground, rotate one wheel, this ensures full LOCK cable position.
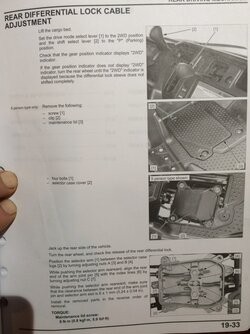
3: Dump the bed, remove access panel in the driver side rear passenger foot well.
4: Remove four 10mm bolts on cable housing cover.
5: You will see:
---------Two cables coming in on outside, one in center exiting to rear diff.
---------All three are in a holder swiveling "arm".
6: Adjust the two outside cable's until the "arm" is centered between the housing's four tick marks.
7: Then adjust the middle cable so its pivot pin is flush with the "arms" index line.
--------Check that there is at least 1/4'' (6mm) gap between this pivot pin and rear of the arm's guide hole.
It should look like this when finished:
View attachment 11625


