P1000m5 What did you add to/do with your Pioneer 1000 5 today?

Rayger143

Rayger143

Well-Known Member
Lifetime Member
Supporting Member
Aug 5, 2020
3,098
27,203
113
Winfield, BC Canada
Ownership

  1. 1000-5
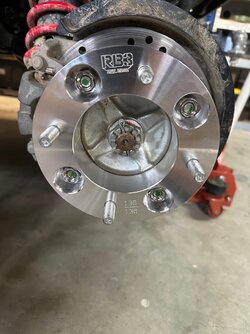
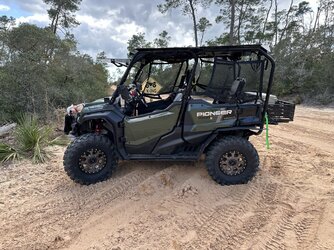
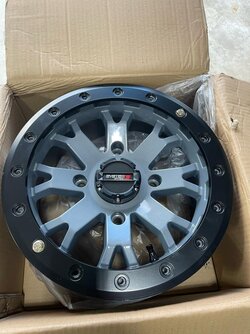
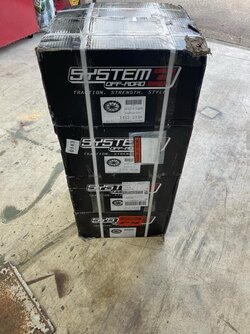
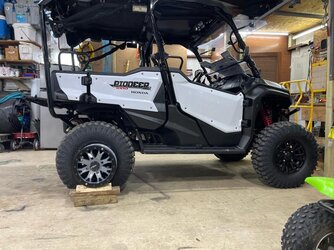
Treated myself to an early Christmas present. 15” system 3 SB7 beadlocks with 30x10 xtr 370 tires. Rub just a touch at full lock with atlas pro A-Arms (no steering stop). Ordered RB3 wide track kit, hoping that will fix the rub before I break down and add the steering stops.

View attachment 410194 View attachment 410195
Lookin good. You will be good after installing spacers.
 
  • Like
Reactions: Jankyeye
O

ob1jeeper

Well-Known Member
Dec 20, 2019
98
282
53
Arizona
Ownership

  1. 1000-5
Removed the struts I had used to tilt the lower portion of the full windscreen out for fresh air during the warmer months. Starting to get to the point I'll be adding the door uppers in the next few weeks... ;)
 
  • Like
Reactions: Rayger143
Dirtstiffs-1000

Dirtstiffs-1000

Well-Known Member
Lifetime Member
Supporting Member
Nov 3, 2018
1,657
6,034
113
Republican from the wet side of Oregonifornia
hondasxs.com
Ownership

  1. 1000-5
20231126 155515
 
P1K5Dave

P1K5Dave

Well-Known Member
Lifetime Member
Club Contributor
Jul 11, 2020
2,245
8,427
113
Petoskey, MI
Ownership

  1. 1000-5
Ordered RB3 wide track kit, hoping that will fix the rub before I break down and add the steering stops.
Oddly enough, spacers may make rubbing worse depending on your setup.
 
  • Sad
Reactions: Jankyeye
Jankyeye

Jankyeye

Well-Known Member
Lifetime Member
Dec 17, 2021
827
4,004
93
Tampa, Fl.
Ownership

  1. 1000-5

  2. Talon R LV
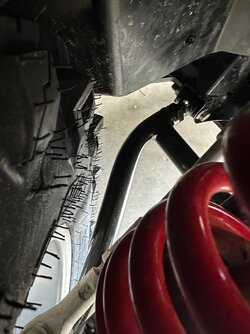
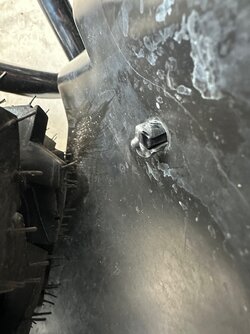
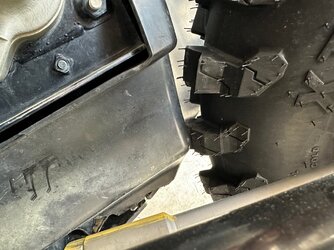
@Rayger143 @P1K5Dave 1” spacers in the front solved the rubbing on the A arms, still just a touch of rub on the inner fender panels.

IMG 7366 IMG 7369 IMG 7368 IMG 7367
 
NorthernJoe

NorthernJoe

Well-Known Member
Feb 10, 2021
359
1,365
93
Northern Ontario
Ownership

  1. 1000-5
@Rayger143 @P1K5Dave 1” spacers in the front solved the rubbing on the A arms, still just a touch of rub on the inner fender panels.

View attachment 410775 View attachment 410776 View attachment 410777 View attachment 410778
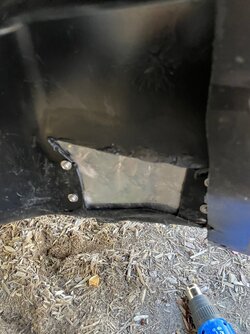
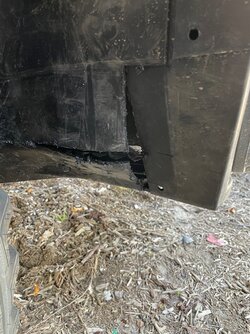
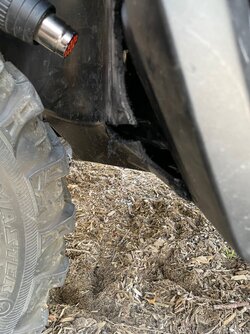
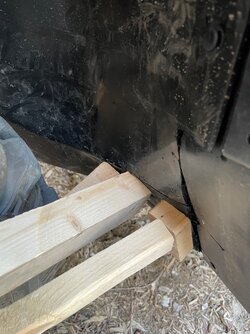
You could do a DYI This took me a couple hours

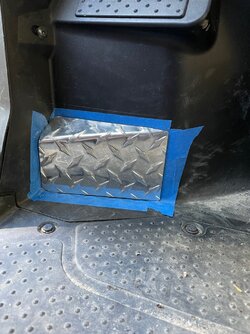
First I made up the metal cover plate

Img 7728 jpg


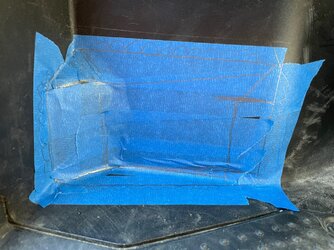
Trace out where the plate is to go
Img 7730 jpg


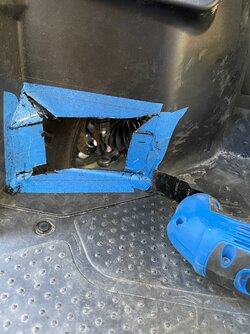
Then you cut out the bulk of the plastic. make sure to leave tabs to rivet the plate to
Img 7732 jpg


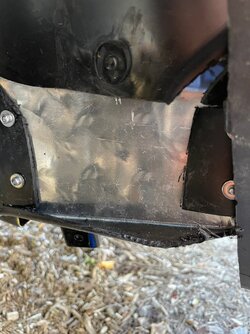
attach the plate with rivets, you can see at the bottom of the picture how much space you gain
Img 7734 jpg


Take a heat gun and fold up the edges
Img 7735 jpg


reinstall the inner fender, cut the outside vertical edge and cut horizontally along the "ridge"
Img 7737 jpg


Take the heat gun and gently heat the top part and press it back against the back of the plate. then heat and push the bottom until it touched the top part. take your multi tool and gently cut through the top and bottom at the same time. remove the scrap and heat the top and bottom at the same time. when it looks wet its ready to shape
Img 7738 jpg


push the warm/soft top and bottom until it makes contact with the new plate installed in the foot well and brace until it cools
You can cut thin slivers and weld them in the seam
Img 7739 jpg
there you just gained over an inch of clearance where it counts!
 
Last edited:
Jankyeye

Jankyeye

Well-Known Member
Lifetime Member
Dec 17, 2021
827
4,004
93
Tampa, Fl.
Ownership

  1. 1000-5

  2. Talon R LV
You could do a DYI This took me a couple hours

First I made up the metal cover plate

View attachment 410800


Trace out where the plate is to go
View attachment 410801


Then you cut out the bulk of the plastic. make sure to leave tabs to rivet the plate to
View attachment 410802


attach the plate with rivets, you can see at the bottom of the picture how much space toy gain
View attachment 410803


Take a heat gun and fold up the edges
View attachment 410804


reinstall the inner fender, cut the outside vertical edge and cut horizontally along the "ridge"
View attachment 410805


Take the heat gun and gently heat the top part and press it back against the back of the plate. then heat and push the bottom until it touched the top part. take your multi tool and gently cut through the top and bottom at the same time. remove the scrap and heat the top and bottom at the same time. when it looks wet its ready to shape
View attachment 410806


push the warm/soft top and bottom until it makes contact with the new plate installed in the foot well and brace until it cools
You can cut thin slivers and weld them in the seam
View attachment 410807
there you just gained over an inch of clearance where it counts!
Thanks, I’ll probably play with the preload a little first and take it out for a ride. If it still rubs I may try this.
 
Rayger143

Rayger143

Well-Known Member
Lifetime Member
Supporting Member
Aug 5, 2020
3,098
27,203
113
Winfield, BC Canada
Ownership

  1. 1000-5
Thanks, I’ll probably play with the preload a little first and take it out for a ride. If it still rubs I may try this.
Mine rubs very little but only while turned and on shock soft setting on rougher trails. Hasn’t rubbed on medium.
 
advertisement
Jankyeye

Jankyeye

Well-Known Member
Lifetime Member
Dec 17, 2021
827
4,004
93
Tampa, Fl.
Ownership

  1. 1000-5

  2. Talon R LV
50 miles on the Ocala Centennial trail today. Front only rubbed at full lock, rear rubbed on a mud buster bolt at full compression. Had to run the fox shocks at level 3 to stop it at any speed.

Managed to loose a bolt from the rough country bed extender and broke a SATV windshield strut.

IMG 7387
 
C

chucksmith0706

Well-Known Member
Jul 22, 2020
300
1,121
93
Louisiana
50 miles on the Ocala Centennial trail today. Front only rubbed at full lock, rear rubbed on a mud buster bolt at full compression. Had to run the fox shocks at level 3 to stop it at any speed.

Managed to loose a bolt from the rough country bed extender and broke a SATV windshield strut.

View attachment 411504

I like them wheels and tires. Good looking bike and setup.


Sent from my iPhone using Tapatalk
 
O

ob1jeeper

Well-Known Member
Dec 20, 2019
98
282
53
Arizona
Ownership

  1. 1000-5
You could do a DYI This took me a couple hours

First I made up the metal cover plate

View attachment 410800


Trace out where the plate is to go
View attachment 410801


Then you cut out the bulk of the plastic. make sure to leave tabs to rivet the plate to
View attachment 410802


attach the plate with rivets, you can see at the bottom of the picture how much space you gain
View attachment 410803


Take a heat gun and fold up the edges
View attachment 410804


reinstall the inner fender, cut the outside vertical edge and cut horizontally along the "ridge"
View attachment 410805


Take the heat gun and gently heat the top part and press it back against the back of the plate. then heat and push the bottom until it touched the top part. take your multi tool and gently cut through the top and bottom at the same time. remove the scrap and heat the top and bottom at the same time. when it looks wet its ready to shape
View attachment 410806


push the warm/soft top and bottom until it makes contact with the new plate installed in the foot well and brace until it cools
You can cut thin slivers and weld them in the seam
View attachment 410807
there you just gained over an inch of clearance where it counts!
Did you try heating and pushing it back before cutting? Just a thought that it may be less cutting and pasting of pieces to get the same end result of clearance...
 
NorthernJoe

NorthernJoe

Well-Known Member
Feb 10, 2021
359
1,365
93
Northern Ontario
Ownership

  1. 1000-5
Did you try heating and pushing it back before cutting? Just a thought that it may be less cutting and pasting of pieces to get the same end result of clearance...
I did do some experimenting before I went this route You would have ended up with a lot of extra material inside the cab and it would have looked messy (in my opinion)
 
O

ob1jeeper

Well-Known Member
Dec 20, 2019
98
282
53
Arizona
Ownership

  1. 1000-5
I did do some experimenting before I went this route You would have ended up with a lot of extra material inside the cab and it would have looked messy (in my opinion)
Cool beans. Was mostly curious whether you could have gotten sufficient clearance without material removal... But it seems you had already tried that. ;)
 
StewB

StewB

Well-Known Member
Jan 2, 2021
723
3,366
93
Utah
Ownership

  1. 1000-5
Replaced the original battery in my 2021 P1K5.
It was on sale for $79.

Interesting point: the instructions say not to leave this battery on a tender. You can use it to top up if the vehicle's been idle for several weeks, but it says not to leave it on all the time.


PS: My dual battery is a MightyMax and it's still working. This one had a higher CCA rating of 350.
 
O

ob1jeeper

Well-Known Member
Dec 20, 2019
98
282
53
Arizona
Ownership

  1. 1000-5
Replaced the original battery in my 2021 P1K5.
It was on sale for $79.

Interesting point: the instructions say not to leave this battery on a tender. You can use it to top up if the vehicle's been idle for several weeks, but it says not to leave it on all the time.


PS: My dual battery is a MightyMax and it's still working. This one had a higher CCA rating of 350.
Many tenders don't have the ability to sense when the battery is fully topped, and continued charging ,even if a trickle, can damage a battery. Even when using trickle chargers, I put them on a timer, to run not more than 2-3 hours per day in colder weather (less than 40-ish), and 1/2 that if temps are over 50 deg-F., and if over 65-70, I don't use one at all.
 
Dirtstiffs-1000

Dirtstiffs-1000

Well-Known Member
Lifetime Member
Supporting Member
Nov 3, 2018
1,657
6,034
113
Republican from the wet side of Oregonifornia
hondasxs.com
Ownership

  1. 1000-5
Many tenders don't have the ability to sense when the battery is fully topped, and continued charging ,even if a trickle, can damage a battery. Even when using trickle chargers, I put them on a timer, to run not more than 2-3 hours per day in colder weather (less than 40-ish), and 1/2 that if temps are over 50 deg-F., and if over 65-70, I don't use one at all.
I use Battery Tender Jr's on all my powersport batteries, and leave them on year round.
Easily get 4 to 5 years out of them.

Just bought this NOCO 5 amp to maintain the dual batteries on my 98 5.9 Cummins.
Charges fast, maintains and switchable to all types of batteries, including 6v.
Made a SAE ring terminal wiring harness to connect up.
Bought an adapter from NOCO to SAE for versatility.
Couldn't wait for Santa...

Have a high amp, NOCO jump box for diesels, too.

NOCO products come professionally packaged, 3 - 5 year warranty, great quality.
American company and engineering, made in Vietnam.

1702833637212


1702830335349
 
Last edited:
advertisement

About us

  • Our community has been around for many years and pride ourselves on offering unbiased, critical discussion among people of all different backgrounds. We are working every day to make sure our community is one of the best.

User Menu

Buy us a beer!

  • Lots of time and money has gone into making sure the community is running the best software, best designs, and all the other bells and whistles. Care to buy us a beer? We'd really appreciate it!

    Beer Fund!

    Club Membership!