You are using an out of date browser. It may not display this or other websites correctly.
You should upgrade or use an alternative browser.
You should upgrade or use an alternative browser.
lee
Village Idiot
Lifetime Member
Club Contributor
Smitty335
Well-Known Member
Lifetime Member
Supporting Member
Did you do a before and after header temperature reading, thats were most of the front seat heat comes? from?In continuation of the previous threads , I decided to post some videos and pics and how to make your P1000 cooler
Cat decapitation -
DIY explanation -
Cat vs not cat muffler sound -
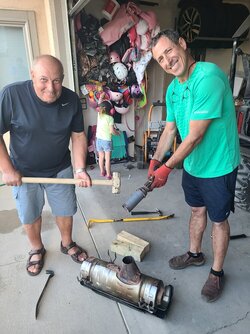
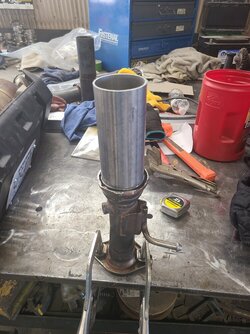
View attachment 279105 View attachment 279106
BigOL3
Well-Known Member
Lifetime Member
Not having any first hand experience with removing cats, I surely wish there were a few more details (verbal, pics, videos, measurements) on each step ....... i.e. making the first cut and each additional cut, and more detailed explanations.In continuation of the previous threads , I decided to post some videos and pics and how to make your P1000 cooler
Cat decapitation -
DIY explanation -
Cat vs not cat muffler sound -
View attachment 279105 View attachment 279106
I watched the video and removed my cat last Friday before an evening ride. The cutting and welding was far easier for me than removing the muffler and heat Shields. Even with penetrating oil, the exhaust bolts were very difficult to break loose because I had forgotten my longer ratchet wrenches and only had a deep well 12mm socket that didn't fit the passenger side bolt very well ,due to the curve in the exhaust ,and a 12mm wrench that didn't give much leverage.
Liberal doses of penetrating oil and profanity were the right combination to break them loose and get everything back together just in time for riding. The exhaust sounds slightly deeper and it definitely made a difference in the amount of heat that I felt coming up between the front of the bed and the front seats. We didn't have a rear passenger this weekend but I think they will notice the difference when they ride with us again. Sorry that I didn't take any pics but the video pretty much shows everything that you need.
Liberal doses of penetrating oil and profanity were the right combination to break them loose and get everything back together just in time for riding. The exhaust sounds slightly deeper and it definitely made a difference in the amount of heat that I felt coming up between the front of the bed and the front seats. We didn't have a rear passenger this weekend but I think they will notice the difference when they ride with us again. Sorry that I didn't take any pics but the video pretty much shows everything that you need.
Robobrainiac
Well-Known Member
Lifetime Member
Do you need the interior pipe that replaces the converter or were you trying to keep the original design by using the pipe to replace the converter?
Robobrainiac
Well-Known Member
Lifetime Member
As far as I know from my research it does not require any tuning. I haven't done it yet to my own but I plan to soon.Does it need to be tuned after you remove the converter
I used the pipe to replace the cat, worked greatDo you need the interior pipe that replaces the converter or were you trying to keep the original design by using the pipe to replace the converter?
No tuning required, runs cooler doesn't sound any louder, slight performance increaseDoes it need to be tuned after you remove the converter
advertisement
Robobrainiac
Well-Known Member
Lifetime Member
I just cut mine out this morning. I can see now where the interior pipe goes.
Robobrainiac
Well-Known Member
Lifetime Member
Some pictures to add to the thread.
I would recommend reading all the way thru before attempting your own modification.
Remove the muffler.
Remove all muffler covers and shields.
Cut this section around the neck.
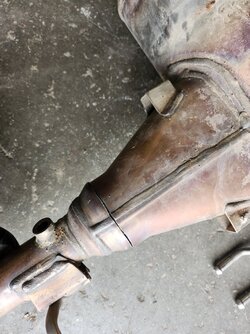
Use persuasive force tapping on the sides of the flange. Alternate repeatedly until the neck separates.
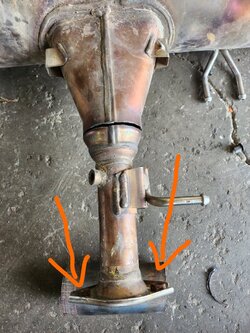
This is what will come out.
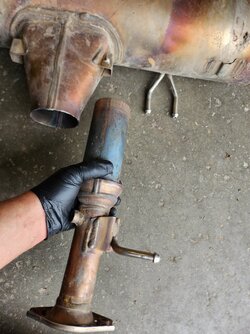
Cut again seperating the catalytic converter from the flange.
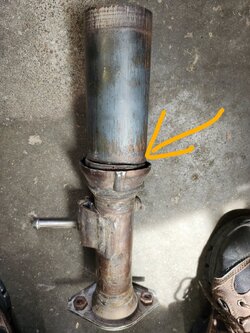
Clean the edges of the cut.
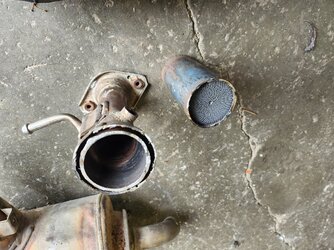
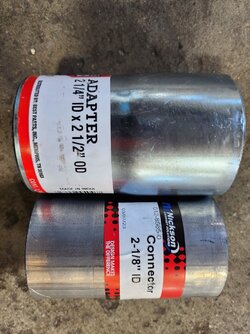
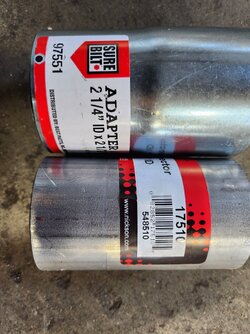
These are the two adapters I used to make my internal pipe.
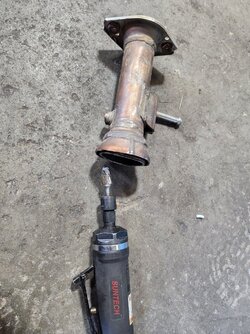
I used a bur bit to clean the edge of the metal lip on the neck piece.
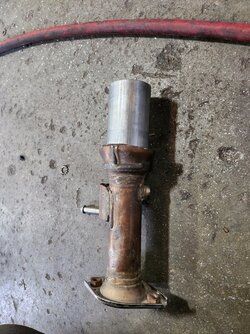
The 2 1/8" connector fits very snug inside the neck. It required a slight tap to seat it. Then weld around the edge of it.
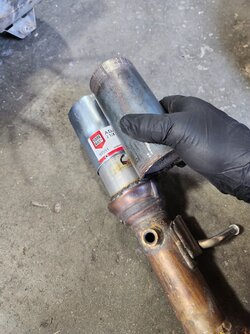
I used the small end of the 2 1/4", 2 1/2" adapter to slide over the 2 1/8" connector. I made it the same length as the catalytic converter used to be. Then weld the seem on it.
Slide the neck back into the muffler. It is a snug fit and required a little tapping. Line everything up and then weld it together.
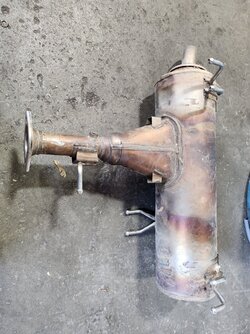
If I were to do it over again. I would have cut slightly to the left 1/4" per the picture (closer towards the neck). I would have cut on the area just where the neck starts to taper down in size. I would cut the catalytic converter in the same spot I did. If I had done it in that manner I would have had more of an internal edge to weld the internal pipe to. It would have given me some extra room for my welding abilities.
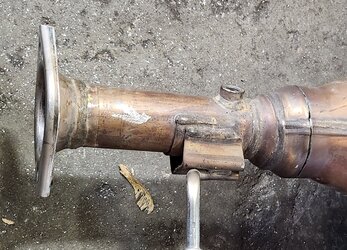
I would recommend reading all the way thru before attempting your own modification.
Remove the muffler.
Remove all muffler covers and shields.
Cut this section around the neck.

Use persuasive force tapping on the sides of the flange. Alternate repeatedly until the neck separates.

This is what will come out.

Cut again seperating the catalytic converter from the flange.

Clean the edges of the cut.

These are the two adapters I used to make my internal pipe.


I used a bur bit to clean the edge of the metal lip on the neck piece.

The 2 1/8" connector fits very snug inside the neck. It required a slight tap to seat it. Then weld around the edge of it.

I used the small end of the 2 1/4", 2 1/2" adapter to slide over the 2 1/8" connector. I made it the same length as the catalytic converter used to be. Then weld the seem on it.

Slide the neck back into the muffler. It is a snug fit and required a little tapping. Line everything up and then weld it together.

If I were to do it over again. I would have cut slightly to the left 1/4" per the picture (closer towards the neck). I would have cut on the area just where the neck starts to taper down in size. I would cut the catalytic converter in the same spot I did. If I had done it in that manner I would have had more of an internal edge to weld the internal pipe to. It would have given me some extra room for my welding abilities.

Last edited:
Didn't you find it was fairly easy once you got into?Some pictures to add to the thread
Remove the muffler.
Cut this section around the neck.
View attachment 394727
Use persuasive force tapping on the sides of the flange. Alternate repeatedly until the neck separates.
View attachment 394728
This is what will come out.
View attachment 394729
Cut again seperating the catalytic converter from the flange.
View attachment 394730
Clean the edges of the cut.
View attachment 394731
I made my first cut closer to the factory weld and the cat just below the factory weld. This allows you to press the internal pipe onto the "cat" pipe and tack it into place, this way when you weld the shell back together you have backing to stop the burn through. May not be necessary if your welding skills are better than mine
Robobrainiac
Well-Known Member
Lifetime Member
Yes, it went smooth after cutting into it. I have not reassembled it yet. I stopped at autozone on my way home after work and found 2 adapters that might work. I am still thinking contemplating my reassembly. I may stop at O'Reilly tomorrow to see if they have anything different before I start to reassemble it.Didn't you find it was fairly easy once you got into?
I made my first cut closer to the factory weld and the cat just below the factory weld. This allows you to press the internal pipe onto the "cat" pipe and tack it into place, this way when you weld the shell back together you have backing to stop the burn through. May not be necessary if your welding skills are better than mine
Is the exhaust tubing, that most seem to be welding in place of the cat, 2.5 inches? If so, 304 stainless is available on Amazon for $29. Think I rather weld stainless than galvanized. And lastly, is that pipe necessary?
tubing
tubing
Robobrainiac
Well-Known Member
Lifetime Member
Here is my thoughts on itIs the exhaust tubing, that most seem to be welding in place of the cat, 2.5 inches? If so, 304 stainless is available on Amazon for $29. Think I rather weld stainless than galvanized. And lastly, is that pipe necessary?
tubing
Inside the neck of the muffler the catalytic converter is set inside of a neck that directs exhaust into the muffler. If you forego the pipe and weld the neck back in place you could create turbulence in the exhaust rather than directing the exhaust as the OE muffler was designed to do.
Does that make sense?
I should have my pipe pieces today at some point. If all goes according to my mental plan it will aid in my inability to weld.
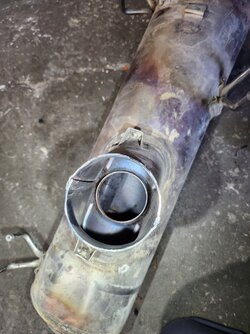
Neck side of the catalytic converter.
Inlet
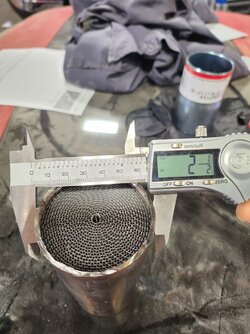
Muffler side of the catalytic converter. The end that seats into the muffler.
Outlet
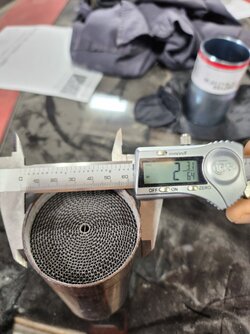
I agree with your assessment about keeping smooth flow,Here is my thoughts on it
Inside the neck of the muffler the catalytic converter is set inside of a neck that directs exhaust into the muffler. If you forego the pipe and weld the neck back in place you could create turbulence in the exhaust rather than directing the exhaust as the OE muffler was designed to do.
Does that make sense?
I should have my pipe pieces today at some point. If all goes according to my mental plan it will aid in my inability to weld.
View attachment 394772
Neck side of the catalytic converter.
Inlet
View attachment 394773
Muffler side of the catalytic converter. The end that seats into the muffler.
Outlet
View attachment 394774
keeping the "interior" pipe should help with keeping things cooler?
I used a 2.5"od exhaust pipe, it slides over the cut off cat pipe and into the exhaust can. Keep the reassembled length the same as it was. I clamped the exhaust flange to my welding table and used a framing square to get things lined up. Someone here suggested taking a zip disk and making slits at the cat end of your replacement pipe to be able to tack it in place. once you start it goes together as easy as it came apart.
Hope this helps
Robobrainiac
Well-Known Member
Lifetime Member
You probably could. I am going to attempt to sell mine when I'm doneWould option 2 be to just gut the Cat (nomo) and put it back as it was? Shouldn’t be too hard to just knock it out and reweld.
advertisement
Similar threads
E
P1000
Under “hood” pics needed
- elarson6772
- Pioneer 1000 Accessories and Modifications 2
- Replies
- 35
- Views
- 2K
- Replies
- 5
- Views
- 401
N
- Replies
- 8
- Views
- 637
- Replies
- 4
- Views
- 410
P1000m5
Tailgate Quick Removal Mod
- Robobrainiac
- Pioneer 1000 Accessories and Modifications
- Replies
- 1
- Views
- 1K


