P500 DIY Underhood storage or, "I made a thing!"

pFive

pFive

Well-Known Member
May 3, 2016
668
1,256
93
Greenwood IN
Ownership

  1. 500
So, I should point out that even though I just purchased a new Pioneer 500, I am a cheap bastard. This thing costs more than the truck I drive everyday, it's almost the most expensive thing I own.

That being said I needed a place to keep a serious tool roll, yank strap and maybe an air compressor and a first aid kit. That's a lot to shove in the trashcan that is wedged under the driver's seat and I am not paying Honda for a plastic ABS bin..cant do it.

So, what are my options? I have seen that cool metal tray that mounts under the hood, and to be honest I could have made one a those but I figured I could squeak out a bit more storage if I tried my hand at building one from scratch with fiberglass, while I have never built anything with fiberglass from scratch I see people custom building speaker forms all the time...how hard could it be right?

So here is what I did.

Step one.

Cut cardboard to fit the bottom and the back, use all the room you can because this will be the outside dimension minus the thickness of the cardboard that you are using.
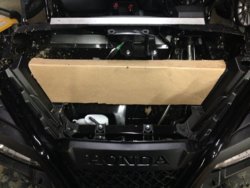
Photo20May200820112014202020AM

Use some strong tape and start laying out and connecting panels together. It's really not critical that it's perfect.
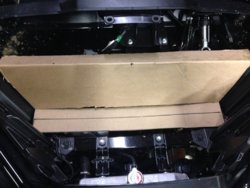
Photo20May200820112021201720AM

Try to get it as close of a fit to the sides as you can, feel free to use tape to fill any voids.
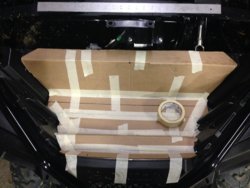
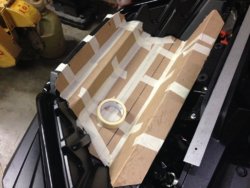
Photo20May200820122015201720PM

Photo20May200820122015202520PM

Now, before we cover our pretty Honda with gooey resin and glass hairs we need to think about how we can protect it and have a release material at the same time.

Trim a trash bag to fit inside the opening leaving enough material so it can fit all of the nooks and cranny's. Only use a SINGLE LAYER OF THE TRASH BAG.
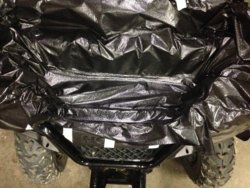
Photo20May200820122045203520PM

Now, we need some sort of temporary adhesive to glue that trash bag down to the form we have made, I found various things on the web but the stores near me did not have much so I needed to fine something that would work and not be expensive. Then it hit me. A cheap and perfect solution, even if I get over spray it will not matter.
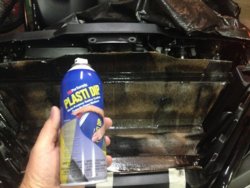
Photo20May20082062015204320PM

Now, spray liberally and give it a bit to get tacky and try to get the plastic stuck to all of the details.
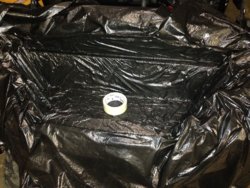
Photo20May20082062023204920PM

Then I went to the local auto parts store and purchased two fiberglass mats this size and two cans of the resin mix (bondo brand, but whatever is on sale)
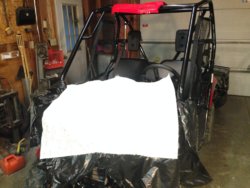
Photo20May20082062059202120PM

Now, put on some GOOD rubber gloves, I like the black Nitrile gloves from harbor freight, this is a must. Resin is tough to get off and the fiberglass needs to be cut into smaller manageable strips so that means handling it at length.

Now, lightly put some resin on the plastic so it holds your strips in place long enough to bury it in resin. DAB DON'T BRUSH! Have a helper and some paint sticks to help you poke it into the cranny's, if you brush too much you will pull the matting apart. Make sure that your corners are using the center of a matting strip and not the edge, the strength comes from the matting and you do not want a mat edge at a corner.
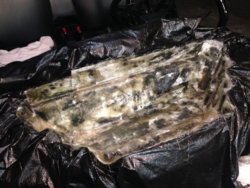
Photo20May20082072054201620PM

It does not need to be purty! Do a few layers and let it sit overnight.
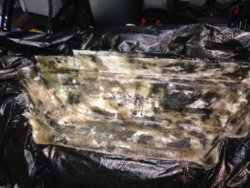
Photo20May20082072054202020PM

The next day push from the bottom and pop it out and get it on a bench or work area.
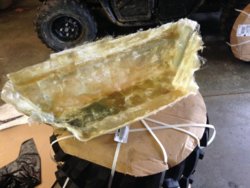
Photo20May200920102043201020AM

Test fit and start marking the top with a marker so it will get close to the hood but not impact it. Then I used a cut off wheel to trip off any frayed edges and layered some more matting and resin on the inside to fill any voids and I also folded some over the top to stiffen the edges some. I used some paint sticks and spring clamps to help hold the folded edges down while they dried. I don't have a pic of the trimmed piece, sorry.
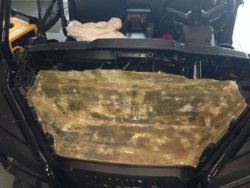
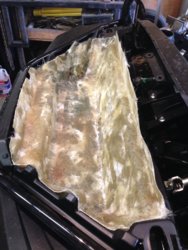
Photo20May200920112020205820AM

Photo20May200920112021201220AM

Now, I wanted to line it with something because raw fiberglass hurts to touch and it needed a little help looking good.

So, I went to Walmart and got some spray adhesive and some heavy felt.
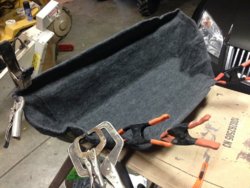
Photo20May201420122006202920PM

And here it is, not bad for a first effort in fiberglass work.

Total cost was about $50.
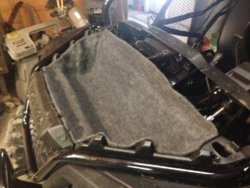
Photo20May20142042023204920PM

Photo20May20142042048200420PM


Stay safe!

Alex
 
Last edited:
rocmar

rocmar

Where Eagles & Angels....Dare to Fly...
Lifetime Member
Dec 21, 2014
4,741
5,776
113
4 CORNERS
Ownership

  1. 500
Nice dude...
but to me.there's really not alot
of room under that hood.
not to mention the hassle of
taking it off...putting it back on
...get a ATV bag that straps to
the rack.....
 
rocmar

rocmar

Where Eagles & Angels....Dare to Fly...
Lifetime Member
Dec 21, 2014
4,741
5,776
113
4 CORNERS
Ownership

  1. 500
Holds alot of stuff

20160213 122322 20150821 105053
 
rocmar

rocmar

Where Eagles & Angels....Dare to Fly...
Lifetime Member
Dec 21, 2014
4,741
5,776
113
4 CORNERS
Ownership

  1. 500
Plus your covering up...
maintanace stuff....
brake fluid....radiator. ..
etc....nice idea..just not
real practical. ..
....not dogging ya Bro...
 
pFive

pFive

Well-Known Member
May 3, 2016
668
1,256
93
Greenwood IN
Ownership

  1. 500
Nice dude...
but to me.there's really not alot
of room under that hood.
not to mention the hassle of
taking it off...putting it back on
...get a ATV bag that straps to
the rack.....


As of right now it has enough room for my tools, tow strap, first aid & air compressor. I guess that can fit on the rack in a big bag...unless you are hauling a dead deer and cooler...and maybe a spare tire.
 
rocmar

rocmar

Where Eagles & Angels....Dare to Fly...
Lifetime Member
Dec 21, 2014
4,741
5,776
113
4 CORNERS
Ownership

  1. 500
You just lift it out... I fail to see a negative here.
That's kool Dude
no negative. ...
If that works for you
kool...
no disrespect
 
JCart

JCart

Well-Known Member
Lifetime Member
Jul 14, 2014
895
2,021
93
Kamloops, BC Canada.
Ownership

  1. 500
Good idea Alex, I like it! I have never done fibre glass work but after seeing this might give it a whirl on other stuff... Already have storage space under there (ammo can) but like your idea for sure.
Thanks for sharing and the felt lining makes it top shelf looking.

jrc
 
O

oldfortyfive

Well-Known Member
Lifetime Member
Dec 6, 2015
606
1,371
93
Illinois
Ownership

  1. 500
So, I should point out that even though I just purchased a new Pioneer 500, I am a cheap bastard. This thing costs more than the truck I drive everyday, it's almost the most expensive thing I own.

Mine cost more than all three of my vehicles combined :rolleyes:
 
  • Like
Reactions: Montecresto
advertisement
Montecresto

Montecresto

Montecresto el segundo
Lifetime Member
Supporting Member
Club Contributor
Jan 17, 2016
22,584
34,172
113
Eastern oklahoma
Ownership

  1. Other Brand

  2. 500

  3. 1000-3

  4. 1000-5

  5. Talon X4
Cool mod Alex, the felt lining is very nice.
 
Last edited:
cthack

cthack

Active Member
Aug 17, 2015
101
198
43
Texarkana, Arkansas
So, I should point out that even though I just purchased a new Pioneer 500, I am a cheap bastard. This thing costs more than the truck I drive everyday, it's almost the most expensive thing I own.

That being said I needed a place to keep a serious tool roll, yank strap and maybe an air compressor and a first aid kit. That's a lot to shove in the trashcan that is wedged under the driver's seat and I am not paying Honda for a plastic ABS bin..cant do it.

So, what are my options? I have seen that cool metal tray that mounts under the hood, and to be honest I could have made one a those but I figured I could squeak out a bit more storage if I tried my hand at building one from scratch with fiberglass, while I have never built anything with fiberglass from scratch I see people custom building speaker forms all the time...how hard could it be right?

So here is what I did.

Step one.

Cut cardboard to fit the bottom and the back, use all the room you can because this will be the outside dimension minus the thickness of the cardboard that you are using.

View attachment 15127

Use some strong tape and start laying out and connecting panels together. It's really not critical that it's perfect.

View attachment 15128

Try to get it as close of a fit to the sides as you can, feel free to use tape to fill any voids.

View attachment 15129

View attachment 15130

Now, before we cover our pretty Honda with gooey resin and glass hairs we need to think about how we can protect it and have a release material at the same time.

Trim a trash bag to fit inside the opening leaving enough material so it can fit all of the nooks and cranny's. Only use a SINGLE LAYER OF THE TRASH BAG.
View attachment 15131

Now, we need some sort of temporary adhesive to glue that trash bag down to the form we have made, I found various things on the web but the stores near me did not have much so I needed to fine something that would work and not be expensive. Then it hit me. A cheap and perfect solution, even if I get over spray it will not matter.

View attachment 15132

Now, spray liberally and give it a bit to get tacky and try to get the plastic stuck to all of the details.

View attachment 15133

Then I went to the local auto parts store and purchased two fiberglass mats this size and two cans of the resin mix (bondo brand, but whatever is on sale)
View attachment 15134

Now, put on some GOOD rubber gloves, I like the black Nitrile gloves from harbor freight, this is a must. Resin is tough to get off and the fiberglass needs to be cut into smaller manageable strips so that means handling it at length.

Now, lightly put some resin on the plastic so it holds your strips in place long enough to bury it in resin. DAB DON'T BRUSH! Have a helper and some paint sticks to help you poke it into the cranny's, if you brush too much you will pull the matting apart. Make sure that your corners are using the center of a matting strip and not the edge, the strength comes from the matting and you do not want a mat edge at a corner.

View attachment 15135

It does not need to be purty! Do a few layers and let it sit overnight.

View attachment 15136

The next day push from the bottom and pop it out and get it on a bench or work area.

View attachment 15137

Test fit and start marking the top with a marker so it will get close to the hood but not impact it. Then I used a cut off wheel to trip off any frayed edges and layered some more matting and resin on the inside to fill any voids and I also folded some over the top to stiffen the edges some. I used some paint sticks and spring clamps to help hold the folded edges down while they dried. I don't have a pic of the trimmed piece, sorry.

View attachment 15138

View attachment 15139

Now, I wanted to line it with something because raw fiberglass hurts to touch and it needed a little help looking good.

So, I went to Walmart and got some spray adhesive and some heavy felt.

View attachment 15140

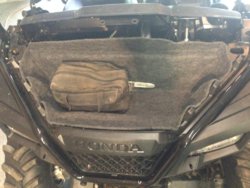
And here it is, not bad for a first effort in fiberglass work.

Total cost was about $50.
View attachment 15141

View attachment 15142


Stay safe!

Alex
That looks great! Thanks for the play by play pics. I bought the Honda storage, looks like you will have more room than I do. I have all sorts of things in mine. Very useful accessory.
 
  • Like
Reactions: Meridian83646
p500fan

p500fan

Well-Known Member
Lifetime Member
Mar 30, 2015
417
354
63
Sand Point, AK
Nice work! I thought it was an informative layout, and the finished product looks great. Good idea. I really liked the felt covering. Makes it look professional.
 
  • Like
Reactions: Meridian83646
Seg

Seg

Well-Known Member
Feb 18, 2016
189
322
63
Notre-Dame de la Salette, Qc, Canada
Ownership

  1. 500
So, I should point out that even though I just purchased a new Pioneer 500, I am a cheap bastard. This thing costs more than the truck I drive everyday, it's almost the most expensive thing I own.

That being said I needed a place to keep a serious tool roll, yank strap and maybe an air compressor and a first aid kit. That's a lot to shove in the trashcan that is wedged under the driver's seat and I am not paying Honda for a plastic ABS bin..cant do it.

So, what are my options? I have seen that cool metal tray that mounts under the hood, and to be honest I could have made one a those but I figured I could squeak out a bit more storage if I tried my hand at building one from scratch with fiberglass, while I have never built anything with fiberglass from scratch I see people custom building speaker forms all the time...how hard could it be right?

So here is what I did.

Step one.

Cut cardboard to fit the bottom and the back, use all the room you can because this will be the outside dimension minus the thickness of the cardboard that you are using.

View attachment 15127

Use some strong tape and start laying out and connecting panels together. It's really not critical that it's perfect.

View attachment 15128

Try to get it as close of a fit to the sides as you can, feel free to use tape to fill any voids.

View attachment 15129

View attachment 15130

Now, before we cover our pretty Honda with gooey resin and glass hairs we need to think about how we can protect it and have a release material at the same time.

Trim a trash bag to fit inside the opening leaving enough material so it can fit all of the nooks and cranny's. Only use a SINGLE LAYER OF THE TRASH BAG.
View attachment 15131

Now, we need some sort of temporary adhesive to glue that trash bag down to the form we have made, I found various things on the web but the stores near me did not have much so I needed to fine something that would work and not be expensive. Then it hit me. A cheap and perfect solution, even if I get over spray it will not matter.

View attachment 15132

Now, spray liberally and give it a bit to get tacky and try to get the plastic stuck to all of the details.

View attachment 15133

Then I went to the local auto parts store and purchased two fiberglass mats this size and two cans of the resin mix (bondo brand, but whatever is on sale)
View attachment 15134

Now, put on some GOOD rubber gloves, I like the black Nitrile gloves from harbor freight, this is a must. Resin is tough to get off and the fiberglass needs to be cut into smaller manageable strips so that means handling it at length.

Now, lightly put some resin on the plastic so it holds your strips in place long enough to bury it in resin. DAB DON'T BRUSH! Have a helper and some paint sticks to help you poke it into the cranny's, if you brush too much you will pull the matting apart. Make sure that your corners are using the center of a matting strip and not the edge, the strength comes from the matting and you do not want a mat edge at a corner.

View attachment 15135

It does not need to be purty! Do a few layers and let it sit overnight.

View attachment 15136

The next day push from the bottom and pop it out and get it on a bench or work area.

View attachment 15137

Test fit and start marking the top with a marker so it will get close to the hood but not impact it. Then I used a cut off wheel to trip off any frayed edges and layered some more matting and resin on the inside to fill any voids and I also folded some over the top to stiffen the edges some. I used some paint sticks and spring clamps to help hold the folded edges down while they dried. I don't have a pic of the trimmed piece, sorry.

View attachment 15138

View attachment 15139

Now, I wanted to line it with something because raw fiberglass hurts to touch and it needed a little help looking good.

So, I went to Walmart and got some spray adhesive and some heavy felt.

View attachment 15140

And here it is, not bad for a first effort in fiberglass work.

Total cost was about $50.

View attachment 15141

View attachment 15142


Stay safe!

Alex
Nice job! With my powersteering and other electrical stuff, I was trying to figure out how to use the remaining free space. I like your idea!
 
S

Sledge

Guest
Got an idea for you, Alex-

Yours would make a perfect form to make more. Since yours is a bit undersize due to the cardboard, it should be perfect for molding new ones over the outside, right?

You could make those rascals pretty quickly now.

I'd sure buy one.

Edit: I've done some Fiberglas work (surfboards and boats), and I wonder if you might find woven cloth friendlier to work with than mat.

Joe
 
Last edited by a moderator:
pFive

pFive

Well-Known Member
May 3, 2016
668
1,256
93
Greenwood IN
Ownership

  1. 500
I have seen a lot of stereo guys use a blanket for larger builds... But, I don't think I want to make any more, at least till winter. :)

Also, the cardboard only altered the front and back, the sides were just covered in trashbag glued to the black honda plastic.
 

About us

  • Our community has been around for many years and pride ourselves on offering unbiased, critical discussion among people of all different backgrounds. We are working every day to make sure our community is one of the best.

User Menu

Buy us a beer!

  • Lots of time and money has gone into making sure the community is running the best software, best designs, and all the other bells and whistles. Care to buy us a beer? We'd really appreciate it!

    Beer Fund!

    Club Membership!