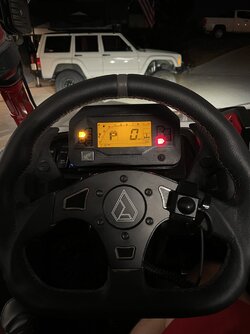
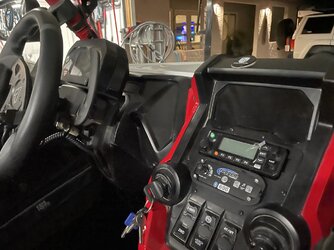
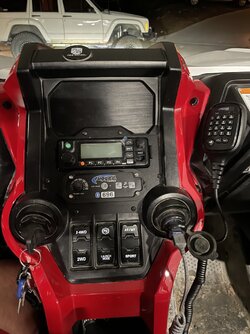
Guage pod relocation done šŸ˜€

PapaC

PapaC

Well-Known Member
Dec 12, 2021
55
334
53
W. Wa
Ownership

  1. Talon X
Big thanks to sspeederr for the kit. I took my time and got it done without too much difficulty. ;) I soldered, and heat shrunk the wire connections, which I highly recommend. I have one of those helping hand alligator clip thingys and that helps big time. Use flux! It helps. I thought I was home free, but then when went to put the pod on the steering column, I couldn't get the rubber boot through the hole. I ended up using a heat gun to soften it up, and finally got it.

i Used an engine turned pattern vinyl wrap on the switch plate. Thought it came out great. The secret to that is to sand the plastic to 220, then spray adhesion promoter on it. Then the vinyl sticks great.

Iā€™ve got a bunch of other stuff to add, so itā€™s on to the next project! Pics-

5D965C02 A155 4861 9777 617E0A40D54F
1E97ACD7 31A4 491B BDD2 470007306770
AF50EFB4 3E11 4DC3 AB8D 5405C4129194
 
Enigma

Enigma

East Tennessee Mudder
Lifetime Member
Mar 22, 2020
366
838
93
Rocky Top
Ownership

  1. Do not currently own
Look great. How much time did it take to set that up?
 
  • Like
Reactions: Remington
PapaC

PapaC

Well-Known Member
Dec 12, 2021
55
334
53
W. Wa
Ownership

  1. Talon X
Look great. How much time did it take to set that up?
I have a saying about myself; ā€œIā€™m slow, but Iā€™m goodā€. :p

It was about 4 hours for me, but Iā€™m sure it could be done quicker. I had covered the switch plate earlier, so it was ready to go.

One thing I did also that I didn't mention, or get a pic of was on the bracket that held the gauge box, and now holds the switch plate I cut out a good portion of it to allow easier access when I thread the switch connectors through. Iā€™m reasonably sure I can now get the rocker switch connectors through, connect them, then snap the switches in place without removing it again. Moot point of course if you use alternate locations for switches and use the solid plate.

I recommend this for sure. Canā€™t tell you how many times while driving I looked down at the steering wheel to get info. Problem solved!
 
sspeederr

sspeederr

Well-Known Member
Lifetime Member
Supporting Member
May 10, 2020
391
661
93
24701
Ownership

  1. Other Brand

  2. Talon R
Great write up @PapaC thanks for the kind words I realize my instructions may leave for some questions for certain things reason my mail box is always open if anyone have any questions I have since learned that it easier to feed your modified harness threw the pod rather then trying to stuff the boot I have updated this.
but thanks again enjoy
 
Enigma

Enigma

East Tennessee Mudder
Lifetime Member
Mar 22, 2020
366
838
93
Rocky Top
Ownership

  1. Do not currently own
I have a saying about myself; ā€œIā€™m slow, but Iā€™m goodā€. :p

It was about 4 hours for me, but Iā€™m sure it could be done quicker. I had covered the switch plate earlier, so it was ready to go.

One thing I did also that I didn't mention, or get a pic of was on the bracket that held the gauge box, and now holds the switch plate I cut out a good portion of it to allow easier access when I thread the switch connectors through. Iā€™m reasonably sure I can now get the rocker switch connectors through, connect them, then snap the switches in place without removing it again. Moot point of course if you use alternate locations for switches and use the solid plate.

I recommend this for sure. Canā€™t tell you how many times while driving I looked down at the steering wheel to get info. Problem solved!
Very nice work. Thanks
 
Wood5791

Wood5791

New Member
Jan 3, 2022
8
14
3
Santee, CA
Ownership

  1. Talon X4 LV
@sspeederr did a very nice job on this kit especially for the price point. Instructions are straight forward and easy to follow. When it comes to routing the wiring its kinda some guess work but I plan doing a lot of clean up after I had a stereo shop do race radios and a Stage 5 MBQUARTZ sound system. Definite gonna add dual battery set up with all the extra stuff now. @PapaC about the same time for me as well. The 3 screws for the original cluster location took me 45 min. to get back in.

5EEA820C F056 486F A2F0 667E6C3285FE D8E05F09 F288 4EE0 BEC2 E91C9F54C3DE 17238581 C635 484B 92FE 692D8BC6C3F0
 

About us

  • Our community has been around for many years and pride ourselves on offering unbiased, critical discussion among people of all different backgrounds. We are working every day to make sure our community is one of the best.

User Menu

Buy us a beer!

  • Lots of time and money has gone into making sure the community is running the best software, best designs, and all the other bells and whistles. Care to buy us a beer? We'd really appreciate it!

    Beer Fund!

    Club Membership!