P500 P500 Brake pad replacement with photos

Mudder

Mudder

NTC Ambassador of Walls
Lifetime Member
Oct 1, 2016
11,643
87,838
113
Georgia
Ownership

  1. Other Brand

  2. 500
11FB88CF 3F91 44AE 9449 156442542CB8
First time stumbling through replacement, open for comments and corrections, especially any good tips. Replaced with aftermarket brass pads. Hoping the ipad pics help for reference and we can edit to make this a Resource (@Hondasxs ?). I will edit based on member input. Thanks in advance.


Tools used, 12 and 17 mm wrench, caliper tool, clamp, brush for cleaning. 3 cups of coffee.
 
Last edited:
Mudder

Mudder

NTC Ambassador of Walls
Lifetime Member
Oct 1, 2016
11,643
87,838
113
Georgia
Ownership

  1. Other Brand

  2. 500
C321269D 7BEC 4F7A AA4C 94C146FF914D
1E17A47C 9BF2 4BB7 B6A1 DB29C103624A


Front pads are very easy, hold the caliper bolts from spinning with the 17 mm and remove the two bolts with the 12 mm wrench. The plastic mud guard can be pushed away to pull the caliper. Support the caliper.

An excellent detailed thread on the Front replacement by @ehart814
P500 - How to: Pioneer 500 front brake pad replacement
 
Last edited:
Mudder

Mudder

NTC Ambassador of Walls
Lifetime Member
Oct 1, 2016
11,643
87,838
113
Georgia
Ownership

  1. Other Brand

  2. 500
F0A9D608 C1CD 4661 883E 7773FA0BFEB9
B09FAB2A A36A 485B 83CD 77052541F2F8
Rear pads are more involved due to disassembly and access. Before starting, this pic shows the components. The blue part and pads with thin plates on the forward pad are of note. The green is the caliper with X grooves that needs to be screwed in, (do not press in like the front caliper). It appears this screw in caliper is a parking brake mechanism design.
Skid plate removed for access to lower bolts
 
Last edited:
Mudder

Mudder

NTC Ambassador of Walls
Lifetime Member
Oct 1, 2016
11,643
87,838
113
Georgia
Ownership

  1. Other Brand

  2. 500
FECBB4CA 6A5D 4383 9041 5000C96A9CDF
91F96FB3 3060 437F B7DA 84EAD9CF4904
F6EBEF1C 1895 46D1 A5CB FC0F2C80DE43
Remove the two caliper bolts.
 
  • Like
Reactions: Gassygordo
Mudder

Mudder

NTC Ambassador of Walls
Lifetime Member
Oct 1, 2016
11,643
87,838
113
Georgia
Ownership

  1. Other Brand

  2. 500
E4D0B189 9507 42BC 8810 BE93B804D70A
D578AC14 F405 4489 A9DF A6AF210157C3
During removal, the thin pad plates may fall, along with the clips as shown in the parts diagram. The caliper piston is now visible. Notice the round tip (red circled) on the forward pad back which must line up with the caliper groove.
 
Last edited:
  • Like
Reactions: Gassygordo
Mudder

Mudder

NTC Ambassador of Walls
Lifetime Member
Oct 1, 2016
11,643
87,838
113
Georgia
Ownership

  1. Other Brand

  2. 500
434913C2 E03F 4096 A375 13B90BBCB0EE
I removed the entire caliper assembly for easy access and photos, the two bolts in top photo with red paint. Screw in the piston to account for the new thicker pads. The block tool helped, just try the different sides to find a fit. For OEM pads, ensure the groove is aligned to allow the tip on the forward pad to fit in a groove.

146212EA 9C8E 4899 9330 D62E30C00169
 
Last edited:
  • Like
Reactions: Gassygordo
Mudder

Mudder

NTC Ambassador of Walls
Lifetime Member
Oct 1, 2016
11,643
87,838
113
Georgia
Ownership

  1. Other Brand

  2. 500
63D9EC7C 7279 4B7B AF64 D98BA7CD7E72
F8CDD61A BDAC 4FD4 91E7 69E10CA8963B
C230EE5E 52BE 4671 8E27 2F7A956B1774
Install pads and clips, attention to detail.
 
  • Like
Reactions: Gassygordo
Mudder

Mudder

NTC Ambassador of Walls
Lifetime Member
Oct 1, 2016
11,643
87,838
113
Georgia
Ownership

  1. Other Brand

  2. 500
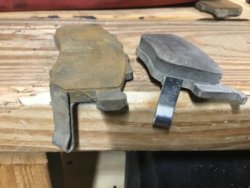
1600 miles, muddy riding. Pic show front pads worn out but rear pads looked good. I will not likely go through the effort of the rear pads again until I go through at least two future sets of front pads.

Edits and tips welcomed to help make this thread helpful to others.

Some related links, Thanks to @ehart814 and @Hondasxs for threads, @DG Rider for tool link.
P500 - How to: Pioneer 500 front brake pad replacement (very detailed)
P500 - Rear brake pads
Caliper Tool.
https://www.amazon.com/ABN-Brake-Piston-Remover-Drive/dp/B00YFT1SXU/?tag=sxsweb24-20

B1954BDA 36CA 4E27 B6B1 7835424E5D8A
 
Last edited:
S

snakeriver

Well-Known Member
Oct 11, 2018
272
596
93
Clarkston Wa
Ownership

  1. 500
1600 miles, muddy riding. Front pads wore out, but rear pads looked good. I will not likely go through the effort of the rear pads again until I go through at least two future sets of front pads.

Edits and tips welcomed to help make this thread helpful to others.

Some related links, Thanks to @ehart814 and @Hondasxs for threads.
P500 - How to: Pioneer 500 front brake pad replacement (very detailed)
P500 - Rear brake pads
Tool.
https://www.amazon.com/ABN-Brake-Piston-Remover-Drive/dp/B00YFT1SXU/?tag=sxsweb24-20

View attachment 106653
Great job on the photos and instruction.
 
advertisement
Rustneversleeps

Rustneversleeps

Well-Known Member
Oct 30, 2018
302
582
93
Talon,New Brunswick,Canada
Ownership

  1. 500
great job man...is that square tool come with the bike or is it purchased ...first time i heard of brass pads would that be like brass on steel...
 
  • Like
Reactions: Smitty335
JJdog

JJdog

Member
Aug 26, 2018
23
47
13
BC, Canada
Ownership

  1. 500
1600 miles, muddy riding. Pic show front pads worn out but rear pads looked good. I will not likely go through the effort of the rear pads again until I go through at least two future sets of front pads.

Edits and tips welcomed to help make this thread helpful to others.

Some related links, Thanks to @ehart814 and @Hondasxs for threads, @DG Rider for tool link.
P500 - How to: Pioneer 500 front brake pad replacement (very detailed)
P500 - Rear brake pads
Caliper Tool.
https://www.amazon.com/ABN-Brake-Piston-Remover-Drive/dp/B00YFT1SXU/?tag=sxsweb24-20

View attachment 106653
Great photos and explanation.
One tip I might offer-The slider pins on the calipers should be pulled out from their little boots and cleaned and regreased. You should be able to just pull them out as the boot ends seat in a groove on the pin. Over time you get water and crud in there and the slider pins will stick and so the pad doesn't retract when you let off the brakes. This causes premature or uneven wear of the pads. There are many brands of grease suitable, it is usually called "Disc Brake Grease" and it is compatible with the rubber boots. You can see the pins and rubber boots in your photos. I hope my explanation makes sense.
 
Bastardchild

Bastardchild

Well-Known Member
Nov 3, 2016
1,978
7,251
113
Orange Heights, fl
Ownership

  1. 500

  2. 1000-5
Great job man! I'll have to try it that way next time. I normally remove the 2 bolts holding the whole caliper to the knuckle and flip the caliper upside down pull the old pads out, stick the new pads in, then stick 2 boxed-end wrench heads between the new pads and squeeze the wrench handles together and it spreads the new pads apart by pushing the piston in so I can slip it back over the rotor. Then I bolt it back on with the 2 bolts. I also havent tried the brass pads yet either, I need to do that. Excellent write up!
 
futzin

futzin

Well-Known Member
Lifetime Member
Sep 10, 2019
4,129
30,680
113
Kentucky
Ownership

  1. 500

  2. 520
Are the rear brake pads visually inspectable without disassembly?
They don't seem to be.
 
advertisement

About us

  • Our community has been around for many years and pride ourselves on offering unbiased, critical discussion among people of all different backgrounds. We are working every day to make sure our community is one of the best.

User Menu

Buy us a beer!

  • Lots of time and money has gone into making sure the community is running the best software, best designs, and all the other bells and whistles. Care to buy us a beer? We'd really appreciate it!

    Beer Fund!

    Club Membership!