Neohio

Neohio

Beast of the East
Lifetime Member
Supporting Member
Club Contributor
Dec 22, 2016
21,536
91,133
113
Painesville Ohio
Ownership

  1. 1000-5
Came home to a package on my stoop, which was 3 days late. i think my local USPS misdelivered it Saturday and it took a few days to get back to me.
Anyways, the connectors listed in OP are indeed correct for the 2016 Pioneer. They are expensive by the time you factor in shipping, but i have other options coming that i will confirm or deny when they are delivered. Chalmers is still under warranty, and well, I should have waited and just sent him in under warranty. But I got antsy when I started reading that the entire harness was replaced when they find a bad wire. Well...... seeing it took them almost 2 weeks to install 2 front tires, alignment and adjust the turf cables, I figured I would be safer doing the repair myself. I tried to go thru the Honda common service manual to see where Honda stands on wiring repairs. Crimp vs solder. Tonight I crimped the wires with uninsulated butt connectors, put some liquid elec tape on it. Tomorrow when the tape cures, I will slide up the heat shrink and shrink it. Then grab my trusty 3m tape and wrap the harness.

Hope this helps someone in the future. I didn't take pics during diagnosis, but i can mock some up if there is interest. i will confirm the cbr harness when it arrives. All the pictures online show it to be correct, but won't know until it is in my hands.
 
Last edited:
Neohio

Neohio

Beast of the East
Lifetime Member
Supporting Member
Club Contributor
Dec 22, 2016
21,536
91,133
113
Painesville Ohio
Ownership

  1. 1000-5
Got the phone call from my dealer this morning that the harness (32104-MJE-D00) I ordered is ready for pickup. I had nothing to do for lunch, so I ran over to grab it. I don't really need it anymore, but they charged my card on file when they ordered it, so I own it!
The harness definitely has 4 of the proper connectors on it for our injectors. So if anyone needs some to repair their rigs. I have 4 spares sitting in the toolbox I keep in the bed.
 
Neohio

Neohio

Beast of the East
Lifetime Member
Supporting Member
Club Contributor
Dec 22, 2016
21,536
91,133
113
Painesville Ohio
Ownership

  1. 1000-5
@Wiggins
Follow the same steps i did here.
You threw a code 12. Which is front injector.
 
Neohio

Neohio

Beast of the East
Lifetime Member
Supporting Member
Club Contributor
Dec 22, 2016
21,536
91,133
113
Painesville Ohio
Ownership

  1. 1000-5
4A215BE9 F258 4644 916C C15A865E5638
78C81232 05AB 46C5 A347 6A28A020F606
 
B

Brennon

Member
Oct 17, 2015
17
26
13
Fort Myers, FL
Thank you, Thank you, Thank you for this post. Just had same symptoms on a buddies P1000, had the exact same wire break down in the connector.
 
  • Like
Reactions: tjtrust
Neohio

Neohio

Beast of the East
Lifetime Member
Supporting Member
Club Contributor
Dec 22, 2016
21,536
91,133
113
Painesville Ohio
Ownership

  1. 1000-5
Thank you, Thank you, Thank you for this post. Just had same symptoms on a buddies P1000, had the exact same wire break down in the connector.
Glad it helped you out.
Was it easy to find searching tags? Would you suggest adding more to help other guys in the future?
 
Neohio

Neohio

Beast of the East
Lifetime Member
Supporting Member
Club Contributor
Dec 22, 2016
21,536
91,133
113
Painesville Ohio
Ownership

  1. 1000-5
@zmnypit
Post 24 has the testing procedure.
 
K

Kamakaze

New Member
Feb 3, 2019
1
0
1
USoA
Ownership

  1. Big Red
Well, well, well...
..got here after ~2 hrs searching the "interwebs" for help getting a buddy's machine to run correctly. It's signaling with a "long - short short short" PGM-FI warning light on the dash = malfuncton indicator light 13 - REAR INJECTOR)

Will report back once I've tried the above diagnostics...THANK YOU Neohio ! ! !

* * * UPDATE 2/7/19 * * * Conducted the 5-step diagnostic shared by Neohio and found: No continuity/resistance in the rear fuel injector's green/blue wire
WITH BONUS : HONDA HAS RECALLED THE PIONEER for a seperate problem ! !
 
Last edited:
Neohio

Neohio

Beast of the East
Lifetime Member
Supporting Member
Club Contributor
Dec 22, 2016
21,536
91,133
113
Painesville Ohio
Ownership

  1. 1000-5
Well, well, well...
..got here after ~2 hrs searching the "interwebs" for help getting a buddy's machine to run correctly.
Will report back once I've tried the above diagnostics...
Seeing as you bumped the thread, let us know what other tags might help someone find this thread faster in the future.


I did figure out how to take the plug apart.

IMG 20190107 2004041

The lock (grey piece) needs to be removed from the connector so you can access the pins/terminals.

IMG 20190107 2004187

Grab a small flat jewelers screwdriver and pry as shown above.

IMG 20190107 2005328

Connector with lock removed.

IMG 20190107 2010478

I cut away some of the plastic on this connector to try and show where the terminal lock is located.
Slide your screwdriver down beside the terminal, slowly apply a twisting motion to disengage the lock from the pin.
IMG 20190107 2012210

Crap picture, but trying to show where the terminal/pin locks into the connector.

If anyone wants pictures on how to crimp a new pin on, I will snap some pictures next time I am wiring.
 
Last edited:
advertisement
ch33br0h

ch33br0h

Well-Known Member
Lifetime Member
Jul 7, 2018
130
369
63
Jardín, Antioquia - Colombia, South America!
Ownership

  1. 1000-5
@Hondasxs has created a repair harness for this!
Pioneer fuel injector wire repair kit.


Just put an order in for some of these!
I have only experienced (2) random shut downs but everything matches exactly what is described here.
Will be ready for the next one to record the codes, but no matter what -you cant loose by having spare parts.

thank you all!
 
Neohio

Neohio

Beast of the East
Lifetime Member
Supporting Member
Club Contributor
Dec 22, 2016
21,536
91,133
113
Painesville Ohio
Ownership

  1. 1000-5
Just put an order in for some of these!
I have only experienced (2) random shut downs but everything matches exactly what is described here.
Will be ready for the next one to record the codes, but no matter what -you cant loose by having spare parts.

thank you all!
I'm told this is a common problem among all model years Pioneers. I haven't heard anything about a 2020 yet, but have heard the occasional 2019 has this issue.
 
Haldog77

Haldog77

NTC's Mafia Enforcer (Ret.)
Lifetime Member
Sep 30, 2019
41,024
352,241
113
Bossier City, Louisiana
Ownership

  1. 1000-3
I'm told this is a common problem among all model years Pioneers. I haven't heard anything about a 2020 yet, but have heard the occasional 2019 has this issue.
Neohio, do you carry a spare kit when you ride?
 
Neohio

Neohio

Beast of the East
Lifetime Member
Supporting Member
Club Contributor
Dec 22, 2016
21,536
91,133
113
Painesville Ohio
Ownership

  1. 1000-5
Neohio, do you carry a spare kit when you ride?
I replaced the one bad plug in question when this issue first happened a few years back. I haven't had an issue since. I do keep one in my truck usually when out riding. More for any potential person I come across vs an issue with my machine again.
 
  • Like
Reactions: Haldog77
jtucker

jtucker

Active Member
Lifetime Member
Jan 12, 2017
118
118
43
North GA
Ownership

  1. 1000-5

  2. Talon R
I replaced the one bad plug in question when this issue first happened a few years back. I haven't had an issue since. I do keep one in my truck usually when out riding. More for any potential person I come across vs an issue with my machine again.
What repair book do you have and where did you get it
 
ch33br0h

ch33br0h

Well-Known Member
Lifetime Member
Jul 7, 2018
130
369
63
Jardín, Antioquia - Colombia, South America!
Ownership

  1. 1000-5
Hi folks,
Welp, happy to report that I received my (3) connectors just one day before all movement down here was frozen with the exception of food and medicine. The amount of time to receive is no reflection on the original shipment, its simply cause I'm really far out and it can take up to 4 weeks for something to reach once it leaves the states.

-Anyway, today was the day!
I shut down (4) times as I was climbing a hill and knew it was time to get in there.
My Pioneer had the random shut downs, followed by the (1) steady then (3) fast engine lights.
Overall in the last month it began to not run as smooth, also had rough engine starts.
I followed the instructions in the thread, did the swap in about 30-45 minutes and started the engine before putting it back together.
Woosh, engined fired up, smooth idle, I put things back together went for a spin and I'm super happy!
For me the engine runs noticeably smoother and the RPMs climb with ease.

Thank you to all for sharing the info and here I now share what I found when I took off the seat back and rubber shield.
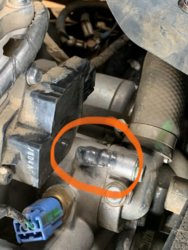
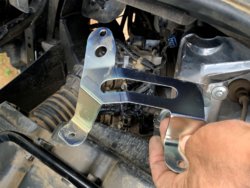
This bracket, was just hanging out in there... not attached to anything and I have no clue what it could be. It was wedges between the engine/seat back and in the picture with the red circle you can see where it was rubbing.

Any clue what it could be?

Honda01 Honda02
 
TripleB

TripleB

Well-Known Member
Lifetime Member
Aug 13, 2018
16,282
147,446
113
Caryville, Tennessee
Ownership

  1. 1000-3

  2. 1000-5
Hi folks,
Welp, happy to report that I received my (3) connectors just one day before all movement down here was frozen with the exception of food and medicine. The amount of time to receive is no reflection on the original shipment, its simply cause I'm really far out and it can take up to 4 weeks for something to reach once it leaves the states.

-Anyway, today was the day!
I shut down (4) times as I was climbing a hill and knew it was time to get in there.
My Pioneer had the random shut downs, followed by the (1) steady then (3) fast engine lights.
Overall in the last month it began to not run as smooth, also had rough engine starts.
I followed the instructions in the thread, did the swap in about 30-45 minutes and started the engine before putting it back together.
Woosh, engined fired up, smooth idle, I put things back together went for a spin and I'm super happy!
For me the engine runs noticeably smoother and the RPMs climb with ease.

Thank you to all for sharing the info and here I now share what I found when I took off the seat back and rubber shield.
This bracket, was just hanging out in there... not attached to anything and I have no clue what it could be. It was wedges between the engine/seat back and in the picture with the red circle you can see where it was rubbing.

Any clue what it could be?

View attachment 193206 View attachment 193207
There is push pins that go through the thin rubber that's behind your back rest and Into that bracket. The thin rubber is hondas so called fix for cab heat. I found the bracket when I was adding some foil insulation under the seat and backrest. U never even know it's there when u remove those push pins. I just happen to see it when I was putting it back together
 
ch33br0h

ch33br0h

Well-Known Member
Lifetime Member
Jul 7, 2018
130
369
63
Jardín, Antioquia - Colombia, South America!
Ownership

  1. 1000-5
There is push pins that go through the thin rubber that's behind your back rest and Into that bracket. The thin rubber is hondas so called fix for cab heat. I found the bracket when I was adding some foil insulation under the seat and backrest. U never even know it's there when u remove those push pins. I just happen to see it when I was putting it back together

Excellent!
thank you so much for the info and I'm going to remove the back again to see if I can get that bracket properly mounted.
 
  • Like
Reactions: TripleB
advertisement

About us

  • Our community has been around for many years and pride ourselves on offering unbiased, critical discussion among people of all different backgrounds. We are working every day to make sure our community is one of the best.

User Menu

Buy us a beer!

  • Lots of time and money has gone into making sure the community is running the best software, best designs, and all the other bells and whistles. Care to buy us a beer? We'd really appreciate it!

    Beer Fund!

    Club Membership!