NewHere2
Village Idiot In Training
Lifetime Member
Supporting Member
After constructing and installing the battery box / storage compartment, I tackled the electrical hookups. My priority was having a more usable switch set up, but trying to keep everything looking "factory". Leaving the area under the hood open for a heater install later. I purchased a switch plate and switches on line. The switch plate was from "mystic1219" here on the forum. He has several models available for the 2018 - 700. He makes a quality product at a reasonable price. He knows what he is doing on these Hondas, as compared to other companies I checked with. The switches came from OTRATTW Switches.
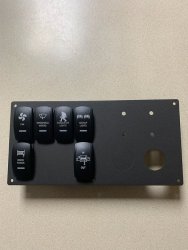
I modified this plate to fit my needs. The most time consuming part of the install was installing another volt meter into my dash switch plate. CAUTION ! The open area on the plate beneath the Wiper Switch and the Sasquatch lights contains a brace under the dash on my 2018 Pioneer. There is limited room there, that's why I used the horizontal volt meter that comes with the Honda Auxiliary kit.
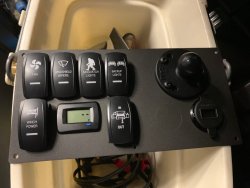
Purchasing a plate having a blank spot in the plate to avoid that support bracket under the dash is the best way to go for my 2018. Makes the install much easier.
I drilled out the rivets on the existing dash warning plate, and used a heat gun to loosen the glue holding the plate. Was able to remove the old plate without damage to it.
After aligning the new plate, I used a metal scribe to mark each switch cut out. Then I marked the outer most corners of all the switches and cut out that rectangle. Tried using my Roto-zip tool to make the cuts. The Roto-zip had way to much RPM for the light plastic and was out of control. I mounted the 1/8" Sabrecut Roto-zip bit into my variable speed drill. WOW ! did that make a difference. I was able to cut the rectangle out with no problems due to the slower speed.
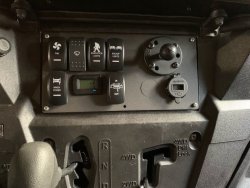
I left as much of the dash material as I could intact. Trying to keep that area as strong as possible. Think I ended up with about 9/16" of support around the larger rectangular hole. The other holes were cut slightly larger than needed for ease of mounting. Notice the vertical brace under the dash! I covered it with electrical tape for extra insurance.

So now I have switches important to me, a GPS holder, phone chargers, and a volt meter for each battery. They are installed where I can easily reach them.
Keeping with the factory look, I purchased the Honda Auxiliary Wire Harness P/N 0SA30-HL3-100. Is it worth the extra money? You will have to be the judge on that one. This was installed under the hood per the instructions. I tapped into the chassis fuse block onto the white/black wire as instructed. This allows me to shut everything off with the key.
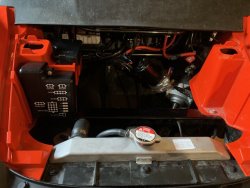
The main exception to the factory install instructions is, I ran the main power feed cable back to my battery isolator post that feeds my second battery. This allows all my accessories ( Wiper kit, light bars, Auxiliary lights, winch, and future heater ) to be run off my 2nd. battery. Leaving the stock battery just for starting.
I installed a TRU Battery Isolator on a homemade non conductive mount under the passenger seat. This is in the area next to the stock battery and in front of the tool kit holder. The mount had to be lowered to avoid contact with the seat. This location also kept my battery leads to a minimum. In the photo, the Battery Isolator (with 2 red caps and wires) is next to my winch contactor. Keeping these two items close together saved me lots of wire. With this set up, both batteries can be charged whenever they call for more juice, but one battery can not drain the other. It's two separate systems. To me, that's extra safety for an "Old Fart" !
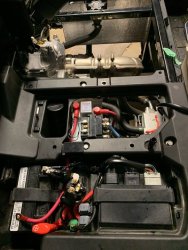
I ran the 2nd. battery wires up under the front of the main seat frame, across and over to the storage box / battery holder. These 2 - 4ga. wires were encased in a heat reflective protective sheathing purchased on line. The positive (+) wire was attached to a 100 amp waterproof circuit breaker. This circuit breaker can also serve as a disconnect allowing the battery to be completely disconnected. The negative (-) wire was connected directly to the battery and the frame ground.
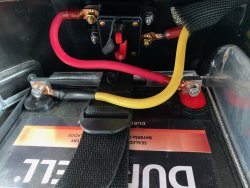
Again, I used the Honda fuse panel and wiring to maintain a nice clean factory look. I hooked the factory accessory harness directly to the 2nd. battery. That way nothing is drawing electricity from the starting battery. All my lights, winch, and fan are fused and have any required relays within the factory accessory box and are drawing off the 2nd. battery. The 2nd. battery has more than twice the reserve capacity of the starting battery. Both batteries are AGM's so they charge better.
In an emergency, a sort jumper wire between the two contact studs (red caps) on the Battery Isolator is all that is needed to jump either battery.


My next project is designing and installing a winch mount so I can winch off the front or rear of the Pioneer using one winch. Most of my riding is done alone and in isolated areas. I'll post that later.

I modified this plate to fit my needs. The most time consuming part of the install was installing another volt meter into my dash switch plate. CAUTION ! The open area on the plate beneath the Wiper Switch and the Sasquatch lights contains a brace under the dash on my 2018 Pioneer. There is limited room there, that's why I used the horizontal volt meter that comes with the Honda Auxiliary kit.

Purchasing a plate having a blank spot in the plate to avoid that support bracket under the dash is the best way to go for my 2018. Makes the install much easier.
I drilled out the rivets on the existing dash warning plate, and used a heat gun to loosen the glue holding the plate. Was able to remove the old plate without damage to it.
After aligning the new plate, I used a metal scribe to mark each switch cut out. Then I marked the outer most corners of all the switches and cut out that rectangle. Tried using my Roto-zip tool to make the cuts. The Roto-zip had way to much RPM for the light plastic and was out of control. I mounted the 1/8" Sabrecut Roto-zip bit into my variable speed drill. WOW ! did that make a difference. I was able to cut the rectangle out with no problems due to the slower speed.
I left as much of the dash material as I could intact. Trying to keep that area as strong as possible. Think I ended up with about 9/16" of support around the larger rectangular hole. The other holes were cut slightly larger than needed for ease of mounting. Notice the vertical brace under the dash! I covered it with electrical tape for extra insurance.
So now I have switches important to me, a GPS holder, phone chargers, and a volt meter for each battery. They are installed where I can easily reach them.

Keeping with the factory look, I purchased the Honda Auxiliary Wire Harness P/N 0SA30-HL3-100. Is it worth the extra money? You will have to be the judge on that one. This was installed under the hood per the instructions. I tapped into the chassis fuse block onto the white/black wire as instructed. This allows me to shut everything off with the key.

The main exception to the factory install instructions is, I ran the main power feed cable back to my battery isolator post that feeds my second battery. This allows all my accessories ( Wiper kit, light bars, Auxiliary lights, winch, and future heater ) to be run off my 2nd. battery. Leaving the stock battery just for starting.
I installed a TRU Battery Isolator on a homemade non conductive mount under the passenger seat. This is in the area next to the stock battery and in front of the tool kit holder. The mount had to be lowered to avoid contact with the seat. This location also kept my battery leads to a minimum. In the photo, the Battery Isolator (with 2 red caps and wires) is next to my winch contactor. Keeping these two items close together saved me lots of wire. With this set up, both batteries can be charged whenever they call for more juice, but one battery can not drain the other. It's two separate systems. To me, that's extra safety for an "Old Fart" !

I ran the 2nd. battery wires up under the front of the main seat frame, across and over to the storage box / battery holder. These 2 - 4ga. wires were encased in a heat reflective protective sheathing purchased on line. The positive (+) wire was attached to a 100 amp waterproof circuit breaker. This circuit breaker can also serve as a disconnect allowing the battery to be completely disconnected. The negative (-) wire was connected directly to the battery and the frame ground.

Again, I used the Honda fuse panel and wiring to maintain a nice clean factory look. I hooked the factory accessory harness directly to the 2nd. battery. That way nothing is drawing electricity from the starting battery. All my lights, winch, and fan are fused and have any required relays within the factory accessory box and are drawing off the 2nd. battery. The 2nd. battery has more than twice the reserve capacity of the starting battery. Both batteries are AGM's so they charge better.
In an emergency, a sort jumper wire between the two contact studs (red caps) on the Battery Isolator is all that is needed to jump either battery.
My next project is designing and installing a winch mount so I can winch off the front or rear of the Pioneer using one winch. Most of my riding is done alone and in isolated areas. I'll post that later.
Last edited:

