P1000 Shift motor cleaning around 10,000 klm is a must.

slowdryrider

slowdryrider

Well-Known Member
Lifetime Member
Club Contributor
Jul 14, 2013
574
784
93
Canada
When your Pioneer 1000 dies while shifting down or dies when putting in gear there's a very good chance it's due to a dirty shift motor. There is usually different codes that get thrown . Also after the machine cools down it will work properly for awhile until it shuts down again.
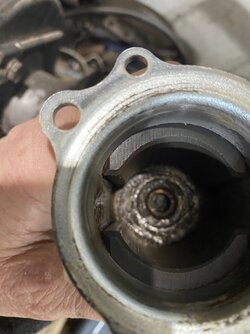
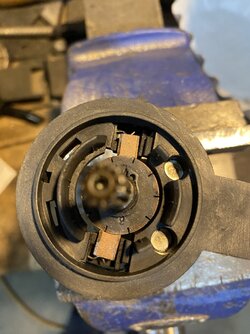
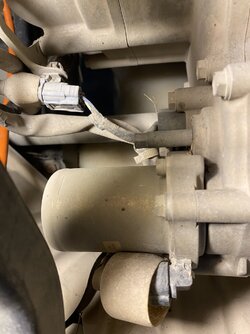
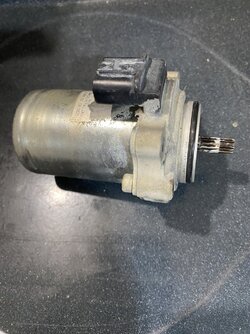
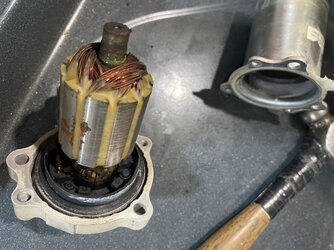
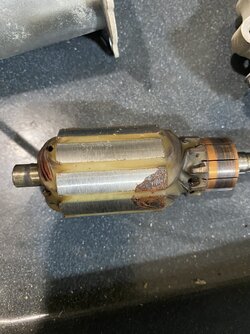
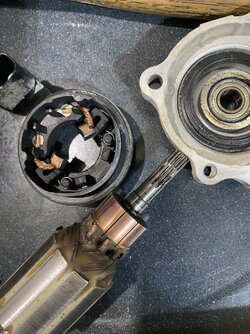
Open the dump bed , on the right hand side down by the exhaust pipe is the shift/control motor . Un plug the wires and remove the 3 10mm head bolts and remove the little motor. There is a o-ring on the motor housing. Once on the bench use a allen wrench to remove the 2 allen head bolts that hold the motor together . Seperate the end pieces from the main motor body. There wll be a plastic brush holder sandwiched between them.Once you have everything apart you will see how dirty everything is and how badly the armature where the brushes run are carboned. Clean the armature with fine sandpaper or emery cloth back to the copper color. [ I put the armature in my drill press and let it run slow speed and held the emery against the armature to clean] Once everything is cleaned apply a bit of grease to the armature bushing end . The best way to put it back together is to put the brushes and brush holder [the plastic piece] onto the armature first so that you can get the brushes put back over the armature . Hold tightly onto the end of the shaft that sticks out from the brushes. The reason to hold it tight is because when you place the armature into the housing the magnetism is going to suck the armature into it and you won't beable to put the brushes back into place. Of course once its together install and try it out. It's fairly simple to do. But you can see just how dirty it does get and this is what causes them to fail and the machine stops shifting properly and throws different codes. This is something that needs to be done every 6000 miles or 10,000 klms. This one I let it go for 14,000 klms and as you can see it's very dirty. Best part no parts to buy just a little time. BTW my machine is used for trail and roads. Very seldom will water ever get over 1/2 way up the tires. Hope this helps with anyone who has shifting problems with different codes.
IMG 6176 IMG 6180 IMG 6182 IMG 6184 IMG 6186 IMG 6187 IMG 6188
 
NTCPrezJB

NTCPrezJB

Retiring Member
Lifetime Member
Supporting Member
Jan 30, 2018
112,980
976,287
113
Hidden
Ownership

  1. 1000-5
When your Pioneer 1000 dies while shifting down or dies when putting in gear there's a very good chance it's due to a dirty shift motor. There is usually different codes that get thrown . Also after the machine cools down it will work properly for awhile until it shuts down again.
Open the dump bed , on the right hand side down by the exhaust pipe is the shift/control motor . Un plug the wires and remove the 3 10mm head bolts and remove the little motor. There is a o-ring on the motor housing. Once on the bench use a allen wrench to remove the 2 allen head bolts that hold the motor together . Seperate the end pieces from the main motor body. There wll be a plastic brush holder sandwiched between them.Once you have everything apart you will see how dirty everything is and how badly the armature where the brushes run are carboned. Clean the armature with fine sandpaper or emery cloth back to the copper color. [ I put the armature in my drill press and let it run slow speed and held the emery against the armature to clean] Once everything is cleaned apply a bit of grease to the armature bushing end . The best way to put it back together is to put the brushes and brush holder [the plastic piece] onto the armature first so that you can get the brushes put back over the armature . Hold tightly onto the end of the shaft that sticks out from the brushes. The reason to hold it tight is because when you place the armature into the housing the magnetism is going to suck the armature into it and you won't beable to put the brushes back into place. Of course once its together install and try it out. It's fairly simple to do. But you can see just how dirty it does get and this is what causes them to fail and the machine stops shifting properly and throws different codes. This is something that needs to be done every 6000 miles or 10,000 klms. This one I let it go for 14,000 klms and as you can see it's very dirty. Best part no parts to buy just a little time. BTW my machine is used for trail and roads. Very seldom will water ever get over 1/2 way up the tires. Hope this helps with anyone who has shifting problems with different codes.
View attachment 418165 View attachment 418166 View attachment 418167 View attachment 418168 View attachment 418169 View attachment 418170 View attachment 418171
Nice write up!
@Hondasxs … potential club contributor tag? 🤷🏻‍♂️
 
NorthernJoe

NorthernJoe

Well-Known Member
Feb 10, 2021
369
1,408
93
Northern Ontario
Ownership

  1. 1000-5
When your Pioneer 1000 dies while shifting down or dies when putting in gear there's a very good chance it's due to a dirty shift motor. There is usually different codes that get thrown . Also after the machine cools down it will work properly for awhile until it shuts down again.
Open the dump bed , on the right hand side down by the exhaust pipe is the shift/control motor . Un plug the wires and remove the 3 10mm head bolts and remove the little motor. There is a o-ring on the motor housing. Once on the bench use a allen wrench to remove the 2 allen head bolts that hold the motor together . Seperate the end pieces from the main motor body. There wll be a plastic brush holder sandwiched between them.Once you have everything apart you will see how dirty everything is and how badly the armature where the brushes run are carboned. Clean the armature with fine sandpaper or emery cloth back to the copper color. [ I put the armature in my drill press and let it run slow speed and held the emery against the armature to clean] Once everything is cleaned apply a bit of grease to the armature bushing end . The best way to put it back together is to put the brushes and brush holder [the plastic piece] onto the armature first so that you can get the brushes put back over the armature . Hold tightly onto the end of the shaft that sticks out from the brushes. The reason to hold it tight is because when you place the armature into the housing the magnetism is going to suck the armature into it and you won't beable to put the brushes back into place. Of course once its together install and try it out. It's fairly simple to do. But you can see just how dirty it does get and this is what causes them to fail and the machine stops shifting properly and throws different codes. This is something that needs to be done every 6000 miles or 10,000 klms. This one I let it go for 14,000 klms and as you can see it's very dirty. Best part no parts to buy just a little time. BTW my machine is used for trail and roads. Very seldom will water ever get over 1/2 way up the tires. Hope this helps with anyone who has shifting problems with different codes.
View attachment 418165 View attachment 418166 View attachment 418167 View attachment 418168 View attachment 418169 View attachment 418170 View attachment 418171
Thank you for the excellent write up and step by step pictures!
 
P1K5Dave

P1K5Dave

Well-Known Member
Lifetime Member
Club Contributor
Jul 11, 2020
2,260
8,462
113
Petoskey, MI
Ownership

  1. 1000-5
What about the option to replace? It seems I remember reading that you can buy a Honda part for X dollars or you can also find one on the market as it's a common motor they utilized.

Any advice here?

I have 15k miles on my 2018 and haven't had issues yet...but when I do, I think I'd be inclined to replace a worn electrical part that has seen its time.

Thanks!
 
CID

CID

Well-Known Member
Lifetime Member
Supporting Member
Oct 27, 2019
5,492
25,269
113
SE Denver-ish
Ownership

  1. Talon R
@P1K5Dave I haven't learned my SxS parts very well yet, haven't needed to, it's a Honda. If this is the right part, Ron Ayers shows Honda's price to be $270 and Ayer's price is $200. For that money, I'd have to try cleaning it to see how much longer it would last.

1707851116795
 
Last edited:
tjoreo

tjoreo

Well-Known Member
Lifetime Member
Feb 18, 2015
1,025
1,975
113
Southern Idaho
Ownership

  1. 1000-5
I know that at least for the 2018 Pioneer 1000 that this motor was used on alot on Honda's electric shift atvs. A friend of mine was throwing a code for his shift motor on his pioneer and I was going to try the motor off my wife's 07 rancher but he ended up getting it working. I don't know if they have changed on new models of pioneers but this was the case for his 18. If I remember right there were quite a few after market motors but can't speak for their quality. We ended up just rocking the machine like you used to have to with the atvs and he was able to get it to shift. Thanks for the write up above and definitely something to consider if someone is having trouble with their machine.
 
advertisement
Hawk53

Hawk53

Well-Known Member
Lifetime Member
Jan 7, 2014
485
622
93
Alberta Canada
Ownership

  1. 1000-3
When your Pioneer 1000 dies while shifting down or dies when putting in gear there's a very good chance it's due to a dirty shift motor. There is usually different codes that get thrown . Also after the machine cools down it will work properly for awhile until it shuts down again.
Open the dump bed , on the right hand side down by the exhaust pipe is the shift/control motor . Un plug the wires and remove the 3 10mm head bolts and remove the little motor. There is a o-ring on the motor housing. Once on the bench use a allen wrench to remove the 2 allen head bolts that hold the motor together . Seperate the end pieces from the main motor body. There wll be a plastic brush holder sandwiched between them.Once you have everything apart you will see how dirty everything is and how badly the armature where the brushes run are carboned. Clean the armature with fine sandpaper or emery cloth back to the copper color. [ I put the armature in my drill press and let it run slow speed and held the emery against the armature to clean] Once everything is cleaned apply a bit of grease to the armature bushing end . The best way to put it back together is to put the brushes and brush holder [the plastic piece] onto the armature first so that you can get the brushes put back over the armature . Hold tightly onto the end of the shaft that sticks out from the brushes. The reason to hold it tight is because when you place the armature into the housing the magnetism is going to suck the armature into it and you won't beable to put the brushes back into place. Of course once its together install and try it out. It's fairly simple to do. But you can see just how dirty it does get and this is what causes them to fail and the machine stops shifting properly and throws different codes. This is something that needs to be done every 6000 miles or 10,000 klms. This one I let it go for 14,000 klms and as you can see it's very dirty. Best part no parts to buy just a little time. BTW my machine is used for trail and roads. Very seldom will water ever get over 1/2 way up the tires. Hope this helps with anyone who has shifting problems with different codes.
View attachment 418165 View attachment 418166 View attachment 418167 View attachment 418168 View attachment 418169 View attachment 418170 View attachment 418171
Thank you for sharing this info.
 
  • Like
Reactions: slowdryrider

About us

  • Our community has been around for many years and pride ourselves on offering unbiased, critical discussion among people of all different backgrounds. We are working every day to make sure our community is one of the best.

User Menu

Buy us a beer!

  • Lots of time and money has gone into making sure the community is running the best software, best designs, and all the other bells and whistles. Care to buy us a beer? We'd really appreciate it!

    Beer Fund!

    Club Membership!