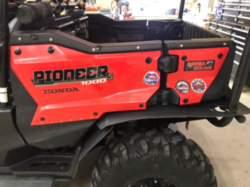
P1000m5 1000-5 Rear Door Inside Storage Modification

GlockMeister

GlockMeister

The Bearded Wonder
Lifetime Member
Supporting Member
May 11, 2016
7,606
35,593
113
Greenville, Mo
Ownership

  1. 1000-5
I did the same. Also bent them down just a touch since the panel moves in an arch. But...

I’m talking about the innerds of the latch itself. It unscrews with some snap ring pliers. The inside piece will become loose.
Yep..i had one come apart when i was doing mine.
 
J

Jiggerman01

New Member
Jan 19, 2017
9
3
3
Hudson, NY
Ownership

  1. 1000-5
Finally got some time home and finished this project. Well, almost finished. Still waiting on the thumb screws. I’ll do 2-3 per door and that should be enough.

Passenger side panel. If someone cared they could color the rivets.
View attachment 76050

Rivet up top for the chain.
View attachment 76051

Not too bad.
View attachment 76052

This is what I fit in the passenger door.
View attachment 76053

View attachment 76054

Driver side
View attachment 76055
Joey, did you ever consider showing your process on You Tube? Pretty ingenious on your part doing this. Do you have in depth instructions on how to accomplish this modification with pictures in a step by step process? If you do, I sure would like a copy of such.
 
  • Like
Reactions: sharp and BWAF
joeymt33

joeymt33

i4WD=imitated 4WD
Moderator
Lifetime Member
Supporting Member
Club Contributor
Mar 17, 2015
11,096
39,129
113
Guntersville, AL
Ownership

  1. 1000-3

  2. 1000-5
Joey, did you ever consider showing your process on You Tube? Pretty ingenious on your part doing this. Do you have in depth instructions on how to accomplish this modification with pictures in a step by step process? If you do, I sure would like a copy of such.

I did not but maybe I’ll get the opportunity someday soon to do another one if a buddy stops by and wants his done.
 
J

JTW

Guest
Joey, did you ever consider showing your process on You Tube? Pretty ingenious on your part doing this. Do you have in depth instructions on how to accomplish this modification with pictures in a step by step process? If you do, I sure would like a copy of such.
Lol
 
  • Like
Reactions: sharp and BWAF
Neohio

Neohio

Beast of the East
Lifetime Member
Supporting Member
Club Contributor
Dec 22, 2016
14,720
74,854
113
Painesville Ohio
Ownership

  1. 1000-5
@Jiggerman01 I
It really is self explanatory on how to accomplish this mod. If you go with the hinge, it is a little bit more work, but you won't find yourself finding a safe place for your panel while you are in the door.

The other popular setup is going 100% removable with the Tansky hood pins.
 
Smitty335

Smitty335

Well-Known Member
Lifetime Member
Supporting Member
Oct 3, 2016
35,445
208,726
113
NWA Arkansas
Ownership

  1. 1000-3

  2. 1000-5
You forgot several steps
#1 Get beer and ice down (DUGH)
#2 First trip to cooler
#3 Second trip to cooler
#4 Third trip to cooler
#5 Forth trip to cooler
#6 Fifth trip to cooler
#6 Sixth trip to cooler
#7 Go to bed
Step one... remove panel
Step two... cut hole in door
Step three... replace panel with
different fasteners.
 
advertisement
Remington

Remington

POIDH Enforcement Officer
Lifetime Member
Supporting Member
Jul 24, 2016
20,255
115,808
113
Michigan
Ownership

  1. 1000-5

  2. Talon X
Image
Image
Image
I finally got to this mod. Had the chit sitting on my bench a while. Still need to tidy up a few things. I have the push pins on the top and henge on the bottom. My panels were put on later so I had to drill my own holes with rubber jack nuts for fastening. Well that made thing a bit of a whore to install the push pins but I made them work. First I used a step bit to counter sink the plastic and installed the nut backwards so that the flange of the nut sunk flush to the plastic setting the ball as close as possible. I also used some red locktight on the threads for that nut. In the inside to tighten the ball bolt, I used a flat washer then a lock washer then had to use a vise grip to hold the outer nut flange to get it (old German word) “good N tight” they will not back out.
Question, those of you with the hinge, what did y’all use to fill/decorate the three holes on the bottom ?
 
joeymt33

joeymt33

i4WD=imitated 4WD
Moderator
Lifetime Member
Supporting Member
Club Contributor
Mar 17, 2015
11,096
39,129
113
Guntersville, AL
Ownership

  1. 1000-3

  2. 1000-5
View attachment 92221 View attachment 92222 View attachment 92223 I finally got to this mod. Had the chit sitting on my bench a while. Still need to tidy up a few things. I have the push pins on the top and henge on the bottom. My panels were put on later so I had to drill my own holes with rubber jack nuts for fastening. Well that made thing a bit of a whore to install the push pins but I made them work. First I used a step bit to counter sink the plastic and installed the nut backwards so that the flange of the nut sunk flush to the plastic setting the ball as close as possible. I also used some red locktight on the threads for that nut. In the inside to tighten the ball bolt, I used a flat washer then a lock washer then had to use a vise grip to hold the outer nut flange to get it (old German word) “good N tight” they will not back out.
Question, those of you with the hinge, what did y’all use to fill/decorate the three holes on the bottom ?

To fill those holes I used some oversized fender rivets. I had bought some 10mm on accident a while back and they worked good.
 
Remington

Remington

POIDH Enforcement Officer
Lifetime Member
Supporting Member
Jul 24, 2016
20,255
115,808
113
Michigan
Ownership

  1. 1000-5

  2. Talon X
All done with both sides. Just waiting on some finder rivits to show up. I had some 3M rubber door seal I bought for an old RV I had and trimmed out the hole to try and minimize crud form getting in. Looks like it seals decent. Time will tell eah?
Image
Image
 
Remington

Remington

POIDH Enforcement Officer
Lifetime Member
Supporting Member
Jul 24, 2016
20,255
115,808
113
Michigan
Ownership

  1. 1000-5

  2. Talon X
It does not seal well per real world testing..
That might have ben what my dog was thinking when I took that photo do you think?:rolleyes: Hahaha
 
  • Like
Reactions: BWAF
Remington

Remington

POIDH Enforcement Officer
Lifetime Member
Supporting Member
Jul 24, 2016
20,255
115,808
113
Michigan
Ownership

  1. 1000-5

  2. Talon X
I didn’t see you gasket material.. have a link? That should help a lot
I’d have to look it up. I bought it a while ago was just sitting around. Might help a little might not. I wasn’t disputing your claims at all, it’s probably ben done in the thread I must have missed it. I was just making light of it with my dog I noticed looking at me funny in that pic. No worries.
 
  • Like
Reactions: BWAF
J

JTW

Guest
I’d have to look it up. I bought it a while ago was just sitting around. Might help a little might not. I wasn’t disputing your claims at all, it’s probably ben done in the thread I must have missed it. I was just making light of it with my dog I noticed looking at me funny in that pic. No worries.
No it should work much better.. I was referring to the ammont if s*** I found in mine after the overland. I hadn’t seen you gasket. I did a similar material on my truck tailgates to keep the dust out when the bedcovers down. Helps tremendously!!
 
  • Like
Reactions: BWAF and Remington
advertisement

About us

  • Our community has been around for many years and pride ourselves on offering unbiased, critical discussion among people of all different backgrounds. We are working every day to make sure our community is one of the best.

User Menu

Buy us a beer!

  • Lots of time and money has gone into making sure the community is running the best software, best designs, and all the other bells and whistles. Care to buy us a beer? We'd really appreciate it!

    Beer Fund!

    Club Membership!