I’ve seen many great suggestions for adding cargo space on the forum. As a result, I would like to offer my $.02 that’s worked out very well for me. Like others, I also decided to purchase the 48-gallon Action Packer (~$75 at Walmart) that fits very nicely on top of the rack. This appeared to be a great, convenient (and cheap) way to transport my tree cutting and pruning tools used to create new trails through our woods.
I wanted to attach the packer to the rack in a way that would ensure that it would stay put but at the same time allow for easy installation and removal. I didn’t want to use U-bolts to attach the packer directly to the rack. By doing so would have required drilling holes in the bottom of the packer allowing liquids (gas, oil, etc.) that are placed inside the packer to possibly leak onto the body of the Pioneer. As a result, I did the following . . .
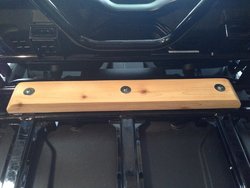
I began my project by attaching a 2x4 with three 1/4" x 2 3/4" hex bolts to the rack using the existing holes right behind the cab (3" bolts can be used but the middle bolt should have 1/4" cut off to keep it clear of access to the air cleaner cover) . . .
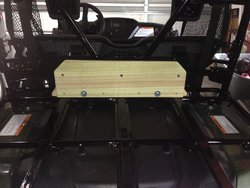
Using two 1/4" x 5" hex bolts and four wood screws, I attached a 1x8 on its edge to the 2x4 . . .
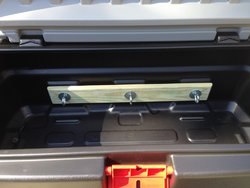
Next, I drilled 3/8" holes through the back of the Action Packer. I attached a 1x4 inside the packer using 3/8" x 5" eye bolts. I used eye bolts to be able to secure items inside the packer using bungee cords . . .
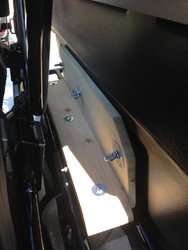
I drilled 1/2" holes through the 1x8 attached to the rack to match the holes that were drilled through the back of the Action Packer. Then I inserted the eye bolts through the 1x8 and attached with wing nuts for easy installation and removal . . .
I used pressure treated wood and as soon as it dried out I painted all the wood pieces black to match the rack and packer.
It works great, doesn't look bad on the P5 and cost under $100 . . .
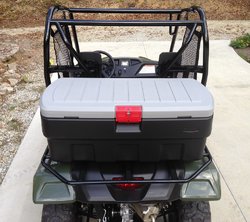
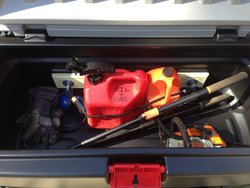
Note: I later purchased a second smaller Action Packer and was able to use the same holder employing the same attachment method. I did this for those times that I only needed to carry fewer and different items. The employed attachment method enables me to switch between the two packers in less time than it would take to pack and unpack one packer (getting lazy in my older age).
Because of the way the packers are attached, I discovered that when a packer is empty, it tends to bounce just enough on the rack to make annoying noises when driving over rough terrain. To remedy, I took some black foam pipe insulation tubes (Home Depot) and cut a couple of lengths to wrap around the round bars where an attached packer rests on the rack. I secured the wrap onto the bars with black cable ties. As a result, negligible noise, it doesn’t look bad even when a packer isn’t attached and best of all it was a very cheap solution!!
I wanted to attach the packer to the rack in a way that would ensure that it would stay put but at the same time allow for easy installation and removal. I didn’t want to use U-bolts to attach the packer directly to the rack. By doing so would have required drilling holes in the bottom of the packer allowing liquids (gas, oil, etc.) that are placed inside the packer to possibly leak onto the body of the Pioneer. As a result, I did the following . . .
I began my project by attaching a 2x4 with three 1/4" x 2 3/4" hex bolts to the rack using the existing holes right behind the cab (3" bolts can be used but the middle bolt should have 1/4" cut off to keep it clear of access to the air cleaner cover) . . .

Using two 1/4" x 5" hex bolts and four wood screws, I attached a 1x8 on its edge to the 2x4 . . .

Next, I drilled 3/8" holes through the back of the Action Packer. I attached a 1x4 inside the packer using 3/8" x 5" eye bolts. I used eye bolts to be able to secure items inside the packer using bungee cords . . .

I drilled 1/2" holes through the 1x8 attached to the rack to match the holes that were drilled through the back of the Action Packer. Then I inserted the eye bolts through the 1x8 and attached with wing nuts for easy installation and removal . . .

I used pressure treated wood and as soon as it dried out I painted all the wood pieces black to match the rack and packer.
It works great, doesn't look bad on the P5 and cost under $100 . . .


Note: I later purchased a second smaller Action Packer and was able to use the same holder employing the same attachment method. I did this for those times that I only needed to carry fewer and different items. The employed attachment method enables me to switch between the two packers in less time than it would take to pack and unpack one packer (getting lazy in my older age).
Because of the way the packers are attached, I discovered that when a packer is empty, it tends to bounce just enough on the rack to make annoying noises when driving over rough terrain. To remedy, I took some black foam pipe insulation tubes (Home Depot) and cut a couple of lengths to wrap around the round bars where an attached packer rests on the rack. I secured the wrap onto the bars with black cable ties. As a result, negligible noise, it doesn’t look bad even when a packer isn’t attached and best of all it was a very cheap solution!!
Last edited:

