BOX1

P1000 FABRIC FRONT DOORS (V2) - 0SR90-HL4-212A & 0SR90-HL4-222A - Instructions

Hondasxs

Hondasxs

Club Founder
Staff member
Lifetime Member
Supporting Member
Feb 13, 2013
17,952
62,637
113
Charlotte, NC
HondaSxS.com
Ownership

  1. 1000-5
T450 d9c4b0634a0c926bd6d5b29ba37d582a

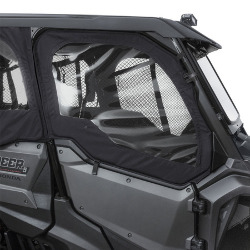
This is the updated instructions for the Pioneer 1000 soft doors

FABRIC FRONT DOORS (V2) -
0SR90-HL4-212A
0SR90-HL4-222A (camo)
  • Precision-manufactured aluminum door frames are lightweight and integrate easily with standard half doors.
  • Durable Sur Last® material for excellent water repellency and is UV, mold/mildew and abrasion resistance.
  • Double zipped, polished vinyl windows roll down increasing airflow thru the cab.
  • Polished vinyl windows are resistant to cracking in extreme cold.
 

Attachments

  • 0SR90-HL4-212A.pdf
    3.4 MB · Views: 1,335
H

HondaTech

Guest
As i suggested on another member's thread the instructions aren't super clear on where to exactly place the provided weather striping on the front plastic panel.

I found it's better to get the door mounted up all the way an then find out where the weather stripping fits best to seal up the gap between the door and the plastic A-pillar filler panel. It also helps, since the door can push it off when closing. Once you've located the best spot for the trim to be in, i suggest letting the door sit closed against the seal for awhile to help it stick to the panel.
 
  • Like
Reactions: ChadD and Denny56
Hondasxs

Hondasxs

Club Founder
Staff member
Lifetime Member
Supporting Member
Feb 13, 2013
17,952
62,637
113
Charlotte, NC
HondaSxS.com
Ownership

  1. 1000-5
Thanks.
Any other suggestions on this accessory you may can give?
I had a frustrated member PM me asking for help and I have never installed one myself so I'm no help. Lol.
 
  • Like
Reactions: ChadD and Denny56
H

HondaTech

Guest
Thanks.
Any other suggestions on this accessory you may can give?
I had a frustrated member PM me asking for help and I have never installed one myself so I'm no help. Lol.

We just did a set, I wasn't involved in whole thing, but I helped the guy set the final fit before drilling the holes for the mounting. They fit alot better than the old ones, once you get the newer panels installed the doors pretty much line up. The filler panels really help fill the gaps of the old stuff.

We set the fabric door on the bottom panel and used that to line up the new mount plate for drilling. We didnt use the measurement they give in the instructions. They also look as if there going to hand out at the top until you fully mount the plate and shove the door into it, then the top pulls in.
 
tjoreo

tjoreo

Well-Known Member
Lifetime Member
Feb 18, 2015
1,003
1,909
113
Southern Idaho
Ownership

  1. 1000-5
I've helped install 3 sets including one for myself. Like @HondaTech said the 10mm measurement they give you doesn't help you at all. Have a helper hold the door and then drill from there. I would recommend starting with the passenger door so it gives you a little practice before the mainly used driver door. You can loosen and adjust the front door holder on the A pillar which helps with sealing. I never installed the weather stripping that hondatech is eluding to because I figured it wouldn't last anyways. I really don't have any issue with the wind coming in there, it actually comes around the edge of the lower door and the shifter worse. The first set we installed we had some issues with it wanting to hit the top rear edge of the door when closing. We installed a set of door bushings which helped alot. They are not perfect but they work pretty well.
 
Denny56

Denny56

Member
May 16, 2020
17
36
13
Missouri
Ownership

  1. 1000-5
Hi guys I see these are older post but I started to install yesterday and I'm having trouble with getting them installed. Any new info, pics, videos to help with the install. 2020 1000-5p
 
tjoreo

tjoreo

Well-Known Member
Lifetime Member
Feb 18, 2015
1,003
1,909
113
Southern Idaho
Ownership

  1. 1000-5
Hi guys I see these are older post but I started to install yesterday and I'm having trouble with getting them installed. Any new info, pics, videos to help with the install. 2020 1000-5p
Don't know what you are having trouble with but let us know. I know the first set I put on we had trouble with the thumb bolt that would attach the window section to the nutsert you place in the door. The angle just didn't seem quite right and we were having trouble with starting the bolt and with it binding up. I ended up drilling the hole a little larger in the aluminum frame. When I did the second install on my own rig, I just started by making that hole bigger which saved me alot of head ache. Like I said earlier, you can loosen up the hose clamp on the a piller to adjust the front door catch to help with sealing and closing. I wouldn't sweat to much about any small air gaps in the door because the rest of the door has major gaps around the edge. They are not perfect but we sure have been grateful to have them. We have to slam the doors to get them to shut and have to push in alittle to get them to open, but they work pretty well.
 
TripleB

TripleB

Well-Known Member
Lifetime Member
Aug 13, 2018
11,597
98,309
113
Caryville, Tennessee
Ownership

  1. 1000-3

  2. 1000-5
Don't know what you are having trouble with but let us know. I know the first set I put on we had trouble with the thumb bolt that would attach the window section to the nutsert you place in the door. The angle just didn't seem quite right and we were having trouble with starting the bolt and with it binding up. I ended up drilling the hole a little larger in the aluminum frame. When I did the second install on my own rig, I just started by making that hole bigger which saved me alot of head ache. Like I said earlier, you can loosen up the hose clamp on the a piller to adjust the front door catch to help with sealing and closing. I wouldn't sweat to much about any small air gaps in the door because the rest of the door has major gaps around the edge. They are not perfect but we sure have been grateful to have them. We have to slam the doors to get them to shut and have to push in alittle to get them to open, but they work pretty well.
I had the same problem on both sets I've installed also.
 
  • Like
Reactions: EMAW
R

rickoshea

Guest
i drilled right through the door bracket set screws and used a longer bolt so it holds the whole bracket much better.and those thumb screws? man.i used rubber well nuts instead.as mentioned,set your door where you want it before you even look at the weather stripping.i didn't even bother with it after all was said and done.my door bushings are so sloppy it wouldn't have helped anyway.it keeps the snow out and that's all i wanted out of them.
 
Denny56

Denny56

Member
May 16, 2020
17
36
13
Missouri
Ownership

  1. 1000-5
Don't know what you are having trouble with but let us know. I know the first set I put on we had trouble with the thumb bolt that would attach the window section to the nutsert you place in the door. The angle just didn't seem quite right and we were having trouble with starting the bolt and with it binding up. I ended up drilling the hole a little larger in the aluminum frame. When I did the second install on my own rig, I just started by making that hole bigger which saved me alot of head ache. Like I said earlier, you can loosen up the hose clamp on the a piller to adjust the front door catch to help with sealing and closing. I wouldn't sweat to much about any small air gaps in the door because the rest of the door has major gaps around the edge. They are not perfect but we sure have been grateful to have them. We have to slam the doors to get them to shut and have to push in alittle to get them to open, but they work pretty well.
Ok thanks for your help. When put the plate on the door did you do the 10mm/3/8" or moved it forward to the edge ? It seems the hole thing needs to go forward because the top rear frame hits the cage.
 
  • Like
Reactions: EMAW
Denny56

Denny56

Member
May 16, 2020
17
36
13
Missouri
Ownership

  1. 1000-5
i drilled right through the door bracket set screws and used a longer bolt so it holds the whole bracket much better.and those thumb screws? man.i used rubber well nuts instead.as mentioned,set your door where you want it before you even look at the weather stripping.i didn't even bother with it after all was said and done.my door bushings are so sloppy it wouldn't have helped anyway.it keeps the snow out and that's all i wanted out of them.
Ok thanks for the info
 
tjoreo

tjoreo

Well-Known Member
Lifetime Member
Feb 18, 2015
1,003
1,909
113
Southern Idaho
Ownership

  1. 1000-5
Ok thanks for your help. When put the plate on the door did you do the 10mm/3/8" or moved it forward to the edge ? It seems the hole thing needs to go forward because the top rear frame hits the cage.
I'm a follow the directions kind of guy, so i know my first set I was pretty meticulous on the 10mm. After doing as was told it still came out the frame hits the cage. When I did the second install on my own rig I did follow the directions but wasn't as concerned. I'm okay with slamming the door pretty hard to get them to shut and pulling on them to get them to open. I think there is just too much discrepancy in the cages to make them all fit perfectly. The other thing I talked about before is a set of door bushings to take up the slack in the doors. On the first install on my friends, the door had to lift a little to seat it properly. A set of bushings took care of that problem and it opens and closes pretty well now. Keep us informed on the install.
 
Denny56

Denny56

Member
May 16, 2020
17
36
13
Missouri
Ownership

  1. 1000-5
Ok thanks for your help. When put the plate on the door did you do the 10mm/3/8" or moved it forward to the edge ? It seems the hole thing needs to go forward because the top rear frame hits the cage.
Ok thanks for the info
I see what your talking about, didn't even tighten up good. What length did you use. Looking at some m6 thumb screws.
 
Denny56

Denny56

Member
May 16, 2020
17
36
13
Missouri
Ownership

  1. 1000-5
I'm a follow the directions kind of guy, so i know my first set I was pretty meticulous on the 10mm. After doing as was told it still came out the frame hits the cage. When I did the second install on my own rig I did follow the directions but wasn't as concerned. I'm okay with slamming the door pretty hard to get them to shut and pulling on them to get them to open. I think there is just too much discrepancy in the cages to make them all fit perfectly. The other thing I talked about before is a set of door bushings to take up the slack in the doors. On the first install on my friends, the door had to lift a little to seat it properly. A set of bushings took care of that problem and it opens and closes pretty well now. Keep us informed on the install.
Ok i got them mounted didn't really concern over the 10mm but they ended up pretty close. And yes no matter what you do you got slam them lol. And I also have to replace the door bushings already. The thumbscreew and shiming it up to clear the upper corner better, that's a work in progress. The 6mm flathead screws that hold it all in are not long enough doesn't tighten good . But will change them. Thanks for your help and input.
 
  • Like
Reactions: EMAW and TripleB
EMAW

EMAW

Mama Tried!
Lifetime Member
Supporting Member
Jun 3, 2020
2,955
37,087
113
Kansas
Ownership

  1. 1000-3
I’ve installed 4 sets of theses. Had trouble on all of them getting the jacknuts installed perpendicular to the fabric door frame. Like someone mentioned on the thread, I had to drill out the ALUM frame for more clearance to get the thumb screw to thread in properly!
I also ended up fabricating a .200 thick spacer to go under the lwr hinge (plus new bushings). This improved how the door closed and latched. You can get some additional adjustments on the latch.
 
  • Like
Reactions: Denny56 and TripleB
Denny56

Denny56

Member
May 16, 2020
17
36
13
Missouri
Ownership

  1. 1000-5
I’ve installed 4 sets of theses. Had trouble on all of them getting the jacknuts installed perpendicular to the fabric door frame. Like someone mentioned on the thread, I had to drill out the ALUM frame for more clearance to get the thumb screw to thread in properly!
I also ended up fabricating a .200 thick spacer to go under the lwr hinge (plus new bushings). This improved how the door closed and latched. You can get some additional adjustments on the latch.
yep had problems with the alignment of the jack nuts and thumb screws going to have to redo the drivers side. I'll diffenly going to check out shiming the hinges and the bushings diffently need replaced.
 
  • Like
Reactions: EMAW and TripleB
tjoreo

tjoreo

Well-Known Member
Lifetime Member
Feb 18, 2015
1,003
1,909
113
Southern Idaho
Ownership

  1. 1000-5
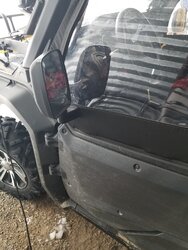
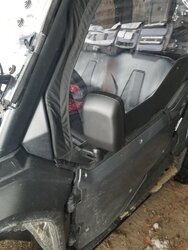
Something else I noticed is can't see out of the passenger side mirror now if it isn't one thing its another lol.
One fix always seems to make another problem. I took some time and tried to figure out the outside mirrors. Like you said the driver is really not the problem but the passenger is pretty tough. The friend of mine on my first install added an extension on his passenger mirror to allow him to see it. The problem is that if someone gets in and lets the door go to far, it will jump over the mirror. I didn't want this so I made a little bracket that attaches to the upper door frame so the mirrors are attached to the door. I have the honda mirrors so I just take them off the factory bracket and bolt them to my piece, then swap back when I take the doors off. It just a little piece of aluminum that I made and riveted to the frame. It works pretty well and the mirrors work like they should by attaching to the doors like most cars.
20200120 110202
20200120 110124 20200120 110115
 
Smitty335

Smitty335

Well-Known Member
Lifetime Member
Supporting Member
Oct 3, 2016
35,360
207,915
113
NWA Arkansas
Ownership

  1. 1000-3

  2. 1000-5
One fix always seems to make another problem. I took some time and tried to figure out the outside mirrors. Like you said the driver is really not the problem but the passenger is pretty tough. The friend of mine on my first install added an extension on his passenger mirror to allow him to see it. The problem is that if someone gets in and lets the door go to far, it will jump over the mirror. I didn't want this so I made a little bracket that attaches to the upper door frame so the mirrors are attached to the door. I have the honda mirrors so I just take them off the factory bracket and bolt them to my piece, then swap back when I take the doors off. It just a little piece of aluminum that I made and riveted to the frame. It works pretty well and the mirrors work like they should by attaching to the doors like most cars.
View attachment 250982 View attachment 250983 View attachment 250984
Looks great!
 
  • Like
Reactions: Denny56 and EMAW
BOX2
box3

About us

  • Our community has been around for many years and pride ourselves on offering unbiased, critical discussion among people of all different backgrounds. We are working every day to make sure our community is one of the best.

User Menu

Buy us a beer!

  • Lots of time and money has gone into making sure the community is running the best software, best designs, and all the other bells and whistles. Care to buy us a beer? We'd really appreciate it!

    Beer Fund!

    Club Membership!