P1000 Help with OEM Heater Install - 2022 Pioneer 1000-5 Deluxe

C

ckirch

Member
Mar 9, 2021
22
30
13
Wisconsin
Ownership

  1. 1000-5
Hi All,
I've been reading on HondaSXS for awhile now, but first time post here.

Around 2 weeks ago I purchased a new 2022 1000-5 Pioneer, and I'm starting to install some accessories, starting with the new Honda Heater. The instructions start by having you remove a fairly large list of parts from the Pioneer, which I've completed except for the last item on the list, which is the Heat Shield.

I've removed what I thought was the heat shield, but it does not match the photo of the Heat Shield in the installation instructions for the Heater. This Heat Shield requires drilling/cutting templates be attached to it, but for the life of me can't find a part that matches the pic. Is anyone familiar with this part, or can tell me exactly where it is located? Here are some pics of the machine and work in progress. I posted a pic of what I think is the Heat Shield, and what its supposed to look like according to the install instructions. The shield I removed has a plastic insert connected to it, and that is labeled "Heat Shield Cover", so I can't be too far off I wouldn't think...

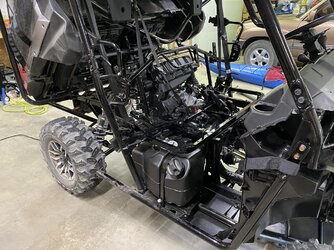
Machine nearly disassembled and ready for heater install
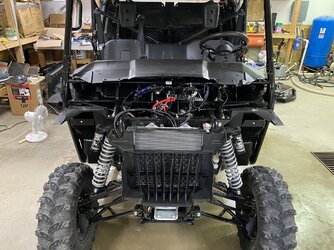
Frontviewnohood


This is where I removed what I thought was the correct Heat Shield (originally covered the exhaust ports)
EngineHeatShield

This is the heat shield I removed that doesn't match the install instruction picture.
Thumbnail IMG 5790


This is what the instructions say to remove and modify, but this does not look like my heat shield.
Thumbnail IMG 0236


The machine is a 2022 and the instructions/Heater kit are the 2022 version.

Thanks anyone who can help!
 
H

HondaTech

Guest
The heat shield your looking for is under the front fender. It's plastic abd you'll curse alot to get it out.

Oh and take the headlights and mounting bar off with the fender. Its easier.

Also use your windshield bottom half to locate the demist vent, if not you'll have fun afterwards.

I've got alot of tips, I could write a book, lol
 
C

ckirch

Member
Mar 9, 2021
22
30
13
Wisconsin
Ownership

  1. 1000-5
Thanks for the quick reply, much appreciated. I thought either the large main hood section or else the side panels/wheel wells were considered the fender when I was disassembling, but I guess it's neither of those. By Fender, do you mean the radiator cover/black plastic fins (#2 on the photo), or the black plastic around the headlights (#1 on the photo), or something else altogether (maybe #3)? Based on your headlight tip I'm guessing it's that housing around the light?

I've never dug in this deep before and I'm still learning the correct terminology for all the parts, so sorry for the extra question.

Thanks for the
Frontviewnohoodmarked
tip, and yes I noticed the windshield has a nice center mark/bulge built right into it, is that what you mean to use for centering/locating the vent?

I'm definitely hesitant to do this by myself, but at this point I don't have much choice, so any tips are very welcomed! :)

Thanks again.
 
C

ckirch

Member
Mar 9, 2021
22
30
13
Wisconsin
Ownership

  1. 1000-5
Scratch the location question, I found it right away after reading your comment and looking under the hood again. Looks like a fun one to get out as you mentioned, hah. I’ll start working on getting this out and will no doubt have more questions along the way. Thanks for the help already!
 
P

PDogRex

Well-Known Member
Supporting Member
Apr 19, 2022
70
349
53
Central MT.
Ownership

  1. 1000-5
I did this heater install on my 2022 P1K5 Trail when it was just 4 days new to me. The Honda Service manual (got mine off eBay) is great for reference and you can following the directions for the heater installation then look up the component in the manual, which will tell you how to remove it, how many and what type fasteners.
Take your time and read and understand the instruction, if it is unclear, reread them again. Route the hoses, wiring just as it is described. Make sure you bleed all the air out of the coolant system.
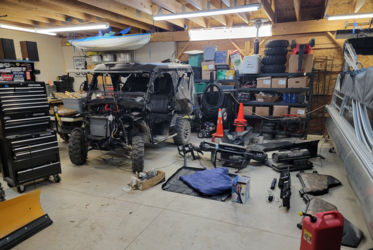
It will take about 12-15 hours to do this. This was the most complex accessory that I have installed on all kinds of equipment. Any of the other Honda accessories are a piece of cake after this. On the plus side you learn where all the components are located.
Pictures are what mine looked like with panels removed for installation.

8EB37F65 D4F2 4DA7 A0AB FD1BE5CA99F5 BAB3D724 0A03 4DCE 8CF8 A4D07D3E650C
 
C

ckirch

Member
Mar 9, 2021
22
30
13
Wisconsin
Ownership

  1. 1000-5
Thanks for the tips and pics! I bought the pdf service manual this morning (to help find the heat shield) and the eBay paperback is on the way. It looks like it will be helpful but unfortunately it couldn’t get me to the correct heat shield, hopefully the rest goes smoother. The section you mentioned with pics and the hardware needed to (dis)assemble will be great when I start putting this all back together...if I ever get it done that is.

Just my luck to start the mods with the most difficult one you’ve ever done, very encouraging ;)

I’ll post back with any progress, but there might not be a lot until later this week… as much as I’d rather work on the heater install I should probably take the girl out for valentines dinner tomorrow…but maybe afterwards.

Hah, I hear that bumperm, this is deeper than I expected it would be. Im running out of garage space because of all the parts that came off.
 
Scoop

Scoop

Well-Known Member
Lifetime Member
Supporting Member
Sep 7, 2021
5,130
20,278
113
Michigan
Ownership

  1. Other Brand

  2. 1000-5

  3. Talon R LV
After looking at all of that work, I'm starting to think I really love freezing my butt off!
LOL. Yea, installing a heater behind the dash was certainly not an endeavor for the faint of heart, that's for sure. Mine was pretty much brand new (~40 miles?) when I installed my Ice Crusher:

1676391442906
 
Smitty335

Smitty335

Well-Known Member
Lifetime Member
Supporting Member
Oct 3, 2016
35,445
208,725
113
NWA Arkansas
Ownership

  1. 1000-3

  2. 1000-5
LOL. Yea, installing a heater behind the dash was certainly not an endeavor for the faint of heart, that's for sure. Mine was pretty much brand new (~40 miles?) when I installed my Ice Crusher:

View attachment 374111
It takes about 2 minutes to install coveralls?
 
advertisement
Scoop

Scoop

Well-Known Member
Lifetime Member
Supporting Member
Sep 7, 2021
5,130
20,278
113
Michigan
Ownership

  1. Other Brand

  2. 1000-5

  3. Talon R LV
Neither does the heater😶
Mine converts the two OEM cup holders to direction adjustable vents, so it actually does if you point them @ the windshield.
 
  • Like
Reactions: Rayger143
H

HondaTech

Guest
Mine converts the two OEM cup holders to direction adjustable vents, so it actually does if you point them @ the windshield.

The new honda heater has a dedicated windshield vent

But there's a reason they call it a demist vent not a defrost vent.
 
  • Like
Reactions: Rayger143 and Scoop
Scoop

Scoop

Well-Known Member
Lifetime Member
Supporting Member
Sep 7, 2021
5,130
20,278
113
Michigan
Ownership

  1. Other Brand

  2. 1000-5

  3. Talon R LV
Sure hope the 22+ dash has more room to add a heater vent. If my kit had had one, I have no idea if I would have even tired to install it (assuming long, thin vent that would install just in front of windshield). My fingers are still healing from last fall!
 
  • Like
Reactions: Rayger143
H

HondaTech

Guest
Sure hope the 22+ dash has more room to add a heater vent. If my kit had had one, I have no idea if I would have even tired to install it (assuming long, thin vent that would install just in front of windshield). My fingers are still healing from last fall!

If you take the doors and front fender flares off the whole backside of those cup holders is exposed.
 
  • Like
Reactions: Rayger143
Scoop

Scoop

Well-Known Member
Lifetime Member
Supporting Member
Sep 7, 2021
5,130
20,278
113
Michigan
Ownership

  1. Other Brand

  2. 1000-5

  3. Talon R LV
If you take the doors and front fender flares off the whole backside of those cup holders is exposed.
Cupholders were pretty much a non-issue. When I was investigating which heater I wanted to install, one came with a very thin, long vent that apparently mounts in the top of the dash right smack dab in the middle under the windshield. Thats' the one that would have been a b*tch on my '21 Deluxe.
 
  • Like
Reactions: Rayger143
C

ckirch

Member
Mar 9, 2021
22
30
13
Wisconsin
Ownership

  1. 1000-5
What seemed unusual to me is that the heater kit requires you to drill/install return air vents for the heater, not just source vents. I would think it could just pull return air directly into the unit instead having dedicated return ducts installed in the cab. I hate having to cut into the dash more than needed.

Maybe it has something to do with the return air temperature...?
 
Scoop

Scoop

Well-Known Member
Lifetime Member
Supporting Member
Sep 7, 2021
5,130
20,278
113
Michigan
Ownership

  1. Other Brand

  2. 1000-5

  3. Talon R LV
What seemed unusual to me is that the heater kit requires you to drill/install return air vents for the heater, not just source vents. I would think it could just pull return air directly into the unit instead having dedicated return ducts installed in the cab. I hate having to cut into the dash more than needed.

Maybe it has something to do with the return air temperature...?
That, or they are worried about the air around the unit being contaminated (e.g., fuel vapors)?
 
advertisement

About us

  • Our community has been around for many years and pride ourselves on offering unbiased, critical discussion among people of all different backgrounds. We are working every day to make sure our community is one of the best.

User Menu

Buy us a beer!

  • Lots of time and money has gone into making sure the community is running the best software, best designs, and all the other bells and whistles. Care to buy us a beer? We'd really appreciate it!

    Beer Fund!

    Club Membership!