Go with the 200 psi unit if you plan on doing all four corners eventually- it's just gonna work better for you. If your going to do just fronts, the 150psi unit will be fine. I'm finding that the rears require alot more pressure to lift heavier loads Stick with the 1/8 lines that the shocks come with all the way to your distribution manifold, and use 1/4 line from the compressor to the manifold. Keeping the system volume low that the shocks 'see' is important for good handling, and keeps the shocks more 'reactive' over rough terrain. Make sure to watch your ride height on the fronts- it's easy to have too much pressure in them, and it causes them to top out at the limit of their travel. I adjust mine by starting out near the top of travel, and reduce the air pressure while I'm riding to avoid bottoming, plus a little bit. Once it's set, you rarely have to make a change unless there's a significant change in load or trail.
You are using an out of date browser. It may not display this or other websites correctly.
You should upgrade or use an alternative browser.
You should upgrade or use an alternative browser.
jwb: I am isolating all 4 corners, gauging all 4 corners with the function of dropping the hi side while crossing a steep hillside assuming no clearance issues. I am using a clippard fill and bleed valve on each corner they are rated for 120 psi they are small detented toggle valve. I have not found a manual valve this size rated any more the 120 psi I am going to assume a safety factor built in them. using these valves and 2 dual needle gauges is going to make a clean install on the dash panel probably over the warning label or to the left of it I have not measured it out. thanks for the info I will go ahead and buy the bigger compressor by any chance have you found a reasonable priced source for the push in fittings every body seems to want to sell you bulk amounts of them.Go with the 200 psi unit if you plan on doing all four corners eventually- it's just gonna work better for you. If your going to do just fronts, the 150psi unit will be fine. I'm finding that the rears require alot more pressure to lift heavier loads Stick with the 1/8 lines that the shocks come with all the way to your distribution manifold, and use 1/4 line from the compressor to the manifold. Keeping the system volume low that the shocks 'see' is important for good handling, and keeps the shocks more 'reactive' over rough terrain. Make sure to watch your ride height on the fronts- it's easy to have too much pressure in them, and it causes them to top out at the limit of their travel. I adjust mine by starting out near the top of travel, and reduce the air pressure while I'm riding to avoid bottoming, plus a little bit. Once it's set, you rarely have to make a change unless there's a significant change in load or trail.
I did find a good source, it's a place in Arizona, but the info is at work. I'll post it tomorrow when I find the website again. The only alternative I've found to the Hoke valves I'm using, are the electric ones that are designed and rated for air ride suspension. They're more money, and would require a little more thought about water proofing the wiring, but it would allow you to use much smaller control switches in the dash, and would also allow the control valves to be mounted closer to the shocks, or where ever you want them for that matter. I think if I do another system, I may use those instead. I saw another set-up where the valves and gauges were mounted up on the roll cage, but I can't do that due to my (favorite) riding conditions- anything attached to the roll cage gets torn off.... Make sure to post some pictures of your install!jwb: I am isolating all 4 corners, gauging all 4 corners with the function of dropping the hi side while crossing a steep hillside assuming no clearance issues. I am using a clippard fill and bleed valve on each corner they are rated for 120 psi they are small detented toggle valve. I have not found a manual valve this size rated any more the 120 psi I am going to assume a safety factor built in them. using these valves and 2 dual needle gauges is going to make a clean install on the dash panel probably over the warning label or to the left of it I have not measured it out. thanks for the info I will go ahead and buy the bigger compressor by any chance have you found a reasonable priced source for the push in fittings every body seems to want to sell you bulk amounts of them.
Go to this website and download the Parker catalog 3501e- Free Catalog Downloads | Parker, Legris/Transair, BrakeQuip The catalog has every type of fitting you'll need for your project. When you have your parts list together, go to www.hydradynellc.com In the search bar, just enter the part #'s you're looking for, and add them to the cart. I think you might have to login, but they had everything I needed and in the quantities I wanted. Shipping was fast too. Hope this is helpful.
JWB
JWB
most of the parts are here i found a 200 psi 100% duty @100 PSI compressor for 130.00 got the shocks still waiting on on the valves i didnt realize that the clippard valves had a 2 week lead time . should have all the parts by late april . got to finish a house remodel, should be done by the time all the parts get here. then i will get after it for real. thanks for your help on this.Go to this website and download the Parker catalog 3501e- Free Catalog Downloads | Parker, Legris/Transair, BrakeQuip The catalog has every type of fitting you'll need for your project. When you have your parts list together, go to www.hydradynellc.com In the search bar, just enter the part #'s you're looking for, and add them to the cart. I think you might have to login, but they had everything I needed and in the quantities I wanted. Shipping was fast too. Hope this is helpful.
JWB
You bet! Could you give me a link to that compressor, or the make and model? I'm thinking of upgrading to a 200psi unit- if it is small enough.most of the parts are here i found a 200 psi 100% duty @100 PSI compressor for 130.00 got the shocks still waiting on on the valves i didnt realize that the clippard valves had a 2 week lead time . should have all the parts by late april . got to finish a house remodel, should be done by the time all the parts get here. then i will get after it for real. thanks for your help on this.
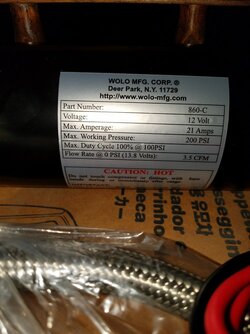
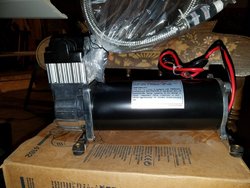
10inches long 7inches high 4inches wide at the base, attached photos for brand and model bought it on amazon was the cheapest compressor of that rating. i could findYou bet! Could you give me a link to that compressor, or the make and model? I'm thinking of upgrading to a 200psi unit- if it is small enough.
Last edited:
Thanks! I'll have to go measure the space where my compressor is and see if it will fit. That is the smallest 200psi unit I've seen.10inches long 7inches high 4inches wide at the base, attached photos for brand and model bought it on amazon was the cheapest compressor of that rating. i could find
View attachment 40061 View attachment 40062
T
So what all is the process involved in this mod ya did? I'm looking into doing dual air shocks in the front and want a reliable setup for the trail riding we do in Idaho. We get into some pretty far out areas without cell service and want to be safe on the trailsMy air suspension saga has reached completion as of yesterday, after spending three days on the H.M. trails. Had a short day on Friday, and confirmed that the improvement in ride does not degrade with speed, and that, once the air pressure is adjusted for load and balance, cornering ability can actually be improved over stock, and that's with the sway bar removed. On Saturday, we made an 87 mile round trip (7 straight hours of hard riding-burned 6 gallons of fuel) over 'difficult' level trails, and although we were exhausted when we got back, I had no seat belt bruises, and was not beat up at all. On Sunday morning, my brother jumped in with me for the ride to last years game stopper- Trail #32. His first comment to me about the machine- he had never ridden in it before- was "this dam thing rides better than my truck!" When we got to the steep climb- the part that stopped me last year, I set the front shock valves to 'articulate', lowered the front shock pressure a smidge, and rolled. My P500 successfully clawed it's way to the top of trail 32 with me, my brother, and the cargo box full of fuel, ropes, air lines, stock shocks, etc, without any drama whatsoever. Kept all four wheels firmly planted and pulling the whole way up!! Trail 32, and me getting beat half to death on the previous H.M. trip, was the whole inspiration for searching out a suspension mod. I had forgotten how steep that climb was, let alone the near vertical ledges that the machine had to climb up, and on-to, to continue the climb. After 'conquering' 32YA!!! we rode back to the cabin, picked up my brothers machine (850 Scrambler) and made another 80 mile round trip on mostly 'easy' trails. We were averaging 20-30 mph on that ride, and at one point, went through a stretch of moguls/whoops at full throttle 5th gear getting air on every one. I won't say it was graceful by any stretch, but, no bottoming, no rebound 'bounce', and no getting bucked into the seat belt. If I had done that before, me, the machine, or both of us would have come home with broken parts. Just to add icing on the cake, I was able to help two other riders that we met on the trails. One guy had a tire going flat, so I connected my 25' air hose and opened a valve- done! Another guy with a group of bikers ran out of gas. Pulled one of my 2 gallon cans out of the cargo box- he was rolling in 5 minutes. Sweet! A great trip all round. So that's it. I am completely satisfied and comfortable saying, that the 'JWB mod' is a totally viable, functional, and so far, reliable, (300 miles of pure abuse) very affordable, performance enhancing in every aspect, suspension upgrade for the P-500. Gotta say it- this feels good!! and thanks to all you guys for helping me think 'outside the box' this is y'alls success too.
If you go back to pg 27 and read through, there are part #'s, pictures, and suggestions all the way through. At least a couple other guys have done this mod, or variation of it, so there's a ton of information and ideas. My set up is all four corners with an on-board compressor. I've been trail busting through/over small trees, brambles, downed trees, stumps etc. for hours at this point with no failures or damage to air lines or shocks so far, but I've managed to puncture another CV boot, (2nd one) and drive something into my radiator that pushed it back/bent it almost 2", rubbed a lot of paint off my roll cage, and tore my aluminum skid plate loose, if that gives you some idea of the 'testing'So what all is the process involved in this mod ya did? I'm looking into doing dual air shocks in the front and want a reliable setup for the trail riding we do in Idaho. We get into some pretty far out areas without cell service and want to be safe on the trails
advertisement
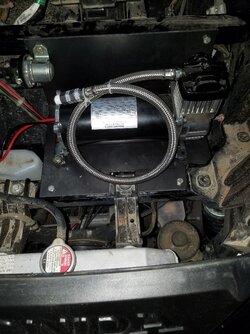
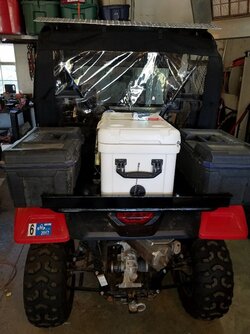
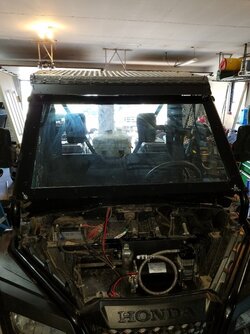
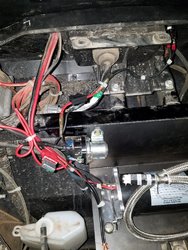
jwb the compressor mount was bent out of 14 gauge and fits perfectly between the top strut and radiator top mount i installed it with nutserts the compressor and relay bolt up perfectly. i didnt get all the pictures taken of the air valves and gauge, i put them in the warning label on the drivers side more pictures to follow.got all the roof windshield and back rack done air compressor is wired in left front shock set up is in all air valves are installed need install airlines and and shocks and i will ready to ride.
View attachment 45091 View attachment 45092 View attachment 45093 View attachment 45094 View attachment 45095
I'm interested to see the valve and gauge set-up in the dash location you've chosen. I've since added power steering to mine, and the air tank had to be lifted a bit to clear the mount bracket. My air tank is mounted where your compressor is. The power steering is absolutely amazing, and if you're gonna be on a lot of tight trails, and loaded pretty heavy, you'll be adding it soonjwb the compressor mount was bent out of 14 gauge and fits perfectly between the top strut and radiator top mount i installed it with nutserts the compressor and relay bolt up perfectly. i didnt get all the pictures taken of the air valves and gauge, i put them in the warning label on the drivers side more pictures to follow.
splash guard idea is great they will protect my valves and gauge i dont remember seeing where you put your compressor at. i am going to run my system with out a tank first.I just cut up an old inner tube and used the Honda push locks to attach. There's still lots of room under the hood even after the power steering install. View attachment 45106 View attachment 45107 View attachment 45109 View attachment 45110 View attachment 45111 View attachment 45112 View attachment 45113 View attachment 45114 View attachment 45115 View attachment 45116
Compressor is top left of 7th picture from top. I think if I switch to the 200 psi compressor, I might get rid of the tank, cuz the one I got, is only rated for 140psi. Still debating...
did you have to do any grinding to put in the rearshocks i am starting on that tonight the fronts are in.Compressor is top left of 7th picture from top. I think if I switch to the 200 psi compressor, I might get rid of the tank, cuz the one I got, is only rated for 140psi. Still debating...
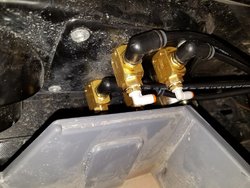
here is the picture of my switch set up they are clippard fill and bleed valves center detent.
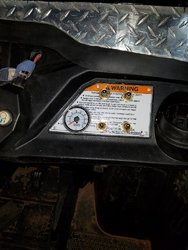

No grinding, just the bushings. They're easier than the fronts. Where did you find that tiny pressure gauge?! That's exactly what I need for mine, although I would prefer digital- easier to read ya know..... Did you take any pictures of the valves? That looks like a nice compact set up. I like it. Looks like you have the same winch I have as well- I mounted the controller pretty much the same way.
It is a 2in dual air guage from viair i think it eas 35.00 i will take picture of the valves go to clippard site and search for fill and bleed valve they are expensive i hope the will handle above 120 psi if need be the shock installmemt was so easy it fell together i used 5/8 plastic air line for trucks to bush the lower mounts it worked like it was made for it you said you pre loaded the shocks to take out the small amount of slack right. I used 3/8 bolts in the front 7/16 in the rear i am pumped to test this out hopefully on saturday my brother inlaw wants me to do his razor when i told him about this mod i dont know what install would be like on a razor there is a company that makes a kit for a razor but your into it 3000.00 in parts aloneNo grinding, just the bushings. They're easier than the fronts. Where did you find that tiny pressure gauge?! That's exactly what I need for mine, although I would prefer digital- easier to read ya know..... Did you take any pictures of the valves? That looks like a nice compact set up. I like it. Looks like you have the same winch I have as well- I mounted the controller pretty much the same way.
.i will send you the picture of the valve tommorow i figure out how load it to the site directly from my phone
Yes on the pre-load. The gauge looks way smaller than 2". Is it actually 2"? Ya, I saw the purpose built air shocks- no way! I did some of that 'side of the hill' thing with mine tonight- it just works amazing! It maintains traction so much better, and I purposely drove it with me on the down side, dropped the air outta the up-side shocks, turned up the hill, and re-pressurized as I made the turn, it worked perfectly. I'm not talkin about a bit of slope either, if I hadn't dropped the high side shocks, it would have tipped over- don't ask how I know that.... I'm learning how to juggle weight transfer to get the best traction for climbing the really steep stuff- little changes in air pressure to a single wheel, or pair, can make the difference between just climbing a hill without losing traction, vs having to 'charge' up a hill using momentum and wheel speed to get to the top. This set up definitely gives the driver a bunch more control in any reasonable situation. If you guys are gonna do the razor, there may be better gabriels for that particular application than the ones we are using- different overall length, stroke etc.It is a 2in dual air guage from viair i think it eas 35.00 i will take picture of the valves go to clippard site and search for fill and bleed valve they are expensive i hope the will handle above 120 psi if need be the shock installmemt was so easy it fell together i used 5/8 plastic air line for trucks to bush the lower mounts it worked like it was made for it you said you pre loaded the shocks to take out the small amount of slack right. I used 3/8 bolts in the front 7/16 in the rear i am pumped to test this out hopefully on saturday my brother inlaw wants me to do his razor when i told him about this mod i dont know what install would be like on a razor there is a company that makes a kit for a razor but your into it 3000.00 in parts alone
.i will send you the picture of the valve tommorow i figure out how load it to the site directly from my phone
View attachment 45317
advertisement
Similar threads
P500
P5 Safety Harnesses
- Hoosier1960
- Pioneer 500/520 Accessories and Modifications
- Replies
- 14
- Views
- 1K
- Replies
- 30
- Views
- 2K
- Replies
- 14
- Views
- 700
- Replies
- 2
- Views
- 378


