P1000m5 Rock Donkey v2 Long Travel

t-bear

t-bear

Active Member
Nov 11, 2019
93
112
33
NE OK
Ownership

  1. 1000-5
1275937249093s.jpg


Oh Damn, I'm gonna have to go back to page 1. Looking forward to it though!
 
CumminsPusher

CumminsPusher

Just a Honda doing Honda things.
Lifetime Member
Supporting Member
Club Contributor
Oct 14, 2015
42,069
322,776
113
Washington/Idaho
Ownership

  1. Other Brand

  2. 1000-5

  3. Talon X LV
@ohanacreek beautiful job. All the hard work paid off, definitely built not bought looks really really good.
 
BigOL3

BigOL3

Well-Known Member
Lifetime Member
Oct 27, 2017
2,997
8,920
113
Deep in the heart of Dixie, Kentwood, La.
Ownership

  1. 1000-5
If you ride with us you can take it for a spin, but I warn you I drove @snuffnwhisky machine and it left me wanting to steal White Lightning.

Ride improvement without the shocks fully tuned is like going from a 500 to a 1000 with the aftermarket shocks. Its still not comparable to a sport machine, I'm not going to compare it that way, but I believe the ride at slower speeds is better than a Talon, but different design parameters. It would be like saying a flexi rock crawling CJ7 is comparable to a trophy truck because they have the same amount of travel and maybe even HP. I wouldn't try to run it around a track or through rough terrain at high speed like a sport machine although I have taken White Lightning for a spin around a track. Arms are WAY to beefy for that, too much weight. I think the frame would be damaged before the arms would. Snuff did an amazing job with the design and setup considering he was working with a "farm rig". Yes I am coddling his ego partly because he deserves it mostly because I still need his help.
I have ridden with @snuffnwhisky and @joeymt33 at Coalmont (Yamaha) and Mulberry (white lightning), but did not ask to ride in white lightning for fear of being ruined with ole Nellie.... lol. But if you got the time, I will take you up on the offer if we meet at some point. No doubt, Snuffnwhisky abilities and skills leaves me just shaking my head in awe.
 
ohanacreek

ohanacreek

My EcoBoost has I4WD
Moderator
Lifetime Member
Jul 25, 2013
11,346
32,050
113
Shelby County, Alabama
Ownership

  1. 1000-5
Well since Joey is showing you Traveller II.0

I’ll share a few videos.


I was actually holding an open Coke going up the hill in the third clip and I didn’t spill it.


Before you give me crap for using a winch, I was solo, unfamiliar with the limits of the machine, testing shocks, DCT programming, and limited on time so I didn’t take any chances.

Rear shocks need to be revalved, DCT programming sorted out, and steering tweaked to account for excess toe-in at full droop,
 
BigOL3

BigOL3

Well-Known Member
Lifetime Member
Oct 27, 2017
2,997
8,920
113
Deep in the heart of Dixie, Kentwood, La.
Ownership

  1. 1000-5
Well since Joey is showing you Traveller II.0

I’ll share a few videos.


I was actually holding an open Coke going up the hill in the third clip and I didn’t spill it.


Before you give me crap for using a winch, I was solo, unfamiliar with the limits of the machine, testing shocks, DCT programming, and limited on time so I didn’t take any chances.

Rear shocks need to be revalved, DCT programming sorted out, and steering tweaked to account for excess toe-in at full droop,
That seemed to be a really long, steep downhill!
 
ohanacreek

ohanacreek

My EcoBoost has I4WD
Moderator
Lifetime Member
Jul 25, 2013
11,346
32,050
113
Shelby County, Alabama
Ownership

  1. 1000-5
Mass update I have been working on this post for a while in my Private Thread so that @Hondasxs could move it to my build thread all at once.


As some of you know after 4days in Tackett in October we were leaving to load up and head home when I had a moment of inattention on a green trail.

B099E691 ACF9 42DA 97C5 2527F96772F6

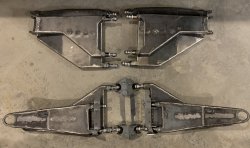
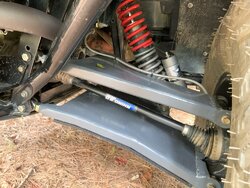
This lead to me ripping the right front a-arm off the frame and bending a SATV upper and lower in the process (which they warranted really quickly). @snuffnwhiskey who is an all around nice guy and true American. I have to kiss ass here because without the work he’d already done putting long travel on White Lightning and his willingness to help, the Rock Donkey would’ve been scrapped due to $1 worth of torn metal. I also would probably still be stuck a few miles into Tackett, but the flatbed on a WhiteLightning got me out. He offered to get it going with mounts modified from his long travel design, after some discussion and me realizing I needed the long travel to even try to keep up with his Snuffoneer it became more than just the mounts


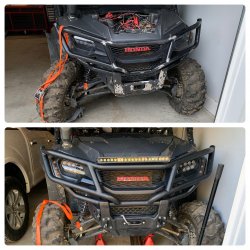
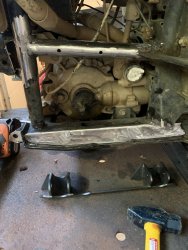
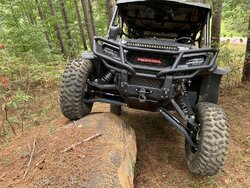
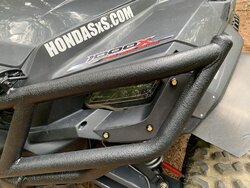
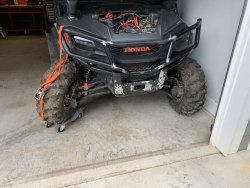
My bumper took a good beating so when I got home I cleaned it up straightened it out, braced the bends, lowered the lightbar mount, and coated it with MonstaLiner.
B9B702C6 744B 49E1 A7B1 A0C04604E885

@snuffnwhiskey created the long travel design.

BA6CBFDC B7BA 4BD8 9990 1FD1CBD30244

Using SATV 6” lift kit axles, YXZ front Fox shocks, RZR Rear Fox shocks, new Springs, new mounts, new valving, larger ball joints, longer tie rods, longer brake lines, bracing in several places, heim joints, (2) ½” bolts instead of (1) 10mm or the upper front mount, 6/1 offset wheels...a LOT more....

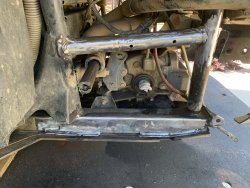
After taking the ROPS off and putting her on the operating table since my shop isn’t built yet. I cut the front mounts off very carefully with a plasma then ground them flush with the frame. This was tedious and dusty taking the time not to gouge the frame or cut anything important.
A878D187 D435 4066 811F EFF86BEB38DB
02629FFB 009D 48F4 9192 510F2FB2E756

7B529F4D AECA 4BD2 910F BD001CD08E64

In the process of getting down off the mountain with the a-arm torn loose it pinched and tore the brakelines. For those that don’t know the 16’ Pioneer has a single brake reservoir in the master cylinder for front and rear brakes. So I purchased a 17’ master cylinder, spacer, and new hose from the fluid reservoir, then when I went to change the reservoir I realized Honda in their weird logic, used the reservoir from a CR-V so the lines are a M12 not the 16' Pioneer M10. I had to reflare the lines and make new lines, since all of the lines to a junction block under the front floorboard had to be changed and are STILL on back order.


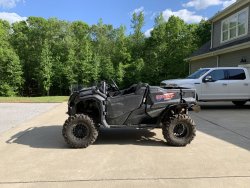
You get about a little more travel a Talon X and can easily fit 32’s, it also relocates the ball joints to near the center of the wheel using the 6/1 wheels so there is less stress on not just them but the tie rods and steering rack, meaning that even though it’s wider at 73” than the 69.5” it was, there’s less stress on parts due to spacers and 5/2 offset. Bigger tierods with heims instead of tie rod ends complete the steering geometry. It steers much easier than the 30's I had.

1B386D6F 8A60 4196 BD61 203BAC4E646A

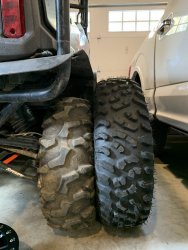
30” Black waters with 60% tread compared to new 32” TerraHooks. They really help crawling over rocks and ledges, the tread is a great hybrid of the Evos and Bighorns to me. I like them very much so far. I am not a mudder but the times I have had to cross a mud hole to finish a trail they did well.

The 32’s leads to an IGR, I went straight to Reduction Boss on FaceBook they have the patent for the IGR for the Pioneer. As he requested, I’m not sharing pics of the IGR.

IGR requires the speedo healers and PCV with Autotune OR a Talon ECU with a lot of adjustments to fuel and DCT maps made via a PV3 by a determined someone. It has more power to crawl since with the IGR and 32’s it’s just about 3% lower geared than factory with stock tires. The issue with putting a Talon ECU in a Deluxe Pioneer is the ECU keeps looking for i4wd and while it works it makes the 4wd mode indicator flash on the dash, annoying but not a big deal. I just have to keep the Flux Capacitor ( the box under the drivers side rear passenger footwell) adjusted well.

You should have realized by now 95% of the credit for this modification is attributed to Snuff, I’ll take credit for the remaining 5% in case something fails so I don’t tarnish his reputation as a master fabricator. He is Dr Frankenstein, I welded the a-arms and maybe had 8” straight of stacked dimes in 80’ of welding, but I got a LOT better with his help.

5B572EDA 938F 48F2 969D 1FA6E7B4B43C
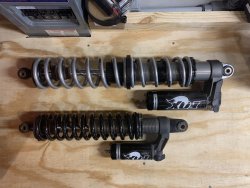
YXZ Fox front vs Honda Fox Front
Added schraders, new springs, and crossover rings. Tuning again by snuff... based off White Lightning.

Added the factory sway bar back on the machine, I took it off when I installed the SATV arms and Pioneer Fox Shocks. Used the POPO rear shocks, Joey found them and they were the right length, I added an extra fire extinguisher just in case. I had to rebuild, revalve, and respring them as well. This is a work in progress as Joey and I are using slightly different rear shock geometry and our weights are different. Mismatched colors are due to available springs vs purchased springs.

37E4E40A BC17 4091 A3B5 D77FDAF8D8C2

So far I am really enjoying the roughly 50-60% more travel it rides amazing with the suspension and the extra sidewall. Clearing obstacles is more fun because I can do it now, but sometimes not as much fun because I can do it a LOT easier now. It is far more stable, there have been a few times when I would have most definitely flopped it on its side factory that it has been very stable, but adding weight as low on the machine as you can add it, removing it from the roof and making it almost 14" wider will do that.

9254F97B 72B0 479A B672 0641C9C3955C


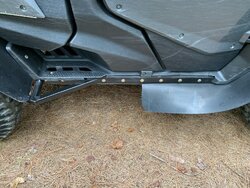
The extra width did mean we had to make our own flares. Which do look ridiculous and like a "magic carpet" but they work better than the mud busters and won't be permanently damaged if they rub a rock or tree. We used a pattern based off of the Mudbusters but much wider, and braced in a few places with some thing HDPE. There is NO mud in the cab now unless it flings off the tires and flies back into the cab through the open windshield area. The extra width also meant tree kickers to keep from getting the rear tire hung against a tree. Since I had near flattened the side rails under the rear passenger step, I cut them and bent them back down.
Using 2" angle I straightened them out, this gave me a place to mount the rear passenger steps to.
Using 5/16 wall tube I triangulated and braced the angle to the frame. It should not bend up and since 32's were as large as I "plan" on going I made it only ¾ of an inch from the rear tire to keep a stump or rock from getting in there and trapping me.

DBD8BAC7 3E32 48ED A160 8B78F6BC530B
 
ohanacreek

ohanacreek

My EcoBoost has I4WD
Moderator
Lifetime Member
Jul 25, 2013
11,346
32,050
113
Shelby County, Alabama
Ownership

  1. 1000-5
Charging relay

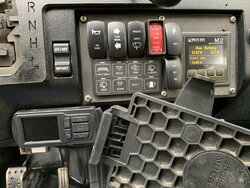
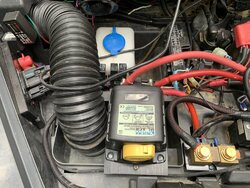
I had a battery go out and I am not sure if it was the ISO that went bad but it had water in it...pressure washing not mud holes. Like I said in an earlier post the voltmeter was hard to see so I replaced it with the BlueSea Multimeter. It has the ability to control a CHARGING RELAY, there is a distinction here. An ACR (Automatic Charging Relay) is a latching relay and only uses power to change its state. It does not require power to stay in that state. I was using a 500a continuous duty relay with the rules in the BlueSea Multimeter to act as a charging relay, but my batteries never would fully charge even using a 5amp BatteryTender.

see post 887

So I changed over to the BlueSea ACR, it has a manual override (yellow knob in image) on the unit and a switch (red switch in image) that will allow you to over ride the voltage sensing charging circuit. This allows you to jump start the machine using the aux battery to power the main electrical system in the case that the starting battery has died. I have used it twice before I was able to replace the starting battery after my cheap way of creating a charging relay damaged it.

3F05CFAB DD2D 48BC 913D 25D63E4C72C4
7CD08B3A 56FB 4C96 8DD7 8FE58D23BCBC
 
advertisement
ohanacreek

ohanacreek

My EcoBoost has I4WD
Moderator
Lifetime Member
Jul 25, 2013
11,346
32,050
113
Shelby County, Alabama
Ownership

  1. 1000-5
Intercom/Rear Winch

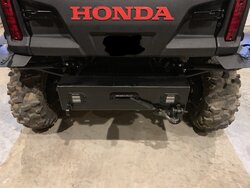
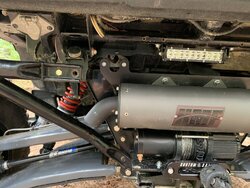
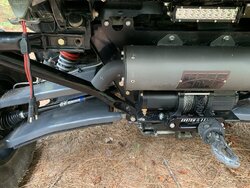
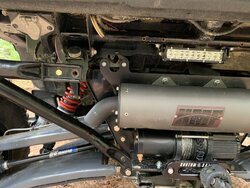
I had the HMF but it was so loud I couldn't hear my daughter and I was afraid it was going to give her the hearing damage I have from years of loud music, loud exhausts, shooting without hearing protecting, and working without hearing protection. I wanted to shed weight since I was adding weight back with the long travel, so I removed the quality rear bumper I had purchased from @knuckledeep. I had put it on since to have a rear winch you have to remove the factory exhaust and put the HMF on, or use the rear bumper from @knuckledeep.

1503A213 C085 4C40 BA37 DF59448C524F
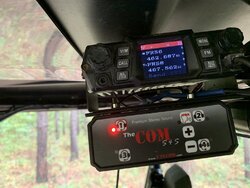
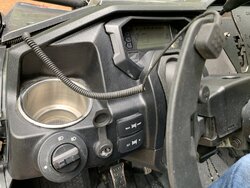
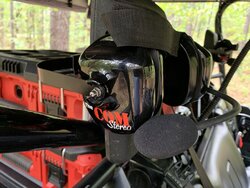
I put the bumper and the factory exhaust back on but even as quiet as the factory exhaust is I still could not hear her, so I also sold the bumper to another member who has since added it to his machine and is happy with his purchase. I then bought the HMF AGAIN...the things we do for our offspring, and I also sold the WetSounds system I had, again to another member, and bought a 4 seat intercom setup with behind the head headsets, bluetooth, and radio input. I could not bring myself to spend 2.5x the money on rugged radios. Considering the radios are the SAME radio just OEM branded for Rugged.

E101360D 40F2 43B6 BFDA A8F0A841766B
0F4217AA 2A78 4F88 A9DC 826162123078
9BEA69F1 6D6B 465B 977F BAA8A97C7976


I can hear her and anyone else who is riding with me without having to almost yell over the exhaust at normal speeds. I can talk freely to someone at 50mph with the windshield off. Its very nice and I am not risking damage to my daughters hearing with the loud exhaust. I can actually hear the radio when someone says something now, since it cuts the music if I am listening over bluetooth and I am not trying to hear it over exhaust.


Removing the bumper meant I had nothing to mount my backup lights to, so I bought a cheap $10 light bar from Amazon and mounted it on the bar that rotates with the bed when it dumps. It is a great place actually, I had the rock lights I was using as backup lights mounted there originally, you can see the holes where they were mounted.

712408F5 87EE 4F39 9D83 643E4E3950C3

I originally had the rear winch mounted to the A-arm bolts but since the rear mounting points for the A-arms changed I had to brace those bolt holes and I added more bracing to the hitch and frame to spread out the load from the winch to more points on the rear frame.
 
ohanacreek

ohanacreek

My EcoBoost has I4WD
Moderator
Lifetime Member
Jul 25, 2013
11,346
32,050
113
Shelby County, Alabama
Ownership

  1. 1000-5
While I was rewiring for the SwitchPro and switches, I added a few things.

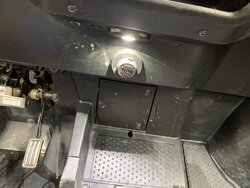
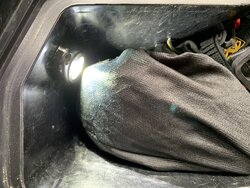
1. More amazon special rock lights as interior lights, since the SwitchPro I bought from another member allows you to dim a circuit, I added a rear light to the bed area this illuminates the drawer setup I in the next post, a light under the dash to light up the floor for when I drop something or feel something(s) crawling on my leg, and one in the glovebox because the dome never really shines in there.

159BBDCF 605E 432B 92DA 2C2C00B2E799
0DDBE6B3 8636 4806 B89C EB8F62686942


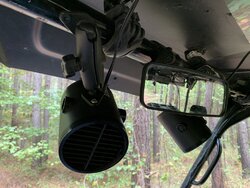
2. Two 12v "tornado fans" on RAM mounts, I tried using the clamp mounts that came on them but they never stayed put. I stole the fan from @joeymt33 one hot Alabama day last summer. Quite literally he gave his up because my daughter was uncomfortable. I immediately ordered two right there in the middle of the trail from Amazon. The ram mounts I added this summer, yeah the ram mounts cost me as much as the fans but they made them functional and I can aim them now. It will let me use them for defrost in the winter on the glass windshield as well, basically just keeping warm humid air off the cold windshield.

CC46BC30 1699 4B49 ABFC 4991887AFABE


3. New turn signals, and a 6Pin trailer connector, I already had a 4Pin but the 6Pin allows me to plug my 40 gallon spray rig in and not have to disconnect the 12v fans. It also gives me a second 12v auxiliary out at the rear of the machine for camp lighting when we are camping. The turn signals I had, had cheap wiring and a cheap unsealed flasher. Everytime I washed the machine it would get water in it and click for hours. The cheap trailer marker lights that came with the kit weren't visible and took extras to make them even remotely visible so I found some amber "eagle eye" LEDs , again from amazon, made plastic covers for the holes in the plastic and mounted them. Much brighter and fewer of them.

D7FD80EF 67D0 4479 B31E A2BD337AAAD4
49023C6F BF64 48C6 BDCA 0799534A1F90
4F26E067 6BAE 4EC4 92AC 43C0ED730031
 
ohanacreek

ohanacreek

My EcoBoost has I4WD
Moderator
Lifetime Member
Jul 25, 2013
11,346
32,050
113
Shelby County, Alabama
Ownership

  1. 1000-5
Camping/Overland

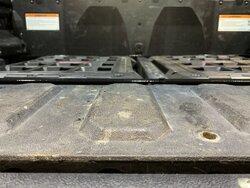
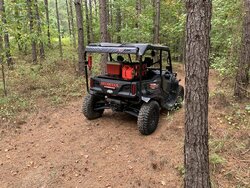
Several Takeovers back @Koda had a jeep drawer mounted in his machine, I liked it but it didn't take up as much of the bed and provide what I felt was the most usable space. I have been wanting to build one for a while now and I finally got around to it after I tried for a year to make Ridgid tool boxes work the way I wanted them to. While I really like the Ridgid setup there was a lot of wasted space when camping and they were stacked so high it was comical. I never could get to what I needed to easily and they were a pain to get in and out quickly, because of the way I had them mounted to the bed. I ended up using the frame I had made for the Ridgid boxes to mount in the bed without the rear seats (the rear seats and seatbelt weight around 100-110lbs. I have small children so they need seats that have their own built in harnesses and I use several ratchet straps to secure the seats to the factory seats without the cushions. The factory seats can be installed or removed in about 10mins once you do it the first time.

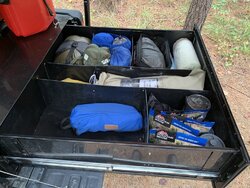
I built the frame and skinned it with HDPE, sealed it tight with silicone and sealed the face of the drawer to the frame using weather strip. I did not get any dust or water in the drawer which made me happy. I used the HDPE inside as dividers/bracing for the bottom of the drawer to reduce weight. Total the drawer and base frame weigh about as much as the rear seats and seatbelt so its a wash. It will only really get used for camping and long weekends.

As I was building it someone led me to Milwaukee Packouts and the mounting bases, man I wish I had just ponied up for that expensive red plastic the first go around. Then Milwaukee came out with Packout coolers, so again I sold the 8 Ridgid boxes and 26qt Ozark Trail cooler and mount off to offset an upgrade.


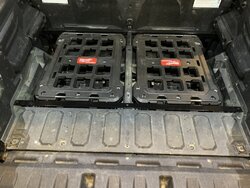
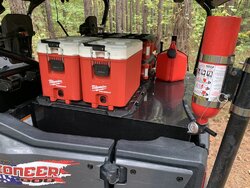
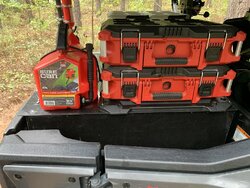
I bought two base plates and mounted them on top of the drawer. I picked up two small packout boxes one for tools and parts, and one as a first-aid kit. I hope that one is a waste of money but I got a buddy who is an EMT and was a Combat medic to set me up with a kit to take care of dang near anything.

After looking and thinking I realized I could mount the coolers and tool boxes in the bed on the packout bases and have them permanently mounted under the drawer. So when its time to use the drawer I remove the packout boxes/coolers, bolt the drawer to try frame, and place the packout coolers and first aid kit on top.
I do have to remove everything from the toolkit packout and place it in a bag at the front of the drawer to lower weight and place it toward the center of the machine. For long trips I have a place to strap a 2.5 gal SureCan down. I absolutely love the SureCans they do NOT LEAK at all not even vapors, and are easy to fill up the machine with. I will not buy another brand fuel can EVER.
9944A3E3 FEEF 40AA 9B46 53C7894956BF
41C20CAE 0295 4AB0 B2A3 83379EF96579
D80BB3B5 280F 47FC 9958 94575DA11195
4586568E 32CA 47A3 8E2D 9086039EF248
1EB08A13 0411 48D8 93A2 484ACE13EF68


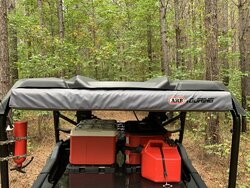
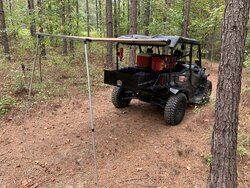
A while back @Ultrasonic1 posted an ARB awning (pn 814301) mounted to the rear of the machine and while I was removing weight with the wet sounds, rear bumper, rear seats, factory exhaust, and trimming down my tool and recovery kits. I added the 20lbs for this. They also had a side and back wall (side PN 813403 rear 813301) that I figured would be great for rainy camping. It should make for a nice wind/rain break for the drawer while I am setting up camp or cooking in camp. Only takes a min or two to setup and maybe double that to take down. The walls are in the center of the drawer. I did have to cut the factory roof to make it fit but I cut the front suspension off the machine earlier this year so... whats a $400 plastic roof at this point?

It is NICE on a hot summer day. We have used it a couple of times at my in-laws place on the river. ( I am not going to post pics of my girls on a public forum too many weirdos in the world)

B4DDD72D 8FFC 4353 800A 7562B1FCE0EF
FAEE6929 87DD 463F 9E0B 10DD17354475
6C2230D1 F278 4697 89BF 8B9CDCFEEA1A
 
ohanacreek

ohanacreek

My EcoBoost has I4WD
Moderator
Lifetime Member
Jul 25, 2013
11,346
32,050
113
Shelby County, Alabama
Ownership

  1. 1000-5
Very nice upgrades @ohanacreek

You’ll notice I gave a lot of credit to others and I probably missed some, I borrowed some ideas and integrated them with my own. Some of the shared designs between the three machines there’s a 80% probability it was snuffs idea, outside that it was bouncing ideas off each other.
 
TripleB

TripleB

Well-Known Member
Lifetime Member
Aug 13, 2018
16,245
147,113
113
Caryville, Tennessee
Ownership

  1. 1000-3

  2. 1000-5
Camping/Overland

Several Takeovers back @Koda had a jeep drawer mounted in his machine, I liked it but it didn't take up as much of the bed and provide what I felt was the most usable space. I have been wanting to build one for a while now and I finally got around to it after I tried for a year to make Ridgid Toold boxes work the way I wanted them to. While I really like the Ridgid setup there was a lot of wasted space when camping and they were stacked so high it was comical. I never could get to what I needed to easily and they were a pain to get in and out quickly. I ended up using the frame I had made for the Ridgid boxes to mount in the bed without the rear seats (the rear seats and seatbelt weight around 100-110lbs. I have small children so they need seats that have their own built in harnesses and I use several ratchet straps to secure the seats to the factory seats without the cushions. The factory seats can be installed or removed in about 10mins once you do it the first time.

I built the frame and skinned it with HDPE, sealed it tight with silicone and used the face of the drawer with weather strip. I did not get any dust or water in the drawer which made me happy. I used the HDPE inside as dividers/bracing for the bottom of the drawer to reduce weight. All total the drawer and base frame weigh about as much as the rear seats and seatbelt so its a wash. It will only really get used for camping and long weekends.

As I was building it someone led me to Milwaukee Packouts and the mounting bases, man I wish I had just ponied up for that expensive red plastic the first go around. Then Milwaukee came out with Packout coolers, so again I sold the 8 Ridgid boxes and 26qt Ozark Trail cooler and mount off to offset an upgrade.


I bought two base plates and mounted them on top of the drawer. I picked up two small packout boxes one for tools and parts, and one as a first-aid kit. I hope that one is a waste of money but I got a buddy who is an EMT and was a Combat medic to set me up with a kit to take care of dang near anything. After looking and thinking I realized I could mount the coolers and tool boxes in the bed on the packout bases and have them permanently mounted under the drawer. So when its time to use the drawer remove the packout boxes/coolers, bolt the drawer to try frame and place the packout coolers and first aid kit on top. I do have to remove everything from the toolkit packout and place it in a bag at the front of the drawer to lower weight and place it toward the center of the machine. For long trips I have a place to strap a 2.5 gal SureCan down. I absolutely love the SureCans they do NOT LEAK at all not even vapors, and are easy to fill up the machine with. I will not buy another brand fuel can EVER.
View attachment 225682
View attachment 225681
View attachment 225685
View attachment 225684
View attachment 225683


A while back @Ultrasonic1 posted an ARB awning (pn 814301) mounted to the rear of the machine and while I was removing weight with the wet sounds, rear bumper, rear seats, factory exhaust, and trimming down my tool and recovery kits. I added the 20lbs for this. They also had a side and back wall (side PN 813403 rear 813301) that I figured would be great for rainy camping. It should make for a nice wind/rain break for the drawer while I am setting up camp or cooking in camp. Only takes a min or two to setup and maybe double that to take down. The walls are in the center of the drawer. I did have to cut the factory roof to make it fit but I cut the front suspension off the machine earlier this year so... whats a $400 plastic roof at this point?

It is NICE on a hot summer day. We have used it a couple of times at my in-laws place on the river. ( I am not going to post pics of my girls on a public forum too many weirdos in the world)

View attachment 225686
View attachment 225687
View attachment 225688
Why do u hang your fire extinguisher upside down?
 
  • Like
Reactions: JenElio and Isaiah
ohanacreek

ohanacreek

My EcoBoost has I4WD
Moderator
Lifetime Member
Jul 25, 2013
11,346
32,050
113
Shelby County, Alabama
Ownership

  1. 1000-5
Why do u hang your fire extinguisher upside down?

That was the only place it would fit and be accessible from the outside. Where I’d originally had it, I had to have it clamped into the mount a certain direction. I didn’t change it and after I got it mounted I thought facing toward the ROPS and down would keep water from staying in it.
 
ohanacreek

ohanacreek

My EcoBoost has I4WD
Moderator
Lifetime Member
Jul 25, 2013
11,346
32,050
113
Shelby County, Alabama
Ownership

  1. 1000-5
Thanks @snuffnwhiskey your particular set of skills with metal let me add a bumper brace. It doesn’t flex and shake like paint mixer anymore.
FBEB2387 95C4 4AED 8ADD 9DC8ED9C8DD3


99F40962 931B 4173 B17E AA1BEEC97E8B


BB35B062 F374 4F8B 860A 3ABBAB4C22BE

Had to wash the fiberglass filaments off from the welding blanket they were making me ITCH.

7E83805F 059C 45E7 B276 1F0193345B90

Took me a bit to get the a-pillar end the perfect length but I think it turned out alright and the MonstaLiner blended really well.
 
advertisement

Similar threads

About us

  • Our community has been around for many years and pride ourselves on offering unbiased, critical discussion among people of all different backgrounds. We are working every day to make sure our community is one of the best.

User Menu

Buy us a beer!

  • Lots of time and money has gone into making sure the community is running the best software, best designs, and all the other bells and whistles. Care to buy us a beer? We'd really appreciate it!

    Beer Fund!

    Club Membership!