Starter replacement instructions -another method

isdxs09

isdxs09

New Member
Dec 16, 2017
1
4
3
US
This isn't the only way to replace the starter on a 2010 MUV700, but it worked for me and after reading a lot of posts, I wanted to give you my experience with pictures.

First remove both seats and then the left, center and right plastic plates beneath them. Now you have exposed everything.

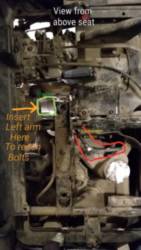
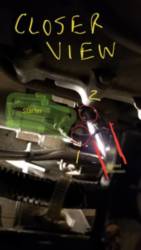
The starter has two screws holding it in place. You can use a socket extension to get the passenger side screw directly from the top. In order to get to the second bolt, I had to go in under the frame and use a swivel flex socket end (see first two pictures).

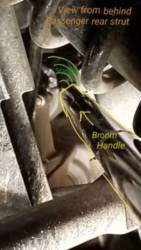
Once I got those out, I took a broomstick and got behind the passenger rear strut and directed the broomstick so that the opposite end was directly on the starter face (picture 3). Then I lightly tapped the broomstick end with a hammer and the starter popped right out. Much nicer than trying to twist tug and pull till your knuckles are bloody.

Then tip the starter on end so you can pull off the rubber covering the battery cable connection. Unscrew the nut with a socket extension and maneuver the starter out in a vertical position.

Then in order to get additional battery cable length to play with, I unhooked two cable fasteners which allowed me to get an extra 4 inches of cable. At that point I could connect the cable to the new starter before lowering it into the 'hole.' Trying to get the new starter oriented correctly was my biggest challenge. It went in vertically and getting it horizontal was a bear, but eventually it slipped into horizontal position. I had to put it in, pull it out, re-adjust the gear, and stick it back in and try again. Once the gears aligned it slipped in part way. However the only way I got the right leverage to pop it in was by lifting the cargo bed all the way up, and then laying on the bed frame on the passenger side and using my left arm to get in there and pull the starter towards the rear. Then I went back up into the passenger area and dropped a crow bar into the hole again. Putting the end right on the tip of the starter near those screws I was able to pull on the crowbar giving leverage to align the screw holes. After that its gravy to resemble.

It's not a 30 minute job. I am not a mechanic but have all the tools I need and it took me 2 hours.

How that helps someone because you guys have helped me a bunch.

Best regards 6eda2063a6ed2f0a82490541bce5cd4e520c9fe64c98c787792c1d439ca5a88dBd7cb20318934d01e38db942bd61e966
Sent from my SM-G950U using Tapatalk
 
gnedinok

gnedinok

New Member
Oct 5, 2016
24
25
3
Wellston, OK
Ownership

  1. 700-2

  2. Big Red
Looks like I'm next. Wish me luck. My dang arms bruise so damn easy I sure ain't looking forward to this :) Where is everyone buying their starters. New ones better?
 
gnedinok

gnedinok

New Member
Oct 5, 2016
24
25
3
Wellston, OK
Ownership

  1. 700-2

  2. Big Red
I was able to pull mine straight out the front without any problem! Bought mine from Crank and Charge on E bay for 98.95 and it included a new solenoid. 1 year warranty. Good reviews with 24 sold, top rated seller. Should be here Friday. Hope I don't drop any of the bolts putting it back, mighty tight EVERYWHERE on this thing. Good time to tighten all the nut clamps where the pans under the set attach, most of mine were quite loose. And an oil and filter change and complete looksee as well whilst everything is open :) . . . gnedinok
 
  • Like
Reactions: Mudwing
J

Jwilliams21

New Member
Oct 24, 2018
2
0
1
Texas
Ownership

  1. 700-2

  2. Big Red
This isn't the only way to replace the starter on a 2010 MUV700, but it worked for me and after reading a lot of posts, I wanted to give you my experience with pictures.

First remove both seats and then the left, center and right plastic plates beneath them. Now you have exposed everything.

The starter has two screws holding it in place. You can use a socket extension to get the passenger side screw directly from the top. In order to get to the second bolt, I had to go in under the frame and use a swivel flex socket end (see first two pictures).

Once I got those out, I took a broomstick and got behind the passenger rear strut and directed the broomstick so that the opposite end was directly on the starter face (picture 3). Then I lightly tapped the broomstick end with a hammer and the starter popped right out. Much nicer than trying to twist tug and pull till your knuckles are bloody.

Then tip the starter on end so you can pull off the rubber covering the battery cable connection. Unscrew the nut with a socket extension and maneuver the starter out in a vertical position.

Then in order to get additional battery cable length to play with, I unhooked two cable fasteners which allowed me to get an extra 4 inches of cable. At that point I could connect the cable to the new starter before lowering it into the 'hole.' Trying to get the new starter oriented correctly was my biggest challenge. It went in vertically and getting it horizontal was a bear, but eventually it slipped into horizontal position. I had to put it in, pull it out, re-adjust the gear, and stick it back in and try again. Once the gears aligned it slipped in part way. However the only way I got the right leverage to pop it in was by lifting the cargo bed all the way up, and then laying on the bed frame on the passenger side and using my left arm to get in there and pull the starter towards the rear. Then I went back up into the passenger area and dropped a crow bar into the hole again. Putting the end right on the tip of the starter near those screws I was able to pull on the crowbar giving leverage to align the screw holes. After that its gravy to resemble.

It's not a 30 minute job. I am not a mechanic but have all the tools I need and it took me 2 hours.

How that helps someone because you guys have helped me a bunch.

Best regardsView attachment 72255View attachment 72256View attachment 72257

Sent from my SM-G950U using Tapatalk


Does anyone know of a video I could watch before replacing the starter? I am not the most mechanically sound person in the world. Trying to change the starter on my 2013 muv700. Couldn’t find anything on youtube
 
gnedinok

gnedinok

New Member
Oct 5, 2016
24
25
3
Wellston, OK
Ownership

  1. 700-2

  2. Big Red
Does anyone know of a video I could watch before replacing the starter? I am not the most mechanically sound person in the world. Trying to change the starter on my 2013 muv700. Couldn’t find anything on youtube

J, I will tell you it's a chore. Not sure of the difference from my 09 to your 13 nor any videos. remove the battery cables first, then both seats and pans, then the cable clips under the passenger seat and on the engine (8mm). A 10mm swivel socket is dang near a must, I did make it work with a 3/8 swivel and 10mm socket but just barley (bought a set after). The bolts on the starter are 10mm as is the nut that connects the cable to the starter, 1/4 inch drive ratchet and 10mm is handy for the cable (tight quarters, everywhere). With the cable clips loose I was able to bring the starter out the front and disconnect the cable with it out in the open as I could not find my 1/4" drive 10mm socket :-(
Be sure to grease the o-ring on the new starter. A small pry bar is a must for removal of the old starter and popping the new one back in.
Did I mention that things are TIGHT QUARTERS down there. Bruised this old mans arms up something fierce! Hope this helps and good luck man. gnedinok
 
  • Like
Reactions: Mudwing
J

Jwilliams21

New Member
Oct 24, 2018
2
0
1
Texas
Ownership

  1. 700-2

  2. Big Red
J, I will tell you it's a chore. Not sure of the difference from my 09 to your 13 nor any videos. remove the battery cables first, then both seats and pans, then the cable clips under the passenger seat and on the engine (8mm). A 10mm swivel socket is dang near a must, I did make it work with a 3/8 swivel and 10mm socket but just barley (bought a set after). The bolts on the starter are 10mm as is the nut that connects the cable to the starter, 1/4 inch drive ratchet and 10mm is handy for the cable (tight quarters, everywhere). With the cable clips loose I was able to bring the starter out the front and disconnect the cable with it out in the open as I could not find my 1/4" drive 10mm socket :-(
Be sure to grease the o-ring on the new starter. A small pry bar is a must for removal of the old starter and popping the new one back in.
Did I mention that things are TIGHT QUARTERS down there. Bruised this old mans arms up something fierce! Hope this helps and good luck man. gnedinok

Well, I finally got my starter and tackled the project. I must say, it was much easier than I anticipated. The hardest part was getting the seats out lol. Removed the top plate and bolts that hold the starter in. Had to lift the hydraulic bed anpush the old one out with a big screwdriver and pulled it out the top. The new one slid right in and fired right up! I went with the expensive Honda replacement. Read too many bad reviews on the aftermarket starters. Thanks for the help!
 
R

roamineye

New Member
Jan 8, 2019
2
0
1
Oklahoma
Ownership

  1. Big Red
Wow. Thanks for this, gents. It's exactly what I needed. I'm starting mine tomorrow.
 
R

RHS

New Member
Mar 4, 2019
1
1
1
Mississippi
Ownership

  1. Big Red
Just replaced starter on my 2012 Big Red. It never gave any hint of a problem then just wouldn't do nothing but click one day. I found that if you remove the seats, plastic seat pans and then take the "bracket" that goes from one seat side to the other over the engine, remove the 2 bolts that hold the brake cable and slide the bracket out of the way you have a LOT more room to work for coming out and going back in with the starter. Mine came out easy by wiggling it and used a wooden handle to tap it back in to seat the O ring... now...I took the old starter apart afterwards to see why it quit and the coils inside the starter housing were in a hundred pieces...anyone ever have this before?
 
  • Like
Reactions: isdxs09
S

Steve1234

New Member
Oct 11, 2020
1
0
1
CA
Ownership

  1. Big Red
Any advice on getting the gears lined up?
 

About us

  • Our community has been around for many years and pride ourselves on offering unbiased, critical discussion among people of all different backgrounds. We are working every day to make sure our community is one of the best.

User Menu

Buy us a beer!

  • Lots of time and money has gone into making sure the community is running the best software, best designs, and all the other bells and whistles. Care to buy us a beer? We'd really appreciate it!

    Beer Fund!

    Club Membership!