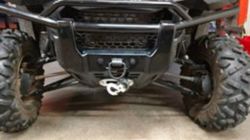
P1000 Superwinch Terra 45 Install with KFI Mount

ToddACimer

ToddACimer

Pioneer 1005-2
Lifetime Member
Oct 7, 2016
3,685
15,587
113
Oshkosh, Wi
Ownership

  1. 1000-5
I bought a 4500 lbs Terra45 Superwinch and figured I would post up a few photos of the KFI mount and general installation. I chose the KFI mount because it mounts to the frame at both lower bumper mounts and at the front differential. I do not really like the EMP mount with the cheesy u-bolts or that it is bolted to the bumper rather than the frame

Here's the electrical under the hood. I wanted everything tucked under the hood and off to the side so I didn't loose any storage space or a future second battery location. Both the positive and negative cables to the battery were cut significantly shorter than the original kit cables
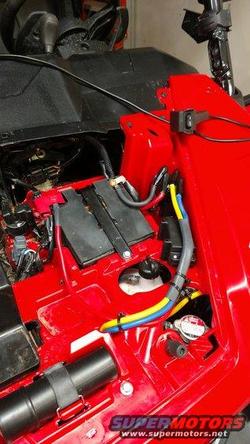
Img 20161112 200357509
Here's the winch cables routed down the left side of the radiator and under the shroud
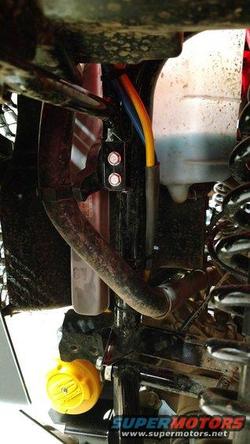
Img 20161112 200034457
Here's the winch mounted on the KFI mount and the winch cables cut to length at the winch
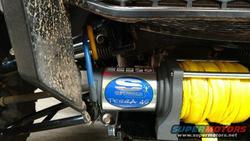
Img 20161112 200021638
Since the winch kit I bought came with steel cable and I switched to synthetic, I had a temporary roller fairlead installed until I bought a hawse. I didn't actually use the winch with the roller. I also didn't like the steep angle of the cable to the winch fairlead cut out in the bumper
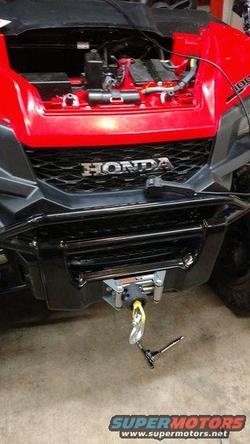
Img 20161112 203757178
Again, steep angle up above the top of the drum just to get to the fairlead cut out
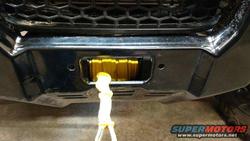
Img 20161120 151331860
Here's my thought of where the winch cable should have come out.
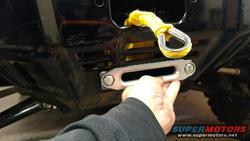
Img 20161120 151348274
In order to route the cable through this location a few holes were needed in the stock front bumper
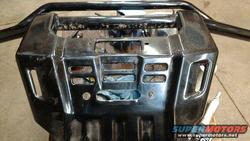
Img 20161120 170820325
Here's the fairlead and the adaptor bracket I fabricated placed on the bumper
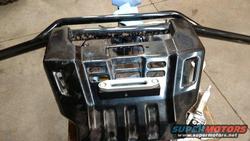
Img 20161120 170928392
Here's the bumper mounted back up with the hawse in place
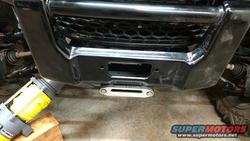
Img 20161120 174151757
In order to do this mod, you will need the stock Terra45 mount inorder to attach the fairlead and bumper back to the frame. I alsu used the Terra45 bolt holes to transfer punch the hole pattern onto the back side of the bumper
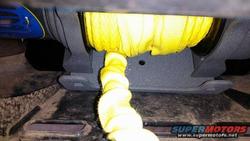
15055668 10100559700332907 8720658877059644890
Here's the cable routed through the cut out and quick edge installed around the cut out
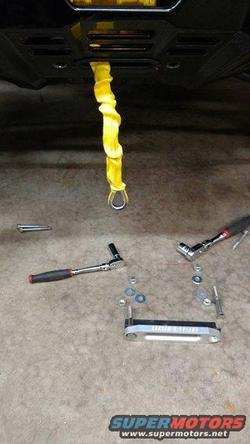
15095127 10100559700597377 2219615837650442828
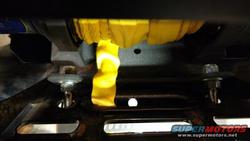
Here's the fairlead bolted in place. I tightened up all the bumper bolts before installing the fairlead. I then tightened the bolts on the back side of winch mount. Lastly I tightened the jam nuts. This allows the bolts to put the bumper in compression and to make the structure more rigid
Img 20161120 175908526
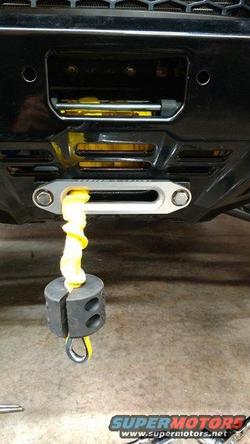
The final product, a straight line pull off the winch drum and a solid fairlead mount
Img 20161120 175902579
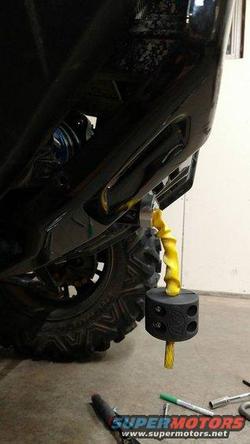
Here's a side profile shot of the bumper after installation
15036308 10100559733805827 3822621336280784207 n
 
ToddACimer

ToddACimer

Pioneer 1005-2
Lifetime Member
Oct 7, 2016
3,685
15,587
113
Oshkosh, Wi
Ownership

  1. 1000-5
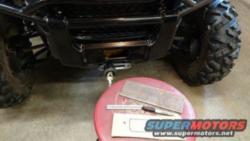
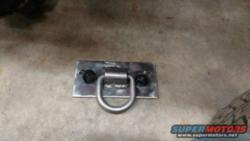
With my winch fairlead relocated, my next task was adding a tow point for recovery and hooking my winch cable when using a snatch block. I made a 1/4" plate to mount behind the stock fairlead hole with a 12k weld on D-ring. End result turned out pretty good with spray on bedliner.

A little bit of cardboard aided design (CAD?) for hole layout and initial dimensions

15241211 10100563237414567 5880344887433054032
Here's the hook plate with the 12k D-ring welded on
15219417 10100563279425377 2215095110868988445
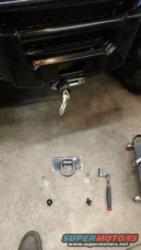
Parts ready for fit up. Bolt and washer, 3/16" spacer to allow the tow point to sit flush behind the fairlead cutout, washer and lock nut on the back side
15241793 10100563279490247 77581778505738801 n
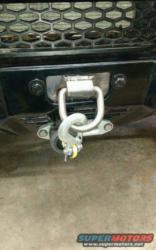
Mounted up and winch hooked
14937324 10100563279460307 892742128173430784
Painted with Rustoleum bedliner
15192531 10100563275563117 352336562634053615
 
Manwell

Manwell

Well-Known Member
Lifetime Member
Jul 12, 2016
803
2,439
93
Georgia
Ownership

  1. 1000-5
Nice job and thanks for sharing!
 
joeymt33

joeymt33

i4WD=imitated 4WD
Moderator
Lifetime Member
Supporting Member
Club Contributor
Mar 17, 2015
11,096
39,129
113
Guntersville, AL
Ownership

  1. 1000-3

  2. 1000-5
Good idea!


Signature:

QUOTE by Sharp, Where's Don? He's probably spray painting stuff lmfao!
 
GlockMeister

GlockMeister

The Bearded Wonder
Lifetime Member
Supporting Member
May 11, 2016
7,606
35,593
113
Greenville, Mo
Ownership

  1. 1000-5
I added a recovery point in that same place. Used some leftover half inch flat stock then added a shackle.
 
GlockMeister

GlockMeister

The Bearded Wonder
Lifetime Member
Supporting Member
May 11, 2016
7,606
35,593
113
Greenville, Mo
Ownership

  1. 1000-5
Negative..but on my list to add
 
lrandy129

lrandy129

Curmudgeon
Lifetime Member
Nov 4, 2016
113
229
63
NELA
Ownership

  1. 1000-5
Nice work and nice write-up, thanks. On a related note - does the Honda mount place the winch that low in the bumper or is it just the KFI?
 
ToddACimer

ToddACimer

Pioneer 1005-2
Lifetime Member
Oct 7, 2016
3,685
15,587
113
Oshkosh, Wi
Ownership

  1. 1000-5
Nice work and nice write-up, thanks. On a related note - does the Honda mount place the winch that low in the bumper or is it just the KFI?

I have not seen the Honda mount installed in person. For me the price was a big turn off. I also wasn't a fan of the EMP mount with the winch upside down and most of the bolts going into the bumper rather than the frame.
 
advertisement
lrandy129

lrandy129

Curmudgeon
Lifetime Member
Nov 4, 2016
113
229
63
NELA
Ownership

  1. 1000-5
I'm with you - would rather tie to the frame than the bumper. Looking at another thread, it sounds like the OEM setup has a harsh angle as well. Believe you nailed it with this install.
 
ToddACimer

ToddACimer

Pioneer 1005-2
Lifetime Member
Oct 7, 2016
3,685
15,587
113
Oshkosh, Wi
Ownership

  1. 1000-5
I'm with you - would rather tie to the frame than the bumper. Looking at another thread, it sounds like the OEM setup has a harsh angle as well. Believe you nailed it with this install.

Thanks. I'm glad to have a secure mount for the winch, a good straight line pull angle and a sturdy tow point for use with a snatch block. Hopefully I'm not stuck too often to need them. I'm a little leary about the low speed clutch engagement and wheel slip and having a good recovery method should save clutches
 
Corona1

Corona1

Well-Known Member
Lifetime Member
Nov 5, 2016
319
878
93
The Land of Cheese
Ownership

  1. 1000-5
I like what you did there, nice work.
I went with the EMP mount to eliminate the steep angle, and to be honest not not very impressed with the mount.


Sent from my iPhone using Tapatalk
 
  • Like
Reactions: Eltobgi
G

GTKing

New Member
Mar 20, 2017
2
1
3
Charlotte, NC
Ownership

  1. 1000-5
I bought a 4500 lbs Terra45 Superwinch and figured I would post up a few photos of the KFI mount and general installation. I chose the KFI mount because it mounts to the frame at both lower bumper mounts and at the front differential. I do not really like the EMP mount with the cheesy u-bolts or that it is bolted to the bumper rather than the frame

Here's the electrical under the hood. I wanted everything tucked under the hood and off to the side so I didn't loose any storage space or a future second battery location. Both the positive and negative cables to the battery were cut significantly shorter than the original kit cables
View attachment 26949
Here's the winch cables routed down the left side of the radiator and under the shroud
View attachment 26950
Here's the winch mounted on the KFI mount and the winch cables cut to length at the winch
View attachment 26951
Since the winch kit I bought came with steel cable and I switched to synthetic, I had a temporary roller fairlead installed until I bought a hawse. I didn't actually use the winch with the roller. I also didn't like the steep angle of the cable to the winch fairlead cut out in the bumper
View attachment 26952
Again, steep angle up above the top of the drum just to get to the fairlead cut out
View attachment 26953
Here's my thought of where the winch cable should have come out.
View attachment 26954
In order to route the cable through this location a few holes were needed in the stock front bumper
View attachment 26955
Here's the fairlead and the adaptor bracket I fabricated placed on the bumper
View attachment 26956
Here's the bumper mounted back up with the hawse in place
View attachment 26957
In order to do this mod, you will need the stock Terra45 mount inorder to attach the fairlead and bumper back to the frame. I alsu used the Terra45 bolt holes to transfer punch the hole pattern onto the back side of the bumper
View attachment 26958
Here's the cable routed through the cut out and quick edge installed around the cut out
View attachment 26959
Here's the fairlead bolted in place. I tightened up all the bumper bolts before installing the fairlead. I then tightened the bolts on the back side of winch mount. Lastly I tightened the jam nuts. This allows the bolts to put the bumper in compression and to make the structure more rigid
View attachment 26960
The final product, a straight line pull off the winch drum and a solid fairlead mount
View attachment 26961
Here's a side profile shot of the bumper after installation
View attachment 26962
Great job with this mod. I have the same winch and want to do the same thing to my new P1000/5D. I'm curious about the adapter you fabricated for the hawse. What's it made of and how did you make it?
 
  • Like
Reactions: dotman1
ToddACimer

ToddACimer

Pioneer 1005-2
Lifetime Member
Oct 7, 2016
3,685
15,587
113
Oshkosh, Wi
Ownership

  1. 1000-5
Great job with this mod. I have the same winch and want to do the same thing to my new P1000/5D. I'm curious about the adapter you fabricated for the hawse. What's it made of and how did you make it?

I use 1"x1" or 1-1/4"x1-1/4" angle. I don't recall the actual size but it is the same height as the fairlead. Since the fairlead is bolted through the bumper and back to the Superwinch fairlead mount under the winch, the bolts hold the angle flush to the bumper and the fairlead at the right angle.
 
Last edited:
G

GTKing

New Member
Mar 20, 2017
2
1
3
Charlotte, NC
Ownership

  1. 1000-5
I us


I use 1"x1" or 1-1/4"x1-1/4" angle. I don't recall the actual size but it is the same height as the fairlead. Since the fairlead is bolted through the bumper and back to the Superwinch fairlead mount under the winch, the bolts hold the angle flush to the bumper and the fairlead at the right angle.
Ok, I see. So I assume you just cut material out of the angle to make clearance for the rope and then drilled two holes in it for the bolts?
 
ToddACimer

ToddACimer

Pioneer 1005-2
Lifetime Member
Oct 7, 2016
3,685
15,587
113
Oshkosh, Wi
Ownership

  1. 1000-5
Ok, I see. So I assume you just cut material out of the angle to make clearance for the rope and then drilled two holes in it for the bolts?
Yes the cut out was the size of the radiused portion of the fairlead so the rope won't touch it
 
J

Joflu

New Member
Jul 7, 2018
1
0
1
Noelville Ontario
Ownership

  1. 1000-5
With my winch fairlead relocated, my next task was adding a tow point for recovery and hooking my winch cable when using a snatch block. I made a 1/4" plate to mount behind the stock fairlead hole with a 12k weld on D-ring. End result turned out pretty good with spray on bedliner.

A little bit of cardboard aided design (CAD?) for hole layout and initial dimensions

View attachment 36923
Here's the hook plate with the 12k D-ring welded on
View attachment 36924
Parts ready for fit up. Bolt and washer, 3/16" spacer to allow the tow point to sit flush behind the fairlead cutout, washer and lock nut on the back side
View attachment 36925
Mounted up and winch hooked
View attachment 36926
Painted with Rustoleum bedliner
View attachment 36927
I bought a 4500 lbs Terra45 Superwinch and figured I would post up a few photos of the KFI mount and general installation. I chose the KFI mount because it mounts to the frame at both lower bumper mounts and at the front differential. I do not really like the EMP mount with the cheesy u-bolts or that it is bolted to the bumper rather than the frame

Here's the electrical under the hood. I wanted everything tucked under the hood and off to the side so I didn't loose any storage space or a future second battery location. Both the positive and negative cables to the battery were cut significantly shorter than the original kit cables
View attachment 26949
Here's the winch cables routed down the left side of the radiator and under the shroud
View attachment 26950
Here's the winch mounted on the KFI mount and the winch cables cut to length at the winch
View attachment 26951
Since the winch kit I bought came with steel cable and I switched to synthetic, I had a temporary roller fairlead installed until I bought a hawse. I didn't actually use the winch with the roller. I also didn't like the steep angle of the cable to the winch fairlead cut out in the bumper
View attachment 26952
Again, steep angle up above the top of the drum just to get to the fairlead cut out
View attachment 26953
Here's my thought of where the winch cable should have come out.
View attachment 26954
In order to route the cable through this location a few holes were needed in the stock front bumper
View attachment 26955
Here's the fairlead and the adaptor bracket I fabricated placed on the bumper
View attachment 26956
Here's the bumper mounted back up with the hawse in place
View attachment 26957
In order to do this mod, you will need the stock Terra45 mount inorder to attach the fairlead and bumper back to the frame. I alsu used the Terra45 bolt holes to transfer punch the hole pattern onto the back side of the bumper
View attachment 26958
Here's the cable routed through the cut out and quick edge installed around the cut out
View attachment 26959
Here's the fairlead bolted in place. I tightened up all the bumper bolts before installing the fairlead. I then tightened the bolts on the back side of winch mount. Lastly I tightened the jam nuts. This allows the bolts to put the bumper in compression and to make the structure more rigid
View attachment 26960
The final product, a straight line pull off the winch drum and a solid fairlead mount
View attachment 26961
Here's a side profile shot of the bumper after installation
View attachment 26962
Did you encounter flexing in your bracket when pulling with the winch? I installed a Superwinch 4500 with a KFI 101285 mount. I find it’s flexing quite a bit.
 
M

MTLuckyDan

Member
Jun 18, 2018
38
51
18
US
So for guys that plow...is it better to have the rope or cable coming out in the stock location regardless of angle? Thinking a low location like in this thread would not be good for lifting plow.

Sent from my P00I using Tapatalk
 
ToddACimer

ToddACimer

Pioneer 1005-2
Lifetime Member
Oct 7, 2016
3,685
15,587
113
Oshkosh, Wi
Ownership

  1. 1000-5
So for guys that plow...is it better to have the rope or cable coming out in the stock location regardless of angle? Thinking a low location like in this thread would not be good for lifting plow.

Sent from my P00I using Tapatalk

I think the mount location is ok for a plow but a winch strap should be used instead of a rope or cable

Did you encounter flexing in your bracket when pulling with the winch? I installed a Superwinch 4500 with a KFI 101285 mount. I find it’s flexing quite a bit.

With most manufactured parts the holes are oversized or slotted. This mount is no different. Rather than rely on the shear of the bolt clamp load it's a good idea to preload the mount before final torque of the fasteners so the bolts are in shear rather than the clamp load of the bolts. If you mount the winch plate loose in the 4 bolts it probably will shift during the first full load pull.
 
advertisement

About us

  • Our community has been around for many years and pride ourselves on offering unbiased, critical discussion among people of all different backgrounds. We are working every day to make sure our community is one of the best.

User Menu

Buy us a beer!

  • Lots of time and money has gone into making sure the community is running the best software, best designs, and all the other bells and whistles. Care to buy us a beer? We'd really appreciate it!

    Beer Fund!

    Club Membership!