P1000 Switch and Accessory Wiring - Need Feedback

J

John79042

Member
Nov 26, 2020
19
38
13
Huntsville, AL
Ownership

  1. 1000-5
Hey Guys! I am new to the forum with a new P1K-5. I am in the process of planning out my accessory wiring. I have been digging through the wealth of information on this site for inspiration. Attached is how I intend to wire my system. I am an engineer by trade, but realize that real world experience often trumps what the books say. That is why I am here asking for feedback from folks who have "been there, done that". Hopefully I can avoid any pitfalls and do it right the first time. With that, please provide feedback on the attached wiring diagram. A few notes below...

1) I have added an auxiliary battery to power my winch and accessories using the dual battery kit from True.
2) Due to limited space, I decided to forego the Stinger and instead use a standard micro relay to control power to the switches. Same effect as using the Stinger, but my fuse panel is constantly hot. This will allow me to power accessories that I may want on when the key is off. Also, I added an "Arm" toggle switch to provide power to my switches in case I want to operate accessories with the key off.
3) I intend to run all my accessories through relays, but can run power directly from my fuse block to an additional accessory if I need to. I found a micro relay box that holds seven micro relays. The system can be expanded by clipping addition relay holders on. I intend to mount the relay box behind the switch panel bolted to the top side of the storage compartment.
4) I am adding a Positive (+) Terminal block to terminate all the relay output feeds. I am also adding a Ground (-) bus bar to attach accessory connections next to the terminal block. When I add accessories, all I will have to do is connect the (+) and (-) connections to the Terminal Block and Bus Bar respectively and put the correct sized fuse in the fuse box.
5) Still have not figured out where to mount my fuse box. Leaning toward welding a couple cross bars to the factory battery hold-down bracket to mount it over the factory battery. Thoughts?

Thanks,
Johnnie
 

Attachments

  • DuelBatt_R1.pdf
    725.2 KB · Views: 507
  • Like
Reactions: JenElio and TripleB
CID

CID

Well-Known Member
Lifetime Member
Supporting Member
Oct 27, 2019
5,095
22,910
113
SE Denver-ish
Ownership

  1. Talon R
That's such a good drawing, it should be 'out in the open'.

I 5q8JQvb XL
 
J

John79042

Member
Nov 26, 2020
19
38
13
Huntsville, AL
Ownership

  1. 1000-5
Haha. Thanks. I create/review drawings all the time for aviation systems.
 
  • Like
Reactions: CID
Gabbas

Gabbas

Well-Known Member
May 17, 2020
280
700
93
Humboldt, Iowa
Ownership

  1. 1000-5
One question, if your fuse panel is going to be hot all the time so you can run stuff without the key on. Why have a "switch" to turn on that will activate acc? With the fuse panel directly to the battery it will always be powered. The way I ran my fuse panel was + from the stinger which was only activated by key on power.
Great drawing by the way.


Sent from my Pixel 4 using Tapatalk
 
J

John79042

Member
Nov 26, 2020
19
38
13
Huntsville, AL
Ownership

  1. 1000-5
Good question. Just to clarify, the fuse panel is powered all the time, but not the switches. The switches only have power when the Key On is activated. Key On activates the relay that provides power to the switches. Only then can the accessories be used. The Override switch provides power to the relay that activates the power to the switches if there is a situation where I want to run an accessory with the key off. The intent of that comment was "if" there was an accessory I wanted to be available all the time, it could be wired to the fuse box through a switch that is not controlled by the Key On/Override relay. An example might be an alarm that gets installed that needs power all the time. You could just wire the alarm directly to the battery, but that defeats the purpose of having a nice clean wiring setup.
 
  • Like
Reactions: Mudwing and TripleB
Gabbas

Gabbas

Well-Known Member
May 17, 2020
280
700
93
Humboldt, Iowa
Ownership

  1. 1000-5
I guess in my eyes it creates an unnecessary power draw. I have seen them wired where you have a switch wired to + and can hit that switch and then that turns the power on to the fuse box without the key being on.

Sent from my Pixel 4 using Tapatalk
 
J

John79042

Member
Nov 26, 2020
19
38
13
Huntsville, AL
Ownership

  1. 1000-5
I guess in my eyes it creates an unnecessary power draw. I have seen them wired where you have a switch wired to + and can hit that switch and then that turns the power on to the fuse box without the key being on.

Same concept here, except the key on or override switch is controlling the switches, not the entire power path like using the Stinger. If you trace the power from each line in the fuse box, each one goes to a normally open relay or switch. With the open circuit on each of those lines, there will be no power draw on the system when powered off. The only way it will draw power (other than key on or override), is if there is a short in a wire to ground. In that case one of 2 things will happen: fuse will blow or it will burn to the ground. It's just a different way to skin a cat. This way, I save a little space under my hood, and a few dollars on a small relay v/s a big relay (Stinger).

Good discussion. It made me go back and double check to make sure I didn't have a closed circuit.
 
  • Like
Reactions: Mudwing and TripleB
Gabbas

Gabbas

Well-Known Member
May 17, 2020
280
700
93
Humboldt, Iowa
Ownership

  1. 1000-5
Same concept here, except the key on or override switch is controlling the switches, not the entire power path like using the Stinger. If you trace the power from each line in the fuse box, each one goes to a normally open relay or switch. With the open circuit on each of those lines, there will be no power draw on the system when powered off. The only way it will draw power (other than key on or override), is if there is a short in a wire to ground. In that case one of 2 things will happen: fuse will blow or it will burn to the ground. It's just a different way to skin a cat. This way, I save a little space under my hood, and a few dollars on a small relay v/s a big relay (Stinger).

Good discussion. It made me go back and double check to make sure I didn't have a closed circuit.
Absolutely. Also helped me understand a bit about wiring. I just went with the tried and true method with a stinger. Lol.

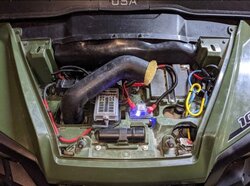
Here's my setup with a winch, a light bar and 2 pod lights. I also have the dual battery, dual voltage gauge, and dual USB plug. 54f1b61e5c6ebc179a72030f2546467d

Sent from my Pixel 4 using Tapatalk
 
J

JAL

Active Member
Nov 22, 2020
65
218
33
Medford, OR
Ownership

  1. 1000-5
That's such a good drawing, it should be 'out in the open'.

View attachment 238384

I am installing a second battery on my Honda. I was very confused by the terminology and how to wire up a winch.

1) It looks like the Warn 4500 has a max amperage draw of 318 amps so most winches are wired directly to the aux battery without an inline fuse.
2) I think the diagram shows a SMART Isolator from True Industries in use, not a simple diode based Isolator. A simple diode based isolator seems to have three terminals, a single input from the alternator and two outputs for two batteries.
 
J

John79042

Member
Nov 26, 2020
19
38
13
Huntsville, AL
Ownership

  1. 1000-5
I am installing a second battery on my Honda...

I am installing a winch and did not include it in the diagram, but it will connect directly to the 2nd battery. You are correct, I am using the True isolator.
 
advertisement
CID

CID

Well-Known Member
Lifetime Member
Supporting Member
Oct 27, 2019
5,095
22,910
113
SE Denver-ish
Ownership

  1. Talon R
I am installing a second battery on my Honda. I was very confused by the terminology and how to wire up a winch.

1) It looks like the Warn 4500 has a max amperage draw of 318 amps so most winches are wired directly to the aux battery without an inline fuse.
2) I think the diagram shows a SMART Isolator from True Industries in use, not a simple diode based Isolator. A simple diode based isolator seems to have three terminals, a single input from the alternator and two outputs for two batteries.
The True isolator will also have 3 wires, one heavy gauge wire to each battery and the third is a pigtail run to ground - I'm guessing that's to reference the two battery voltages telling it when to switch On/Off.

I cQVsGBM M
 
Last edited:
  • Like
Reactions: JenElio
J

John79042

Member
Nov 26, 2020
19
38
13
Huntsville, AL
Ownership

  1. 1000-5
Gabbas,

Nice, clean setup. Is that the winch Solenoid in the upper right? Is it an SATV winch? I have a SATV winch inbound, and curious if the solenoid will fit there.
 
J

John79042

Member
Nov 26, 2020
19
38
13
Huntsville, AL
Ownership

  1. 1000-5
The True isolator will also have 3 wires, one heavy gauge wire to each battery and the third is a pigtail run to ground - I'm guessing that's to reference the two battery voltages telling it when to switch On/Off.

Good catch!!! I forgot to add that... Time to update the drawing :)
 
  • Like
Reactions: CID and TripleB
J

JAL

Active Member
Nov 22, 2020
65
218
33
Medford, OR
Ownership

  1. 1000-5
I am installing a winch and did not include it in the diagram, but it will connect directly to the 2nd battery. You are correct, I am using the True isolator.

Thanks for the clarification.

I also need to clarify my comment. To be clear, the winch is connected to the control solenoid which in turn is connected to the aux battery :).
 
  • Like
Reactions: TripleB
Gabbas

Gabbas

Well-Known Member
May 17, 2020
280
700
93
Humboldt, Iowa
Ownership

  1. 1000-5
Gabbas,

Nice, clean setup. Is that the winch Solenoid in the upper right? Is it an SATV winch? I have a SATV winch inbound, and curious if the solenoid will fit there.
I have a Viper Max 5000lb winch.

Sent from my Pixel 4 using Tapatalk
 

About us

  • Our community has been around for many years and pride ourselves on offering unbiased, critical discussion among people of all different backgrounds. We are working every day to make sure our community is one of the best.

User Menu

Buy us a beer!

  • Lots of time and money has gone into making sure the community is running the best software, best designs, and all the other bells and whistles. Care to buy us a beer? We'd really appreciate it!

    Beer Fund!

    Club Membership!