Broken + stuck ball joint advice

ranchdad

ranchdad

Member
Sep 24, 2022
12
63
13
Upstate SC
Ownership

  1. 1000-5
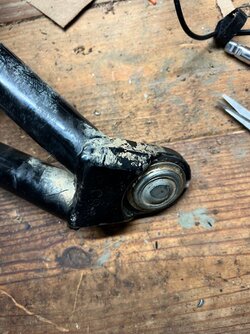
Hey everyone, broke a couple of ball joints last week (previous post). No issues getting the upper ball joint off but the lower is stuck. Two issues I see, first being the lip is bent over the arm-hole and second the wiggly piece (for lack of a better term) is gone so there is nothing solid to apply pressure to. For context, I'm using the harbor freight ball joint press

I started to press on the open side but stopped after the realization that it's likely going to punch through the back rather than press out. Anyone run into this before? Hoping there is an easier way than burning through a bunch of dremel cutting wheels
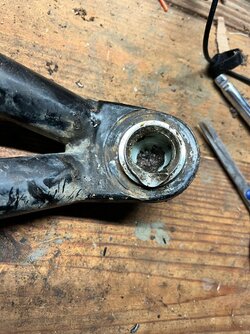
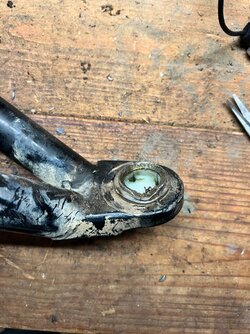
IMG 1066 IMG 1067 IMG 1068
 
Neohio

Neohio

Beast of the East
Lifetime Member
Supporting Member
Club Contributor
Dec 22, 2016
14,573
73,616
113
Painesville Ohio
Ownership

  1. 1000-5
good idea, I hadn't considered that. quick sanity check, it does press on the ball stud side right?
Sometimes we are so concerned with doing things properly, we overlook backyard engineering to get it done.

And yes, apply force to the stud side, the joint bucket should pop out the other end.
 
ToddACimer

ToddACimer

Pioneer 1005-2
Lifetime Member
Oct 7, 2016
3,669
15,484
113
Oshkosh, Wi
Ownership

  1. 1000-5
With a HF BJ press you should be able to put the shaft inside the BJ cup and the smallest collar on the lower side of the a-arm and push it through. Alternatively a chisel on the stud side can be used to crush the ball joint body. Chisel it front side, back side and knuckle side, it'll almost fall out once deformed
 
Scoop

Scoop

Well-Known Member
Lifetime Member
Supporting Member
Sep 7, 2021
5,130
20,280
113
Michigan
Ownership

  1. Other Brand

  2. 1000-5

  3. Talon R LV
With a HF BJ press you should be able to put the shaft inside the BJ cup and the smallest collar on the lower side of the a-arm and push it through. Alternatively a chisel on the stud side can be used to crush the ball joint body. Chisel it front side, back side and knuckle side, it'll almost fall out once deformed

22% off for a few more days!

1664481215034
 
ToddACimer

ToddACimer

Pioneer 1005-2
Lifetime Member
Oct 7, 2016
3,669
15,484
113
Oshkosh, Wi
Ownership

  1. 1000-5
Real men don't borrow tools. 🤣 🤣 J/K
Honestly this is 100% true. I'm not saying I have the tools to do whatever on a Tuesday. But buying tools after I got married meant that on any given day I could tackle a car/truck/SXS project on a weekday and have the tools to finish it so I still had a weekend for fun. I like to say I nailed it.
 
Scoop

Scoop

Well-Known Member
Lifetime Member
Supporting Member
Sep 7, 2021
5,130
20,280
113
Michigan
Ownership

  1. Other Brand

  2. 1000-5

  3. Talon R LV
For me, I prefer to have the peace of mind that I have the tools to do a job, no matter when or how often I want to do it, and without having to rely on or wait for someone else. I also don't mind being the guy who has an obscure tool or two that someone else can borrow.
 
advertisement
ranchdad

ranchdad

Member
Sep 24, 2022
12
63
13
Upstate SC
Ownership

  1. 1000-5
With a HF BJ press you should be able to put the shaft inside the BJ cup and the smallest collar on the lower side of the a-arm and push it through. Alternatively a chisel on the stud side can be used to crush the ball joint body. Chisel it front side, back side and knuckle side, it'll almost fall out once deformed
Thanks I'll give the chisel a shot today. Tried the socket suggestion and it started but the mushroomed ball joint body is too deformed to push through. I'll post a pic later if anyone is interested

update: chisel worked
 
ranchdad

ranchdad

Member
Sep 24, 2022
12
63
13
Upstate SC
Ownership

  1. 1000-5
Ok new ball joints are on but I'm having an issue getting it all connected to the knuckle.

I've tried:
top arm/axle/shock first but then the lower ball joint wont reach
lower arm/axle first but then the top ball joint wont work

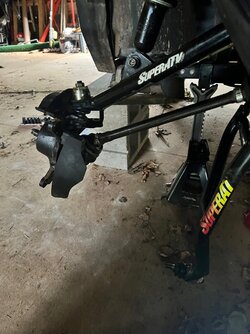
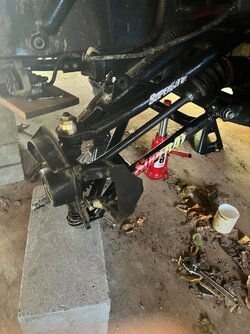
When I take the axle out, everything fits fine (second pic) so I have a hunch it has something to do with that. If you look at the first pic, the axle boot is bent at the knuckle rather than the CV boot closer. Did I put the axle in wrong/damaged?

IMG 1168 IMG 1171
 
ranchdad

ranchdad

Member
Sep 24, 2022
12
63
13
Upstate SC
Ownership

  1. 1000-5
thanks for the replies. Honestly I'm not sure, I just made sure it was in as far as the other side lol. Sounds like a bit over my head, know where I can find more info on this? searched the service manual for 'axle' and couldnt find much
 
ToddACimer

ToddACimer

Pioneer 1005-2
Lifetime Member
Oct 7, 2016
3,669
15,484
113
Oshkosh, Wi
Ownership

  1. 1000-5
thanks for the replies. Honestly I'm not sure, I just made sure it was in as far as the other side lol. Sounds like a bit over my head, know where I can find more info on this? searched the service manual for 'axle' and couldnt find much
I've always installed both ball joints, then the axle and then the lower a-arms bolts. There's hardly room to torque the lower BJ nut with the axle in place.
 
ranchdad

ranchdad

Member
Sep 24, 2022
12
63
13
Upstate SC
Ownership

  1. 1000-5
I've always installed both ball joints, then the axle and then the lower a-arms bolts. There's hardly room to torque the lower BJ nut with the axle in place.
That's a good idea, do you attach the shock to the upper arm before or after putting the axle in place? Watching install videos on Youtube, seems like nobody else has the same issue.
 
advertisement

About us

  • Our community has been around for many years and pride ourselves on offering unbiased, critical discussion among people of all different backgrounds. We are working every day to make sure our community is one of the best.

User Menu

Buy us a beer!

  • Lots of time and money has gone into making sure the community is running the best software, best designs, and all the other bells and whistles. Care to buy us a beer? We'd really appreciate it!

    Beer Fund!

    Club Membership!