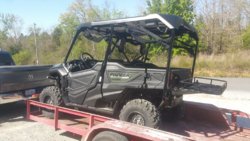
BOX1

P1000 FastRedneck's DIY build

FastRedneck

FastRedneck

Member
Mar 29, 2016
32
62
18
Cave City, AR
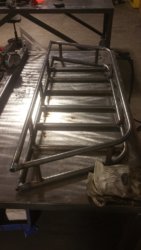
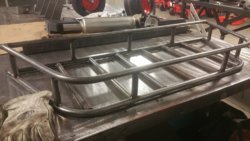
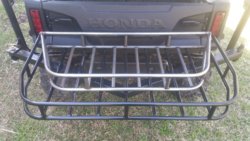
I figured since I've already introduced myself in another thread, I'd go ahead and jump right in and start my own build thread as well. As the title states, the goal of this build is for me to do as much of my own fabrication as possible. I'm not a hardcore mudder/offroader like a lot of you guys, so don't expect anything too crazy. But I do need my rig to be able to haul a lot (both stuff and people), drag a carcass out of the woods, and still be reliable as a moderate trail rig. My current list is more lights, more storage, more traction, and more comfort (in no particular order). The good news is that I work as an R&D fabricator and have access to some really cool toys. I've got sheet metal brakes, sheet metal and tubing lasers, mills, mandrel benders, and a full CAD system at my disposal. The bad news is that it's tough to get time on these machines right now since it's our busy season and we're running behind on our production line. My first project that I'm tackling is going to help with storage. I haven't seen a good affordable option when it comes to racks for these rigs, so I decided to fabricate my own. I wanted a rear rack that would mount in the receiver hitch, and then come up to nearly bed height for ground clearance. So I grabbed a couple sticks of 3/4" round tube and run them through the mandrel bender to build a frame. I bent them so that the edge against the frame is wider than the tail. The bed side of the frame is about 41.5" wide, and the tail is about 32" roughly. I didn't want to run the risk of hanging a corner of the rack in tight turns, so I tapered them in about 5" on each side. I also wanted the tail lights to still be visible on either side of the rack of someone is behind me. Inner basket dimensions are about 14"Lx4"D. I wanted it just large enough to put a small to medium sized cooler in there with enough room for a day bag or other small gear. Right now it's just tacked up until I can run it out to the house and test fit it, and then get some height measurements to the receiver hitch. Only thing I'm thinking about adding is a plate to the backside (sort of like a Jeep) to mount a spare tire/rim to just in case. I'm trying to keep it somewhat light so my wife can handle it if need be as well. What do you guys think so far?
1 2
 
Last edited by a moderator:
FastRedneck

FastRedneck

Member
Mar 29, 2016
32
62
18
Cave City, AR
Thanks guys, I'm pretty lucky that I get to fabricate stuff like this for a living. I decided to come into work a bit early this morning and slapped this thing together real quick before starting some real work. I'm hoping that it'll be big enough for my needs as I'm not using any particular design or anything on paper. I just sort of pulled this out of my imagination as I was going along. Next up will be building a front rack to match, custom LED light mounts on the roll cage, and fabbing my own A-arm covers and skid plates.
 
  • Like
Reactions: Tot
FastRedneck

FastRedneck

Member
Mar 29, 2016
32
62
18
Cave City, AR
Well I finally got home and started to mock up the rack to the back of my rig, and somewhere along the way, I underestimated the size of the Pioneer. This rack is WAY too small to go on the back end, but luckily it looks like it'll be just the right size to become a front rack. I'll finish welding this one up tomorrow and put it off to the side until I can figure out how I want to mount it so that I can still access the hood easily. I'll also begin fabbing up a new rack that will be about 44" wide, at least 20" long, and still be 4" deep to match the other rack. I also plan to keep the same shape with the tapered corners. But I think my goal to keep it light is not gonna happen, so I'll look into adding a spare tire plate on the outer rear of the rack similar to a Jeep spare. I'd love to figure out a way to make this a swing-away for the tailgate, and still be removable, but I'm gonna have to spend some serious time in CAD with my engineers at work figure that out.
 
  • Like
Reactions: Tot
FastRedneck

FastRedneck

Member
Mar 29, 2016
32
62
18
Cave City, AR
Well I got into work early this AM and started on the rear rack V2.0. Cut a couple new pieces of 3/4" tubing and had planned on making an exact copy of the firsr rack. But after taking some measurements and realizing it wasn't gonna work, I decided to change the shape up a bit since the original taper was gonna look goofy with the additional length I'm adding. Made it a compound bend in the mandrel so it comes out straight from the back of the pioneer, but the corners are angled a bit to keep it from hanging on trees, etc. in tighter turns still.
Tmp 12515 20160401 063921496444096
Tmp 12515 20160401 0701571378940819
The good news is that I got some time with my CAD engineer this morning and I looks like we might turn this one into a swing away setup instead of hitch mounting it. Stealing ideas from @Delton, we're probably gonna mount hinge tabs on the roll cage, and then use some 1"x2" tubing as the primary frame backing. I'm thinking 2 cross bars across to the other side to support the weight. But for now I've got to get to work, and headed out to Branson this weekend, so it'll be next weekend most likely before I make some serious headway on this setup.
 
  • Like
Reactions: Itsalljake and Tot
FastRedneck

FastRedneck

Member
Mar 29, 2016
32
62
18
Cave City, AR
Came in early again this morning and got some more accomplished on the new rear rack. Finished cutting all the support bars, upright spacers, and the backer bars.
Tmp 2394 20160405 0652331948464186

Tmp 2394 20160405 065240 2009124258

Tmp 2394 20160405 070539 1082960164

Tmp 2394 20160405 072734 966723694

Tmp 2394 20160405 072724 1058954679

Tmp 2394 20160405 072746197855857
Tack welded everything up and I'm liking the size a lot more. I'll get it home this afternoon and get it hung up behind the 1000 so I can make sure I'm happy with how it looks/works. Also plan on starting mock up for the swing away frame this afternoon as well. So far this is my rough idea (thanks @Delton for the inspiration)
Tmp 2394 20160405 080227 1369625351

The plan right now is to grind down the lower edges of the rear roll cage and on one side weld on a 1" solid bar stock that is bent upward at a 90° angle to serve as the pivot pin. I'll weld a flat plate on the other side to serve as a latch plate with a removable pin. The crossbar will be a 2x2 square tube that is bent on either end so that the tube passes under the center of the rack to better support it evenly. I'll weld a tube with a 1" ID on one side to drop onto the pivot pin, and a flat plate on the other side to slot over the latch plate and hold it in place. The pivot pin will have a quick latch pin in the top ton hold it on, and this way it'll still be fairly easy to remove it if need be. Hoping to have this all done by this weekend.
 
Last edited:
franzw

franzw

Active Member
Jan 2, 2016
277
249
43
pacific nothwest
Ownership

  1. 1000-5
Came in early again this morning and got some more accomplished on the new rear rack. Finished cutting all the support bars, upright spacers, and the backer bars. View attachment 13006
View attachment 13007
View attachment 13008
View attachment 13009
View attachment 13010
View attachment 13011 Tack welded everything up and I'm liking the size a lot more. I'll get it home this afternoon and get it hung up behind the 1000 so I can make sure I'm happy with how it looks/works. Also plan on starting mock up for the swing away frame this afternoon as well. So far this is my rough idea (thanks @Delton for the inspiration)
View attachment 13015
The plan right now is to grind down the lower edges of the rear roll cage and on one side weld on a 1" solid bar stock that is bent upward at a 90° angle to serve as the pivot pin. I'll weld a flat plate on the other side to serve as a latch plate with a removable pin. The crossbar will be a 2x2 square tube that is bent on either end so that the tube passes under the center of the rack to better support it evenly. I'll weld a tube with a 1" ID on one side to drop onto the pivot pin, and a flat plate on the other side to slot over the latch plate and hold it in place. The pivot pin will have a quick latch pin in the top ton hold it on, and this way it'll still be fairly easy to remove it if need be. Hoping to have this all done by this weekend.
Looks like bigrack is getting compitition in the fabricating department. Let us know if you talented guys could build anything to sell and ship?
 
FastRedneck

FastRedneck

Member
Mar 29, 2016
32
62
18
Cave City, AR
Looks like bigrack is getting compitition in the fabricating department. Let us know if you talented guys could build anything to sell and ship?

Thanks bud, I saw his racks and they're pretty nice too, I just wanted to use round tube instead of square. I'm stubborn and like the extra challenge, plus I already had the dies in the mandrel for the round tube from another project at work. As for selling them, I'm mulling around the idea depending on costs. I know shipping is gonna be a killer with the size and weight of this thing, but it's looking like materials may also be a bit high too. This tubing runs about $3-4 per foot, and I've got around 35' into just the basket. Plus the cost of the 2x2 support bar, hardware, and the materials for building the hinge, latch, tire rack, and then painting all of it. Conservatively, I'd guess I'm gonna be into the whole project for around $200 plus my labor. I have a feeling that's I'd have to sell these for around $400-500 to break even, plus shipping. But we'll see where I'm at when it's all said and done.
 
Delton

Delton

Honda Fanboy
Vendor
Lifetime Member
Club Contributor
Jan 6, 2016
9,966
31,472
113
Middle TN
Ownership

  1. 1000-5
Came in early again this morning and got some more accomplished on the new rear rack. Finished cutting all the support bars, upright spacers, and the backer bars. View attachment 13006
View attachment 13007
View attachment 13008
View attachment 13009
View attachment 13010
View attachment 13011 Tack welded everything up and I'm liking the size a lot more. I'll get it home this afternoon and get it hung up behind the 1000 so I can make sure I'm happy with how it looks/works. Also plan on starting mock up for the swing away frame this afternoon as well. So far this is my rough idea (thanks @Delton for the inspiration)
View attachment 13015
The plan right now is to grind down the lower edges of the rear roll cage and on one side weld on a 1" solid bar stock that is bent upward at a 90° angle to serve as the pivot pin. I'll weld a flat plate on the other side to serve as a latch plate with a removable pin. The crossbar will be a 2x2 square tube that is bent on either end so that the tube passes under the center of the rack to better support it evenly. I'll weld a tube with a 1" ID on one side to drop onto the pivot pin, and a flat plate on the other side to slot over the latch plate and hold it in place. The pivot pin will have a quick latch pin in the top ton hold it on, and this way it'll still be fairly easy to remove it if need be. Hoping to have this all done by this weekend.
I started out planning mine with a 90 degree pivot lol. Can't wait to see finished product. Mine is simple and to the point but I do best I can with what I have.....bandsaw and a 211 Miller lol. Looking great bud!!
 
FastRedneck

FastRedneck

Member
Mar 29, 2016
32
62
18
Cave City, AR
I started out planning mine with a 90 degree pivot lol. Can't wait to see finished product. Mine is simple and to the point but I do best I can with what I have.....bandsaw and a 211 Miller lol. Looking great bud!!

Thanks bud, I looked through your build thread and your mount is what inspired me to abandon the receiver mount in favor of the swing away. I like the idea of less stuff down low to hang up on the trail, and this will be stupid simple despite being "fancier" than your setup. I guess I'm just reinventing the wheel so to speak. I also need a slightly larger basket than you do as well, which is why I chose to go with the support bar underneath it instead of welding directly to the face of it. I finished welding out the basket on my lunch break and decided to test it by suspending it about 6" off the ground and stepped into it while bouncing on each support bar. It was rock solid even with my 230# fat ass on it. I think my cooler and other gear will be a cake walk for this one.
 
  • Like
Reactions: Delton
FastRedneck

FastRedneck

Member
Mar 29, 2016
32
62
18
Cave City, AR
So another early morning for me in the shop, trying to get the support bar fabbed up for the swing away frame. I started with a piece of 2x2 square tube and attempted to run it through our mandrel bender, only to discover that someone has destroyed the bearings in the guide roller. So my that pretty much ruined my first stick I had cut. Went back to the drawing board and decided to take 2
pieces of 2x2, cut the ends on an angle and weld them together in and point under the center of the basket

Tmp 7192 20160406 060305 1112162958
Tmp 7192 20160406 061242 79636161

Tmp 7192 20160406 061347196718412
Tmp 7192 20160406 0614141839132936

It actually turned out looking kinda cool IMHO. Unfortunately I forgot to get the center to center measurements on the roll cage where I plan on mounting this setup, so I'm pretty much on hold until then. Most likely I'll just load the Pioneer up and bring it up to the shop this Saturday and finish it up. It'll also give me a chance to see how well my new trailer I bought the other day pulls with a load on it.

On another note, I talked with one of our assembly line painters and he informed me about a new powder coat that we're going to be using on our 2017 models.
Tmp 7192 20160406 064110 1110170733

It is a textured powder coat that has a similar look and feel to bed liner, but is supposed to be way more durable. I'm thinking that this is going to be what I finsh this whole thing in. It has a really cool, tough look to it as well.
 
FastRedneck

FastRedneck

Member
Mar 29, 2016
32
62
18
Cave City, AR
Came in early again to make one last push to wrap this rack up. Started off this morning by fabbing up the hinge pin. I stole some 1" cold rolled bar and a actuator sleeve off our production line since they were designed to work together on one of our products. Took the torch to the 1" and bent it onto a 90°, cut the top half to the correct length, beveled the edge and drill a hole for the retaining pin. Welded a 1/2" long collar as a base on the pin, andI'm using a 4" long collar that will pivot on the pin to weld my support bar to. It's a stupid simple setup that turned out really nice.
Tmp 16531 20160406 1512381925299423

Tmp 25783 20160406 151327 782345238

Tmp 25783 20160406 1513591513040784

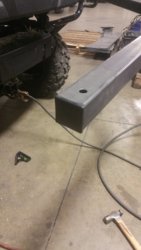
Then I put my 2x2 support bar on the mill and machined out the end about 1" to insert my collar sleeve into and make the setup stronger.
Tmp 25783 20160407 065222 963593830

Tmp 25783 20160407 072511 1335171094

Tmp 25783 20160407 0725401401287852

Tmp 25783 20160407 0727321930688111

As of right now I'm pretty much done until I can get my P1k5 up here and actually attach everything to it, which is my plan for Saturday.

On a side note, when I walked in this morning it appeared that my boss has decided to join the Pioneer club as well.
Tmp 25783 20160407 055118103703687


This made it really convenient to pull my measurements of the roll cage and make sure my width was right. I might have to keep my project on the DL though, or else I have a feeling he may have me building a rack for him too.
 
FastRedneck

FastRedneck

Member
Mar 29, 2016
32
62
18
Cave City, AR
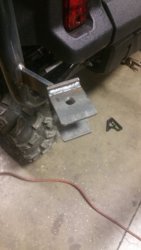
Finally got the rear rack finished up today. Came into work on my day off and brought the rig in with me so I could weld everything up. I started off by grinding down the rear of the roll cage to mount the hinge pin to and cut the hinge pin to the correct length, and then welded it on. The pin sticks out approximately 4" from the rear of the roll cage.
Tmp 2878 20160409 081224 505464920

Tmp 2878 20160409 0821021435544854

Tmp 2878 20160409 082728692325100


After test fitting the support beam, i noticed that the hinge had a bit of sag in it, and was about 1" low on the other side. I fabricated a saddle to pin the support beam to and welded it to the roll cage on the drivers side, and it will carry the beam level when pinned.
Tmp 2878 20160409 082823 783010333
Tmp 2878 20160409 082901 1701510616
Tmp 2878 20160409 084944 1546341538
Tmp 2878 20160409 084953 2070789373
Tmp 2878 20160409 085002374923126

Next I drilled a 5/8" hole in the saddle and beam to accept a 1/2" quick pin. Then I chopped off the excess beam and used a 2x2 frame plug to give it a nice clean look.
Tmp 2878 20160409 091427132525834

Tmp 2878 20160409 090158334693297

Tmp 2878 20160409 091431 160583755


Then I welded the basket to the support beam and painted it all with a gloss black. Eventually I will have the whole basket side powder coated, but for now it'll get me back on the trail and get the job done without looking like crap.
Tmp 2878 20160409 0924161597904075
Tmp 2878 20160409 092608605226431
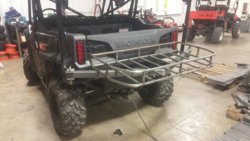
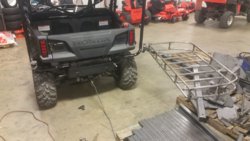
Here it is all finished up and mounted, and loaded up ready to head out. When I get home later I'll toss a couple coolers in it so you guys can see how big it really is
Tmp 2878 20160409 100222 920929757


And just for size reference, this is the V1 basket sitting inside the V2 so you can see how much bigger I made this one
Tmp 2878 20160409 1025244698830
Tmp 2878 20160409 091427 24652115 Tmp 2878 20160409 091431 1027793586 Tmp 2878 20160409 092416 2097767957 Tmp 2878 20160409 092608691989292 Tmp 2878 20160409 100222 1373376719 Tmp 2878 20160409 102524 283585665
 
Last edited:
rubicon05

rubicon05

Well-Known Member
Dec 24, 2015
234
310
63
Southern, IN
Ownership

  1. 1000-5
You have some mad skills my friend....that is an awesome mod!! Great job.....
 
  • Like
Reactions: pct
FastRedneck

FastRedneck

Member
Mar 29, 2016
32
62
18
Cave City, AR
You have some mad skills my friend....that is an awesome mod!! Great job.....

Thanks bud, appreciate the complement. Just wish I didn't have to squeeze these projects in between my work stuff at the shop, but it is what it is.

Next on my list is LEDs. I've already picked up a set of small 1x3 pods that will be going on the rear. I plan on picking up a 50" or 52" to go on the roof pretty soon, and then I'll add another smaller bar in the bumper later. I say later because I plan on fabbing up either a brush guard or possibly an entire new bumper. Still on the fence about that one.

After that I plan on fabbing my own full skid plates and A-arm guards to protect everything underneath. I also have the first basket I built that will eventually become a hood rack. Stereo will be added in there somewhere as well. Probably do it around the same time I do all the lights so I only have to deal with wiring and installing a switch panel once. I'm also going to do wheels and tires l, but that'll be down the road a ways.
 
  • Like
Reactions: joeymt33
Farmer

Farmer

🚜🔨🚛🔧
Lifetime Member
Supporting Member
Aug 22, 2014
2,851
16,388
113
Southern MO
Ownership

  1. 700-2
How much weight can you put in it? Or should I say plan to put in it? You do amazing work and it looks great but it looks like you might need a strap from the rear to the upper roll bar for added strength if you haul a loaded cooler or something like that.
 
FastRedneck

FastRedneck

Member
Mar 29, 2016
32
62
18
Cave City, AR
How much weight can you put in it? Or should I say plan to put in it? You do amazing work and it looks great but it looks like you might need a strap from the rear to the upper roll bar for added strength if you haul a loaded cooler or something like that.

It's quite a bit stronger than I expected it to be. My original intention was a medium sized cooler that would take up about half of it, and then a gear/tool/day bag on the other half. But so far I've climbed my 230# fat ass on it and it held me fine, and I was even able to lift the back end up off the ground a couple inches with it. The beam is carrying a majority of the weight, and it's 2x2" .180 square tube, with a 1" cold rolled bar stock pin, and and heavily over engineered saddle, all of which is welded to the roll cage. It's sturdy as hell, and it appears that it will fail around the same time the roll cage will.
 
  • Like
Reactions: HoundDog and Farmer
Farmer

Farmer

🚜🔨🚛🔧
Lifetime Member
Supporting Member
Aug 22, 2014
2,851
16,388
113
Southern MO
Ownership

  1. 700-2
It's quite a bit stronger than I expected it to be. My original intention was a medium sized cooler that would take up about half of it, and then a gear/tool/day bag on the other half. But so far I've climbed my 230# fat ass on it and it held me fine, and I was even able to lift the back end up off the ground a couple inches with it. The beam is carrying a majority of the weight, and it's 2x2" .180 square tube, with a 1" cold rolled bar stock pin, and and heavily over engineered saddle, all of which is welded to the roll cage. It's sturdy as hell, and it appears that it will fail around the same time the roll cage will.

Sweet! That's how I test my tailgate cables. I hang my fat ass from them! LOL!
 
  • Like
Reactions: pct
BOX2
box3

About us

  • Our community has been around for many years and pride ourselves on offering unbiased, critical discussion among people of all different backgrounds. We are working every day to make sure our community is one of the best.

User Menu

Buy us a beer!

  • Lots of time and money has gone into making sure the community is running the best software, best designs, and all the other bells and whistles. Care to buy us a beer? We'd really appreciate it!

    Beer Fund!

    Club Membership!