Lighting Upgrades

Theron

Theron

Member
Sep 30, 2013
50
30
18
Anchorage Alaska
Ownership

  1. 700-4
Added some lights to the rig. Not going to say it was easy, but I did it. Did not use any honda plug and play wiring. Added a marine fuse box and automotive relay and all switches readily available online. I figure I got about $760 for the four lights, bar clamps, all switches, volt meter, usb plug, relay, fuse box and fuses, wires, wire loom, and connectors, with lots of leftovers. I had put the winch on earlier, but added the panel mounted switches on this project. The switch plate is made out a 1/8 aluminum sheet. The new lights make the stock lights obsolete. It is now pointless to turn them on other than for oncoming traffic. Overall Im very happy with outcome.

Photo4 2Photo5 1
Photo4 1Photo2 1Photo1 1Photo3 3Photo3 1Photo2 2Photo1 2
 
  • Like
Reactions: bobbyhill
Hondasxs

Hondasxs

Club Founder
Staff member
Feb 13, 2013
18,037
63,554
113
Charlotte, NC
HondaSxS.com
Ownership

  1. 1000-5

  2. Talon R
Looks good. Those mounts look/are professional made. I think I will try this option to mount my light bar also. I have been wanting it in the same place as yours and if I can make a custom mount that will work great.
Would like to see a few pics of the fuse box and location. Is it a (+) bus one?
I got to get started in mine here soon.
Thanks for sharing.

Oh. If you could have that aluminum plate engraved with a design... That would be bad ass.
thanks.
 
spifyd

spifyd

Active Member
Lifetime Member
Jan 2, 2014
420
178
43
newhampshire
Very nice work . Do you have a link to those dome lights.
 
Theron

Theron

Member
Sep 30, 2013
50
30
18
Anchorage Alaska
Ownership

  1. 700-4
spifyd said:
Very nice work . Do you have a link to those dome lights.

Here they are. They are real nice. They light up the cab pretty well and seem to be sealed well as Im not sure if I will be putting a top on. The down side is they were pretty expensive and if you have a hard top you could probably find a much cheaper light that mounts to a flat surface. $100 for two although that includes shipping to Alaska, which aint cheap. If you do get these, I learned a lesson on the first one. I drilled and taped the pipe and was a little careless in keeping the tap straight, which resulted in binding of the provided bolts as the tolerances on the light are tight. I paid more attention on the second one and had no problem.

Had to edit, forgot to click the URL. They actually have wire leads attached also that are sealed to the light board. Not sure why the pic does not show them.
http://www.amazon.com/gp/product/B007NKXSKY/?tag=sxsweb24-20
 
Theron

Theron

Member
Sep 30, 2013
50
30
18
Anchorage Alaska
Ownership

  1. 700-4
Hondasxs said:
Looks good. Those mounts look/are professional made. I think I will try this option to mount my light bar also. I have been wanting it in the same place as yours and if I can make a custom mount that will work great.
Would like to see a few pics of the fuse box and location. Is it a (+) bus one?
I got to get started in mine here soon.
Thanks for sharing.

Oh. If you could have that aluminum plate engraved with a design... That would be bad ass.
thanks.

I will try to get some pics later when I get time, but I bolted the fuse box to the side of the glove box behind the panel, not in the glovebox. Its an 6 fuse box with a cover, automotive style fuses. The aluminum is actually an old street sign recycled. Engraving would be nice but I like having that space for five more switches if needed.
 
H

hydrantman

Guest
Did you wire your hot line to the Ignition line so that everything is off until you turn your key on, if so where exactly is that wire that you connected to I can't seem to find it can you lend me a hand on this?
Thanks
 
Theron

Theron

Member
Sep 30, 2013
50
30
18
Anchorage Alaska
Ownership

  1. 700-4
hydrantman said:
Did you wire your hot line to the Ignition line so that everything is off until you turn your key on, if so where exactly is that wire that you connected to I can't seem to find it can you lend me a hand on this?
Thanks

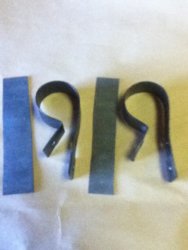
I used a relay like the one in this picture that you can get from any auto parts store.
Relay

#86 in the diagram is where you attach your (key on) hot wire. I used the one going to the key and used a probe tester to find out which one was hot only when the key is on, I believe it was a red with yellow stripe. A better option would have been to tap into the hot on the cigarette lighter outlet as I believe that one is only hot when the key is on and it should be the only red going into the outlet (easy to find and the real answer to your question). Then you can run a heavier gauge wire straight from the battery to #30. Run the ground to #85, and I ran #87 out to my fuse box, then from the fuse box out the switches and on to the lights etc.

A few other notes, the relay I got looks just like the one pictured but has one more tab which is made for a high low beam switch setup, so I just capped that one. I would look for the relay pictured with only four tabs(I didn't know what I needed at the time). They should also have the plug with wire pigtails that plugs into the relay.The numbers seem to be universal so the diagram pictured should be the same for any similar relay switch. Also you can just put the relay in the existing fuse box under the existing fuses. I also used plenty of dielectric grease (electrical insulating compound) on every connection.

To be clear the only purpose of using the relay is to be able to run heavier gauge wire to power all my extra accessories as I didn't want to run them all off that little 18 or 22ga wire going to the key or cigarette lighter. The wire from the cigarette lighter outlet only flips the switch in the relay so that the wire from the battery powers the #87 out to accessories only when the key is on. That may have been more than you wanted but hopefully it helps you out. I only explained it this way because it took me some time and research to figure this all out for myself.
 
advertisement
duwops

duwops

Active Member
Lifetime Member
Nov 10, 2013
231
45
28
Nice job on the switch panel and aux fuse panel!
 
Zonie

Zonie

Member
Lifetime Member
Oct 20, 2013
30
0
6
Payson & Tempe, AZ
Theron- I bought two of the Ridid LED dome light and I'm wondering if you used any type of insulation to protect the back circuit panel since they are open. Did they just seal up when you bolted them to the roll bar?
 
Theron

Theron

Member
Sep 30, 2013
50
30
18
Anchorage Alaska
Ownership

  1. 700-4
Zonie said:
Theron- I bought two of the Ridid LED dome light and I'm wondering if you used any type of insulation to protect the back circuit panel since they are open. Did they just seal up when you bolted them to the roll bar?

No they did not fit perfectly tight. I just made sure the wires were on the bottom to drain any moisture as the board seemed to be all sealed up and I think they will be fine. Only time will tell as I have not tested them, and the real test will be years of use. I did consider calking all around them except for a little spot on the bottom to drain, but I really think they are sealed good enough. Obviously a roof would solve this problem all together but I have limits to how closed in I will be while enjoying the outdoors.

One tip on them. I was a little careless when drilling and tapping the bar and had a hard time with the bolts binding due to slightly different angles on the first one. I paid much more attention on the second and the bolts went right in. I knew better, but was in a hurry.
 
2

2thpir8

Member
Lifetime Member
Sep 9, 2013
31
1
8
NC
Do any of you know the diameter of the ROPS bars off hand? The mounting kits for some of these lights has the option for a bar mount. Just checking to see which size would be needed.
 
2

2thpir8

Member
Lifetime Member
Sep 9, 2013
31
1
8
NC
thanks, found what i needed in that size
 
Theron

Theron

Member
Sep 30, 2013
50
30
18
Anchorage Alaska
Ownership

  1. 700-4
2thpir8 said:
Do any of you know the diameter of the ROPS bars off hand? The mounting kits for some of these lights has the option for a bar mount. Just checking to see which size would be needed.

I couldn't find the exact size bar clamp to fit my application so I decided to go with 1.75" and use rubber sheet. 1/16" worked perfect and now that I have completed the project I think I like the rubber better than clamps that were the right size, at least with the clamps I used. They are not moving at all. I could hang the machine by them and they wouldn't move. Plus they may add a little shock dampening for the lights.
 
duwops

duwops

Active Member
Lifetime Member
Nov 10, 2013
231
45
28
Homemade rear light clamps for ROPS
 

Attachments

  • image.jpg
    image.jpg
    127.1 KB · Views: 612
  • image.jpg
    image.jpg
    115.9 KB · Views: 649
  • image.jpg
    image.jpg
    110.8 KB · Views: 610
2

2thpir8

Member
Lifetime Member
Sep 9, 2013
31
1
8
NC
That looks nice. Thanks for the info guys. It seems like some rubber in between the ROPS and mount would be better anyway. Keep it quieter and keeps the mount from marking up the bar.
 

About us

  • Our community has been around for many years and pride ourselves on offering unbiased, critical discussion among people of all different backgrounds. We are working every day to make sure our community is one of the best.

User Menu

Buy us a beer!

  • Lots of time and money has gone into making sure the community is running the best software, best designs, and all the other bells and whistles. Care to buy us a beer? We'd really appreciate it!

    Beer Fund!

    Club Membership!