P1000 SPAL HIGH PERFORMANCE COOLING FAN 19030-HL4-A01

BigOL3

BigOL3

Well-Known Member
Lifetime Member
Oct 27, 2017
2,994
8,920
113
Deep in the heart of Dixie, Kentwood, La.
Ownership

  1. 1000-5
I've only ever removed 1 radiator on a P1K and that was for a frame job. But I dont believes there's anyway to do so without taking the front fender off. Which is honestly not as bad as it sounds.
After physically looking at the fan/shroud behind the radiator, it appears everything ABOVE it would have to be removed to get to it. Am I missing something? Will the panel below the hood, that contains battery and 12V connections have to be removed, or is there a 'work around' to avoid that?
 
Adam490

Adam490

HFA Grand High Wizard
Lifetime Member
Supporting Member
Apr 7, 2019
8,021
60,382
113
Covington, LA
Ownership

  1. 1000-5

  2. Talon R LV
After physically looking at the fan/shroud behind the radiator, it appears everything ABOVE it would have to be removed to get to it. Am I missing something? Will the panel below the hood, that contains battery and 12V connections have to be removed, or is there a 'work around' to avoid that?
It'll be loose in the front from taking apart everything you need to get the grille free. You won't need to remove the lower hood assembly. If you look at the picture @ToddACimer posted you can see the lower hood assembly stays in place but the entire black plastic grille assembly will need to be taken off.
 
ToddACimer

ToddACimer

Pioneer 1005-2
Lifetime Member
Oct 7, 2016
3,676
15,543
113
Oshkosh, Wi
Ownership

  1. 1000-5
It'll be loose in the front from taking apart everything you need to get the grille free. You won't need to remove the lower hood assembly. If you look at the picture @ToddACimer posted you can see the lower hood assembly stays in place but the entire black plastic grille assembly will need to be taken off.
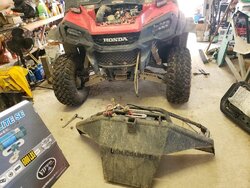
With all the fasteners out, there's room to move it around and work behind the radiator. This is a photo from working on my intake and front bumper but you can see how much room youd have to access. The radiator moves forward at least 6" with the overflow bottle removed

IMG 20200608 120929 01
 
BigOL3

BigOL3

Well-Known Member
Lifetime Member
Oct 27, 2017
2,994
8,920
113
Deep in the heart of Dixie, Kentwood, La.
Ownership

  1. 1000-5
With all the fasteners out, there's room to move it around and work behind the radiator. This is a photo from working on my intake and front bumper but you can see how much room youd have to access. The radiator moves forward at least 6" with the overflow bottle removed

View attachment 206836
Good deal, thanks for the info.
 
H

HondaTech

Guest
After physically looking at the fan/shroud behind the radiator, it appears everything ABOVE it would have to be removed to get to it. Am I missing something? Will the panel below the hood, that contains battery and 12V connections have to be removed, or is there a 'work around' to avoid that?

It's easier to just remove the colored part with the grill attached. Take both doors off, outer fender flares and then pull the wiring out of th way.

Half hour to remove the parts at the most.
 
Bradley-Thornton

Bradley-Thornton

Well-Known Member
Lifetime Member
Nov 6, 2017
684
1,649
93
Hattiesburg MS
Ownership

  1. 1000-5
With the VP cool down from post 2. It helped but it still hit 3 bars but it did way less and not for a long.
 
  • Like
Reactions: BigOL3
BigOL3

BigOL3

Well-Known Member
Lifetime Member
Oct 27, 2017
2,994
8,920
113
Deep in the heart of Dixie, Kentwood, La.
Ownership

  1. 1000-5
It's easier to just remove the colored part with the grill attached. Take both doors off, outer fender flares and then pull the wiring out of th way.

Half hour to remove the parts at the most.
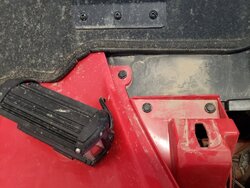
Colored part?? You mean the red 'under hood's that contains battery, etc? Does it need to be completely loose? I hope not, or I will have to remove windshield and maybe top! I have the 2 bolts that are in front of tool kit out, are the 6 plastic rivets near windshield all left holding it?3024c5a05f16a0c09b602f336c3b1187

Sent from my SM-G965U using Tapatalk
 
BigOL3

BigOL3

Well-Known Member
Lifetime Member
Oct 27, 2017
2,994
8,920
113
Deep in the heart of Dixie, Kentwood, La.
Ownership

  1. 1000-5
I assumed when I got to this point, I would see the rivets holding the black plastic grill ..... surprise, surprise ..... dont see them! Any info on how to take it off is appreciated.B424b8e248a04ee4c4e29f121f967dd2

Sent from my SM-G965U using Tapatalk
 
ToddACimer

ToddACimer

Pioneer 1005-2
Lifetime Member
Oct 7, 2016
3,676
15,543
113
Oshkosh, Wi
Ownership

  1. 1000-5
I assumed when I got to this point, I would see the rivets holding the black plastic grill ..... surprise, surprise ..... dont see them! Any info on how to take it off is appreciated.View attachment 207217

Sent from my SM-G965U using Tapatalk

There are 5 Phillip's screws holding each headlight housing. There are also 2 m6 bolts on each side for the headlight mounting bracket
 
  • Like
Reactions: TripleB and BigOL3
BigOL3

BigOL3

Well-Known Member
Lifetime Member
Oct 27, 2017
2,994
8,920
113
Deep in the heart of Dixie, Kentwood, La.
Ownership

  1. 1000-5
There are 5 Phillip's screws holding each headlight housing. There are also 2 m6 bolts on each side for the headlight mounting bracket
OK, I guess I wrongly assumed the headlights were not actually attached to the grill. I thought they were just held in place by that frame bracket. I will start back at that point Thurs, if I get caught up on work. Thanks.
 
advertisement
ToddACimer

ToddACimer

Pioneer 1005-2
Lifetime Member
Oct 7, 2016
3,676
15,543
113
Oshkosh, Wi
Ownership

  1. 1000-5
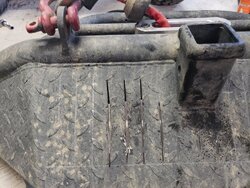
While I was waiting, I have started adding some ventilation to the TC bumper. Hope it will be enough to help.View attachment 207223

Sent from my SM-G965U using Tapatalk

It's a little late now but from a strength standpoint and for easy of cutting, an array of round 1" holes may have been quicker and easier but more importantly it wouldn't have the potential stress concentration of the rectangular cutouts.
 
BigOL3

BigOL3

Well-Known Member
Lifetime Member
Oct 27, 2017
2,994
8,920
113
Deep in the heart of Dixie, Kentwood, La.
Ownership

  1. 1000-5
It's a little late now but from a strength standpoint and for easy of cutting, an array of round 1" holes may have been quicker and easier but more importantly it wouldn't have the potential stress concentration of the rectangular cutouts.
I had concern of sticks entering the radiator if 1" holes were use. I will NOT have any rectangle cutout. It simply will be straight narrow cuts (less than 1/8" wide) about 1" apart, so as to allow air, but no sticks. Top and bottom of cuts will still be intact.
 
H

HondaTech

Guest
Colored part?? You mean the red 'under hood's that contains battery, etc? Does it need to be completely loose? I hope not, or I will have to remove windshield and maybe top! I have the 2 bolts that are in front of tool kit out, are the 6 plastic rivets near windshield all left holding it?View attachment 207216

Sent from my SM-G965U using Tapatalk

With your windshield it could be more involved. But yes the red plastic panel with the grill and healdights can be removed on 1 piece. I never take the h/l buckets off. Take the 4 bolts out of the h/l mount bracket and it'll come with the front fender and grille.
 
BigOL3

BigOL3

Well-Known Member
Lifetime Member
Oct 27, 2017
2,994
8,920
113
Deep in the heart of Dixie, Kentwood, La.
Ownership

  1. 1000-5
There are 5 Phillip's screws holding each headlight housing. There are also 2 m6 bolts on each side for the headlight mounting bracket
I found and removed 3 of the phillip screws, and finally was able to see the forth one, and have yet to see the 5th screw. IF my arms were about 4.5' long WITH and eyeball attached to a finger, I MIGHT could reach/see how to remove/reinstall the other 2 screws ....... lol. That not being the case, I think I will finish putting vents in the TC bumper, install another fan under the seat and leave it at that. To totally remove the top plastic with grill and lights attached, I would first have to totally remove my windshield and top AND undo a lot of the 12V wiring. I think I will pass on all that. No doubt, if this was done to begin with before adding a bunch of accessories it would have been much simpler.
 
NTCPrezJB

NTCPrezJB

Retiring Member
Lifetime Member
Supporting Member
Jan 30, 2018
108,798
959,713
113
Hidden
Ownership

  1. 1000-5
I found and removed 3 of the phillip screws, and finally was able to see the forth one, and have yet to see the 5th screw. IF my arms were about 4.5' long WITH and eyeball attached to a finger, I MIGHT could reach/see how to remove/reinstall the other 2 screws ....... lol. That not being the case, I think I will finish putting vents in the TC bumper, install another fan under the seat and leave it at that. To totally remove the top plastic with grill and lights attached, I would first have to totally remove my windshield and top AND undo a lot of the 12V wiring. I think I will pass on all that. No doubt, if this was done to begin with before adding a bunch of accessories it would have been much simpler.
That eyeball on a finger on a 4.5' arm was hysterical to me!
 
  • Like
Reactions: Mudwing and BigOL3
ToddACimer

ToddACimer

Pioneer 1005-2
Lifetime Member
Oct 7, 2016
3,676
15,543
113
Oshkosh, Wi
Ownership

  1. 1000-5
The one you can't see is on top of the headlight in the center of the light. I'll be the first to admit, I left those out after dropping 2 of the screws and they disappeared.
 
  • Haha
  • Like
Reactions: BigOL3 and TripleB
Bradley-Thornton

Bradley-Thornton

Well-Known Member
Lifetime Member
Nov 6, 2017
684
1,649
93
Hattiesburg MS
Ownership

  1. 1000-5
What I'm working on as far as over heating.


About us

  • Our community has been around for many years and pride ourselves on offering unbiased, critical discussion among people of all different backgrounds. We are working every day to make sure our community is one of the best.

User Menu

Buy us a beer!

  • Lots of time and money has gone into making sure the community is running the best software, best designs, and all the other bells and whistles. Care to buy us a beer? We'd really appreciate it!

    Beer Fund!

    Club Membership!