P1000 Stock P1000s that ride rough

ODAMO

ODAMO

Well-Known Member
Oct 12, 2018
1,287
3,463
113
Ohio
Ownership

  1. 1000-3
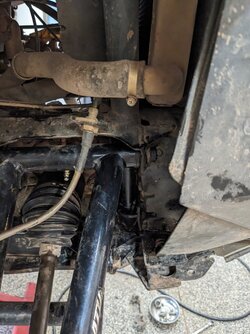
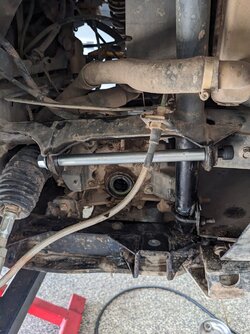
I had to replace a ripped rear axleshaft boot and in doing so discovered an interesting situation.
In the manual it explains how the a arms need to be torqued at the frame mounts at a certain shock eye to eye dimension. That dimension happens to coincide with the vehicle being at ride height. What I discovered was that the a arms on my unit were actually torqued at full droop, not ride height. I have my rear shocks at preload 1 and always thought it rode rather stiff. At ride height each a arm was creating additional downforce because the bushings are bonded and therefore were in torsion when they should have been in a neutral state. I estimate the force per a arm was about 15-20 lbs. resulting in 60-80lbs. total effective additional spring rate on the rear. After loosening the a arms, rolling forward and back to settle suspension and retorqueing them at ride height it does indeed ride a lil smoother. Not fox shock smooth but smoother.(if the fox shocks also have bonded bushings they too would benefit from checking the intallation)
So, anybody that doesnt like the ride quality of their unit might want to check their bushings. When you loosen an a arm mounting bolt at ride height if they were torqued at droop you will hear the bushing unload while you loosen it indicating they were wrong.
I do want to give a shoutout to @joeymt33 for his video on cv boot repair. His tip on tapping out the cv ball cage assy. saves time and money if you only have to repair an outer boot. Thanks for the info.
 
joeymt33

joeymt33

i4WD=imitated 4WD
Moderator
Lifetime Member
Supporting Member
Club Contributor
Mar 17, 2015
11,096
39,129
113
Guntersville, AL
Ownership

  1. 1000-3

  2. 1000-5
I had to replace a ripped rear axleshaft boot and in doing so discovered an interesting situation.
In the manual it explains how the a arms need to be torqued at the frame mounts at a certain shock eye to eye dimension. That dimension happens to coincide with the vehicle being at ride height. What I discovered was that the a arms on my unit were actually torqued at full droop, not ride height. I have my rear shocks at preload 1 and always thought it rode rather stiff. At ride height each a arm was creating additional downforce because the bushings are bonded and therefore were in torsion when they should have been in a neutral state. I estimate the force per a arm was about 15-20 lbs. resulting in 60-80lbs. total effective additional spring rate on the rear. After loosening the a arms, rolling forward and back to settle suspension and retorqueing them at ride height it does indeed ride a lil smoother. Not fox shock smooth but smoother.(if the fox shocks also have bonded bushings they too would benefit from checking the intallation)
So, anybody that doesnt like the ride quality of their unit might want to check their bushings. When you loosen an a arm mounting bolt at ride height if they were torqued at droop you will hear the bushing unload while you loosen it indicating they were wrong.
I do want to give a shoutout to @joeymt33 for his video on cv boot repair. His tip on tapping out the cv ball cage assy. saves time and money if you only have to repair an outer boot. Thanks for the info.

I’m glad the video was helpful. And that is a good note on the bushing pre-load.
 
WagginTail

WagginTail

Well-Known Member
Lifetime Member
Club Contributor
Oct 13, 2020
1,585
5,880
113
SC
Ownership

  1. 1000-5
I had to replace a ripped rear axleshaft boot and in doing so discovered an interesting situation.
In the manual it explains how the a arms need to be torqued at the frame mounts at a certain shock eye to eye dimension. That dimension happens to coincide with the vehicle being at ride height. What I discovered was that the a arms on my unit were actually torqued at full droop, not ride height. I have my rear shocks at preload 1 and always thought it rode rather stiff. At ride height each a arm was creating additional downforce because the bushings are bonded and therefore were in torsion when they should have been in a neutral state. I estimate the force per a arm was about 15-20 lbs. resulting in 60-80lbs. total effective additional spring rate on the rear. After loosening the a arms, rolling forward and back to settle suspension and retorqueing them at ride height it does indeed ride a lil smoother. Not fox shock smooth but smoother.(if the fox shocks also have bonded bushings they too would benefit from checking the intallation)
So, anybody that doesnt like the ride quality of their unit might want to check their bushings. When you loosen an a arm mounting bolt at ride height if they were torqued at droop you will hear the bushing unload while you loosen it indicating they were wrong.
I do want to give a shoutout to @joeymt33 for his video on cv boot repair. His tip on tapping out the cv ball cage assy. saves time and money if you only have to repair an outer boot. Thanks for the info.
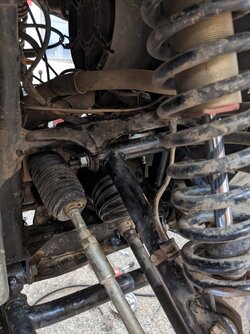
What is the torque spec on the a arm bolts? I never knew that could be an issue. When I installed my SuperATV arms I probably tightened the bolts while the pioneer was on a jack. I know I didn't torque them.

I've been noticing a slight clunking noise in the front end lately. This past weekend I figured out the left front upper a arm bolt moves side to side when I roll the front tire back and forth quickly. Might be time to do the upgraded a arm mounts?
 
Scoop

Scoop

Well-Known Member
Lifetime Member
Supporting Member
Sep 7, 2021
5,191
20,513
113
Michigan
Ownership

  1. Other Brand

  2. 1000-5

  3. Talon R LV
What is the torque spec on the a arm bolts?

These are from the 2016-2020 service manual.

1694130942206
 
TripleB

TripleB

Well-Known Member
Lifetime Member
Aug 13, 2018
15,618
140,491
113
Caryville, Tennessee
Ownership

  1. 1000-3

  2. 1000-5
What is the torque spec on the a arm bolts? I never knew that could be an issue. When I installed my SuperATV arms I probably tightened the bolts while the pioneer was on a jack. I know I didn't torque them.

I've been noticing a slight clunking noise in the front end lately. This past weekend I figured out the left front upper a arm bolt moves side to side when I roll the front tire back and forth quickly. Might be time to do the upgraded a arm mounts?
Bushing could be wore already. Top one seems to wear the quickest.
 
WagginTail

WagginTail

Well-Known Member
Lifetime Member
Club Contributor
Oct 13, 2020
1,585
5,880
113
SC
Ownership

  1. 1000-5
Bushing could be wore already. Top one seems to wear the quickest.
Maybe. But the bolt shouldn't move side to side in the hole of the frame should it?
 
  • Like
Reactions: JenElio
JenElio

JenElio

NTC's NoMo Chupacabra Caliente!!....
Lifetime Member
Oct 31, 2019
75,053
677,066
113
Loxahatchee, florida
Ownership

  1. Other Brand

  2. 1000-5
Maybe. But the bolt shouldn't move side to side in the hole of the frame should it?
It shouldn't, no. But it wears out the hole in the tab. You need to get the washer/bolt kit and reinforce that area. Mine has same symptoms, I need to get it done sooner then later.
 
WagginTail

WagginTail

Well-Known Member
Lifetime Member
Club Contributor
Oct 13, 2020
1,585
5,880
113
SC
Ownership

  1. 1000-5
It shouldn't, no. But it wears out the hole in the tab. You need to get the washer/bolt kit and reinforce that area. Mine has same symptoms, I need to get it done sooner then later.
Yea that's what I'm thinking. Also I think I seen someone on here upgrade to a 12mm bolt. Might do that as well
 
advertisement
ToddACimer

ToddACimer

Pioneer 1005-2
Lifetime Member
Oct 7, 2016
3,685
15,587
113
Oshkosh, Wi
Ownership

  1. 1000-5
RB3 has new kit they just worked on with @ToddACimer
That's the one I'm leaning towards now...
Haven't proven it to be more reliable yet but I'm trying. I have about 200 miles on the 12mm setup and it is still tight. I've broken 10mm grade 12.9 bolts in less than 1000 miles. The 12mm upgrade sounds better for sure and feels tighter.

PXL 20230719 005523344 PXL 20230719 005526240 PXL 20230718 221738993
 
someguy1313

someguy1313

Well-Known Member
Mar 5, 2021
237
518
93
SouthEast
Ownership

  1. 1000-5
very interested in the A Arm upgrade kit...

will this be upper and lower? and will this have weld in/bolt in gussets?

I think who ever makes a complete kit that's a pretty straightforward install strengthing the uppers and lowers will sell a lot of them.
 
  • Like
Reactions: JenElio
JenElio

JenElio

NTC's NoMo Chupacabra Caliente!!....
Lifetime Member
Oct 31, 2019
75,053
677,066
113
Loxahatchee, florida
Ownership

  1. Other Brand

  2. 1000-5
very interested in the A Arm upgrade kit...

will this be upper and lower? and will this have weld in/bolt in gussets?

I think who ever makes a complete kit that's a pretty straightforward install strengthing the uppers and lowers will sell a lot of them.
It's just for the uppers, not gussets. There's lots of info around here on adding all types of gussets to reinforce different areas as needed.

I don't think you could make a "straightforward install kit" for gussets. It's all gotta be welded on, I mean yeah they could sell you the gussets but if you already have the knowledge and tools to weld it all your self chances are you have some steel laying around you could use to make them as well.....my 2 cents
 
ToddACimer

ToddACimer

Pioneer 1005-2
Lifetime Member
Oct 7, 2016
3,685
15,587
113
Oshkosh, Wi
Ownership

  1. 1000-5
It's just for the uppers, not gussets. There's lots of info around here on adding all types of gussets to reinforce different areas as needed.

I don't think you could make a "straightforward install kit" for gussets. It's all gotta be welded on, I mean yeah they could sell you the gussets but if you already have the knowledge and tools to weld it all your self chances are you have some steel laying around you could use to make them as well.....my 2 cents
My build thread highlights how I did the gussets on the uppers and lowers, as well as the welded washers on the tabs and then the 12mm bolt upgrade. It's definitely easier in my opinion to start with some 2x2x1/8" tube and cut the parts you need . It could be manufactured but in the end you want to test fit the parts and bolt them in place for welding. Depending on your front bumper setup the front upper gussets need to be place around the mounting feature for the bumper. Most aftermarket bumpers mount outside the frame unlike the stock bumper that slides inside the frame.
 
  • Like
Reactions: Scoop and JenElio

About us

  • Our community has been around for many years and pride ourselves on offering unbiased, critical discussion among people of all different backgrounds. We are working every day to make sure our community is one of the best.

User Menu

Buy us a beer!

  • Lots of time and money has gone into making sure the community is running the best software, best designs, and all the other bells and whistles. Care to buy us a beer? We'd really appreciate it!

    Beer Fund!

    Club Membership!