9D550331-CD9A-4183-AC65-6174E56BD372.jpeg

P1000m5 Traveller II

2016 Honda Pioneer 1000-5 Deluxe
AKRider

AKRider

Well-Known Member
Lifetime Member
Supporting Member
Club Contributor
Mar 31, 2016
1,402
3,224
113
Palmer, Alaska
Ownership

  1. 1000-5
@taylorman are you using some type of PDM, like the Cooper Bussmann?
 
  • Like
Reactions: CumminsPusher
T

taylorman

Active Member
Jun 19, 2016
167
97
28
Lafayette La
I haven't got one yet but I will be getting the cooper bussman. I just got my pioneer last week.


Sent from my iPhone using Tapatalk
 
jasontjames

jasontjames

Active Member
Lifetime Member
Apr 28, 2016
146
174
43
Melissa, TX
Ownership

  1. 1000-5
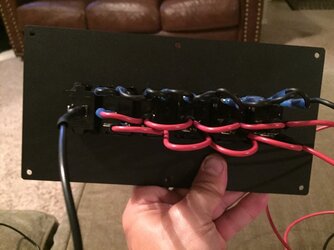
That does help, I think. I have the switch with 5 spades, and nothing connected to 6 and 7. So all I need to do is connect 6 to the brown wire and jump 7 from 8 for the ground in order to have the backlight on even when the switch is off? What about jumping additional switches from this one? I just get everything hooked up right on the first switch and jump each spade to the corresponding spade on the next switch (8 to 8, 2 to 2, 3 to 3, etc)?

That is exactly what I did. I jumpered all of my grounds and routed them back to a grounding bar that I mounted under the hood. I tapped the brown headlight wire and ran that to my switch panel. Then I jumpered all of the led backlights off of that. That way my switches are backlit when I have the headlights on even if the switch is off. I am a novice at best when it comes to wiring so you may get some better feedback from the other guys on the right way to do it.

IMG 2945
 
AKRider

AKRider

Well-Known Member
Lifetime Member
Supporting Member
Club Contributor
Mar 31, 2016
1,402
3,224
113
Palmer, Alaska
Ownership

  1. 1000-5
That does help, I think. I have the switch with 5 spades, and nothing connected to 6 and 7. So all I need to do is connect 6 to the brown wire and jump 7 from 8 for the ground in order to have the backlight on even when the switch is off? What about jumping additional switches from this one? I just get everything hooked up right on the first switch and jump each spade to the corresponding spade on the next switch (8 to 8, 2 to 2, 3 to 3, etc)?

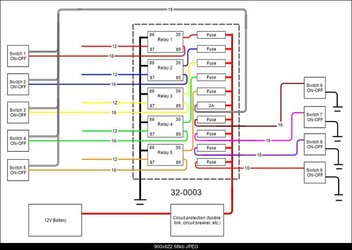
Exactly what @jasontjames said. You don't want to jumper the number 3 pins. Pin 3 is the output power to the accessory you are switching. Here is a diagram of the Cooper Bussmann that someone posted a while back. I'm not sure who, but I thank them. You can click to enlarge it. NOTE: The wire colors on the one you receive might not be exactly the same as this, but it's pretty easy to figure out what is what.

Cooper Bussman

Use the relay outputs to control accessories that have a high amperage, i.e. lightbars, sound systems, etc. The 5 fused lines can be used for things like rock lights, dome lights, USB accessory plugs... low amperage stuff.

If you notice on this diagram, the person that drew it used the 1st fused output with a 2A fuse to provide input power to the switches that are using relays. That goes to pin 2. You can jumper all of them. I'd probably use a 5A fuse, though. The switches are rated for 20A.

When using just the fused outputs, connect them to pin 2, then connect pin 3 directly to your accessory. When using the relay outputs, connect the 16ga wire (pin 85 on the relay in the diagram) to pin 3, and connect the 12ga wire on the PDM to your accessory. When you turn the switch on the voltage coming in on pin 2 will be switched to pin 3, turning on the relay, which supplies the accessory with power.

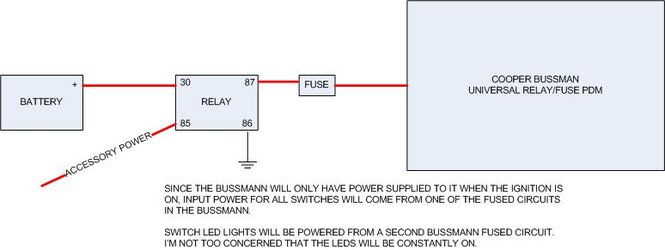
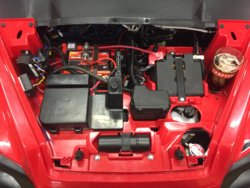
I also used a separate relay to ensure that nothing controlled by the PDM is powered on unless the key is on. I wired it like this.

2nd Battery for Pioneer

Disregard the second paragraph in the above image. I didn't do that.
 
Last edited:
J

Jeffro

Active Member
Jun 20, 2016
106
47
28
Louisiana
Ownership

  1. 1000-5
If you tap into the accessory wire or headlight wire, wouldnt you be using the primary battery for power?
 
AKRider

AKRider

Well-Known Member
Lifetime Member
Supporting Member
Club Contributor
Mar 31, 2016
1,402
3,224
113
Palmer, Alaska
Ownership

  1. 1000-5
I'm using the primary battery to turn on a relay that provides power to the PDM from the second battery. The relay draws very little power. This ensur ed s that when I turn the machine off no accessory remains on. You can turn the key to accessory power and have everything run without having the machine on.

Sent from my SAMSUNG-SM-G870A using Tapatalk
 
Samiam1286

Samiam1286

Member
Jul 24, 2016
56
29
18
Ohio
Ownership

  1. 1000-5
Do you have a part number for the cooper bussman PDM, and where did you purchase? I looked on Amazon but couldn't find anything like this.


Sent from my iPad using Tapatalk
 
advertisement
joeymt33

joeymt33

i4WD=imitated 4WD
Moderator
Lifetime Member
Supporting Member
Club Contributor
Mar 17, 2015
11,096
39,129
113
Guntersville, AL
Ownership

  1. 1000-3

  2. 1000-5
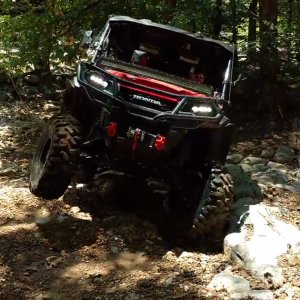
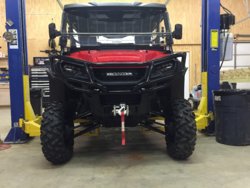
Is this the factory front bumper? I would like to add shackles but my front bumper doesn't seem strong enough.


Sent from my iPhone using Tapatalk

I replied to your other thread. Let me know if you didn't see it.


SIGNATURE:
CumminsPusher quote: Boredom + Pioneer = trouble for me. I can't stop. Damn these things guys. I thank god I'm not the only one though. If it's just you then you're crazy if it's a group it's a sport!
 
joeymt33

joeymt33

i4WD=imitated 4WD
Moderator
Lifetime Member
Supporting Member
Club Contributor
Mar 17, 2015
11,096
39,129
113
Guntersville, AL
Ownership

  1. 1000-3

  2. 1000-5
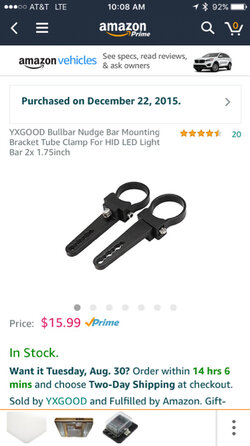
Can you share with me which brackets and lights you bought?


Sent from my iPhone using Tapatalk

Sure thing friend.....

7cd73a6d5b531af8e6efc381db982a62


SIGNATURE:
CumminsPusher quote: Boredom + Pioneer = trouble for me. I can't stop. Damn these things guys. I thank god I'm not the only one though. If it's just you then you're crazy if it's a group it's a sport!
 
  • Like
Reactions: CumminsPusher
GlockMeister

GlockMeister

The Bearded Wonder
Lifetime Member
Supporting Member
May 11, 2016
7,606
35,593
113
Greenville, Mo
Ownership

  1. 1000-5
Can you share with me which brackets and lights you bought?


Sent from my iPhone using Tapatalk
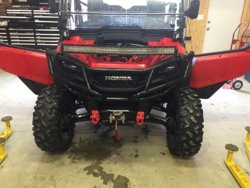
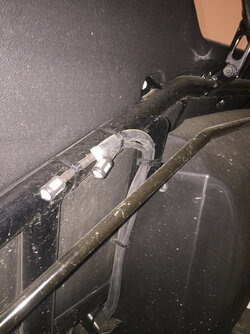
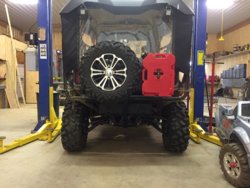
Did you have to cut slits in your rear panel to mount your light like that?
 
joeymt33

joeymt33

i4WD=imitated 4WD
Moderator
Lifetime Member
Supporting Member
Club Contributor
Mar 17, 2015
11,096
39,129
113
Guntersville, AL
Ownership

  1. 1000-3

  2. 1000-5
Did you have to cut slits in your rear panel to mount your light like that?

Nope. It stretches under the mount.


SIGNATURE:
CumminsPusher quote: Boredom + Pioneer = trouble for me. I can't stop. Damn these things guys. I thank god I'm not the only one though. If it's just you then you're crazy if it's a group it's a sport!
 
GlockMeister

GlockMeister

The Bearded Wonder
Lifetime Member
Supporting Member
May 11, 2016
7,606
35,593
113
Greenville, Mo
Ownership

  1. 1000-5
Nope. It stretches under the mount.


SIGNATURE:
CumminsPusher quote: Boredom + Pioneer = trouble for me. I can't stop. Damn these things guys. I thank god I'm not the only one though. If it's just you then you're crazy if it's a group it's a sport!
Thanks for the info. If I can't get my reverse lights crammed into the spot I think I can I'll go this route.
 
M

Mattyb39

Member
Aug 12, 2016
18
37
13
Cranberry Township, PA
Ownership

  1. 1000-5
10b5d5e5fbdf9a877c14337570d77d94

I'm looking for a good alternative to the whole vent lines issue without using bellows. Think this may work?


Sent from my iPhone using Tapatalk
 
joeymt33

joeymt33

i4WD=imitated 4WD
Moderator
Lifetime Member
Supporting Member
Club Contributor
Mar 17, 2015
11,096
39,129
113
Guntersville, AL
Ownership

  1. 1000-3

  2. 1000-5
View attachment 21355

I'm looking for a good alternative to the whole vent lines issue without using bellows. Think this may work?


Sent from my iPhone using Tapatalk

It looks like a fancy expensive filter to me. The instructions say to mount high enough to be out of the water.

I would recommend extending the tubing and putting a chainsaw or line trimmer fuel filter on the end of the line. That's what I did and got rid of my bellows after they failed.

7b5d29cfa013959f4eed2157bdee5be6


SIGNATURE:
CumminsPusher quote: Boredom + Pioneer = trouble for me. I can't stop. Damn these things guys. I thank god I'm not the only one though. If it's just you then you're crazy if it's a group it's a sport!
 
M

Mattyb39

Member
Aug 12, 2016
18
37
13
Cranberry Township, PA
Ownership

  1. 1000-5
It looks like a fancy expensive filter to me. The instructions say to mount high enough to be out of the water.

I would recommend extending the tubing and putting a chainsaw or line trimmer fuel filter on the end of the line. That's what I did and got rid of my bellows after they failed.

View attachment 21357


SIGNATURE:
CumminsPusher quote: Boredom + Pioneer = trouble for me. I can't stop. Damn these things guys. I thank god I'm not the only one though. If it's just you then you're crazy if it's a group it's a sport!

I do agree it seemed rather pricey for a vent filter but I couldn't think of another plan. The fuel filters at the end would be significantly cheaper and still breathe freely. Thanks for the image! Any recommendations on your front snorkel design? Like would you change anything to that design or is it working well for you? I really like that look and I'm sure is sounds pretty cool too so I'd like to do something similar.


Sent from my iPhone using Tapatalk
 
joeymt33

joeymt33

i4WD=imitated 4WD
Moderator
Lifetime Member
Supporting Member
Club Contributor
Mar 17, 2015
11,096
39,129
113
Guntersville, AL
Ownership

  1. 1000-3

  2. 1000-5
I do agree it seemed rather pricey for a vent filter but I couldn't think of another plan. The fuel filters at the end would be significantly cheaper and still breathe freely. Thanks for the image! Any recommendations on your front snorkel design? Like would you change anything to that design or is it working well for you? I really like that look and I'm sure is sounds pretty cool too so I'd like to do something similar.


Sent from my iPhone using Tapatalk

I like the snorkel. It was cheap, install in minutes and can be reverted back to stock with just a hood purchase. You can purchase the parts needed for my design and a spare hood and come out less than a preassembled kit.

Things to consider, it may not be for everyone. Some people don't want the sound in their face. Some people don't want the intake blocking their view. If those things aren't a problem, go for it.

You can barely hear it when the scoop is facing forward or the windshield is on. It also acts as a ram air.(which as far as I can tell, makes no difference in power). It can quickly be turned around before jumping into the river.

Let me know if you need any assistance.


SIGNATURE:
CumminsPusher quote: Boredom + Pioneer = trouble for me. I can't stop. Damn these things guys. I thank god I'm not the only one though. If it's just you then you're crazy if it's a group it's a sport!
 
Last edited:
advertisement

Similar threads

Hometeam
Replies
18
Views
2K
Hometeam

About us

  • Our community has been around for many years and pride ourselves on offering unbiased, critical discussion among people of all different backgrounds. We are working every day to make sure our community is one of the best.

User Menu

Buy us a beer!

  • Lots of time and money has gone into making sure the community is running the best software, best designs, and all the other bells and whistles. Care to buy us a beer? We'd really appreciate it!

    Beer Fund!

    Club Membership!