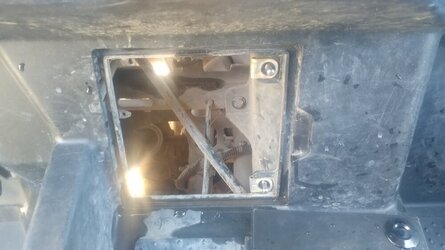
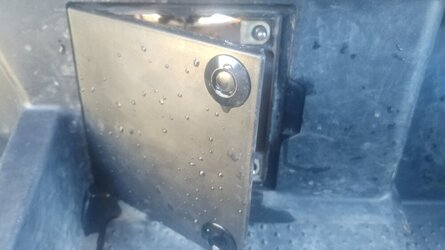
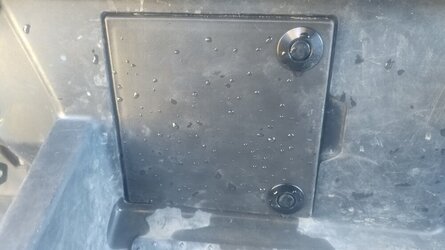
P1000m5 1000-5 Rear Door Inside Storage Modification

D

DenMachine

Guest
  • Like
Reactions: Lady01
D

DenMachine

Guest
Joey... Thanks again for this great idea. I done this and just did a much simpler mod by just using thumb-screws for all 6 connections without any hinge. Doesn't take long to remove the screws and stuff I'm storing is emergency stuff like 1st Aid kit, tire repair and pump and extra warm clothing. Everything is stored in zip bags. I did cover the gaping hole in door with tablecloth type clear plastic from Walmart to keep dust and water out. It just is a simple flap.
 
  • Like
Reactions: Lady01 and joeymt33
D

DenMachine

Guest
Just an FYI,
So I ordered 12 or so, cheap enough at a buck 80 each.
Shipping is the rub. I paid 26 bucks for 3 to 7 day thinking it's about the same cost as Azon with guaranteed shipping. ...day 14, no order delivered and several meaningless emails about paying the tariff and tax if you charge friend..avoid delaysend damage claim DSL.
I should have been wiser...
Here is a link that works from Amazon... FYI

https://amazon.com/YSISLY-Universal-Aluminum-Vehicle-Release/dp/B08JJ3GW77/?tag=sxsweb24-20
 
  • Like
Reactions: Lady01 and TripleB
K

kajngrad

New Member
Nov 17, 2020
3
5
3
south louisiana
Ownership

  1. 1000-5
Just curious if anyone has had issues getting the existing bolts off, to remove the panel(s)? Mine are ridiculously tight, to the point I am borderline stripping out the bolt. Suggestions on how to remove and extract the bolts without ruining the bolt, or breaking the panel?
 
joeymt33

joeymt33

i4WD=imitated 4WD
Moderator
Lifetime Member
Supporting Member
Club Contributor
Mar 17, 2015
11,096
39,129
113
Guntersville, AL
Ownership

  1. 1000-3

  2. 1000-5
Just curious if anyone has had issues getting the existing bolts off, to remove the panel(s)? Mine are ridiculously tight, to the point I am borderline stripping out the bolt. Suggestions on how to remove and extract the bolts without ruining the bolt, or breaking the panel?

You need more uga duggas!!
 
Remington

Remington

POIDH Enforcement Officer
Lifetime Member
Supporting Member
Jul 24, 2016
20,255
115,808
113
Michigan
Ownership

  1. 1000-5

  2. Talon X
This is why I joined this group. Thanks for the ideas!!
Your quite welcome and welcome to the club! See its your first post and no pics!
got any? Like to see what you've done abd got!
Were visual people here ;)
 
  • Like
Reactions: JenElio
The Gun Guy

The Gun Guy

New Member
Mar 5, 2021
4
8
3
Brockway, PA
Ownership

  1. 1000-5
Your quite welcome and welcome to the club! See its your first post and no pics!
got any? Like to see what you've done abd got!
Were visual people here ;)
I just ordered a winch, snorkel and dual battery set up. I'm going to do them all at the same time. I just got the 1000-5, I haven't touched it yet. It's new to me 2018 with 400 miles, camo, front glass and the all-weather hard cab and heater.
 
Remington

Remington

POIDH Enforcement Officer
Lifetime Member
Supporting Member
Jul 24, 2016
20,255
115,808
113
Michigan
Ownership

  1. 1000-5

  2. Talon X
I just ordered a winch, snorkel and dual battery set up. I'm going to do them all at the same time. I just got the 1000-5, I haven't touched it yet. It's new to me 2018 with 400 miles, camo, front glass and the all-weather hard cab and heater.
Cool! Lets see some pics tho! Lol

Im assuming you haven't done the welcome/intorduction thread yet?
Do that and dont forget the pics!

The unwritten gospel around here is....
Pics or it didnt happen!!!
 
  • Like
Reactions: TripleB and JenElio
advertisement
P1K5Dave

P1K5Dave

Well-Known Member
Lifetime Member
Club Contributor
Jul 11, 2020
2,247
8,430
113
Petoskey, MI
Ownership

  1. 1000-5
Checking in to see how you guys' hood latches are holding up over time?

I'm getting ready to do some rear storage, but my first project with these latches was to make my "heater door" quick release for easy install / removal on the trail. Sometimes here in MI you want to open it up in the evening for some heat, but want it closed during the day.

It occurred to me that these things will be constantly bombarded with muddy water, and they could get messy or even seize up.

0513211928c 0513211928b 0513211928
 
  • Like
Reactions: TripleB
P1K5Dave

P1K5Dave

Well-Known Member
Lifetime Member
Club Contributor
Jul 11, 2020
2,247
8,430
113
Petoskey, MI
Ownership

  1. 1000-5
The door doesn't close as tight as it should, due to the depth of the latch button housing, but it's pretty good. I may put a rubber washer or something behind the flange of the button, if I think it's an issue.
 
  • Like
Reactions: TripleB
Adam490

Adam490

HFA Grand High Wizard
Lifetime Member
Supporting Member
Apr 7, 2019
8,035
60,569
113
Covington, LA
Ownership

  1. 1000-5

  2. Talon R LV
Checking in to see how you guys' hood latches are holding up over time?

I'm getting ready to do some rear storage, but my first project with these latches was to make my "heater door" quick release for easy install / removal on the trail. Sometimes here in MI you want to open it up in the evening for some heat, but want it closed during the day.

It occurred to me that these things will be constantly bombarded with muddy water, and they could get messy or even seize up.

View attachment 271378 View attachment 271379 View attachment 271380
My original latches are still holding up fine on the doors. If you have them where they get muddy constantly you'll find that the button sticks and won't release. I pull my panels off and pressure wash the latches then spray them with WD40. Seems to keep them going.
 
P1K5Dave

P1K5Dave

Well-Known Member
Lifetime Member
Club Contributor
Jul 11, 2020
2,247
8,430
113
Petoskey, MI
Ownership

  1. 1000-5
I put storage in one of my small bed panels tonight as a trial run.

One of the things I think could be improved: There is no buffer between the latch and the inside body panel. It's hard surface meets hard surface. This means you have to get the stud depth near perfect to get a solid connection between panels. I found that a quarter-turn adjustment of the stud was the difference on getting a good fit.

I'd like to see something with some give between them, so I'm thinking maybe soft neoprene washers glued to the inner panel, around the stud. Then, when you push the panel on you'd get a little resistance before the "click."

Seems it would improve fit and finish, and reduce the chance of rattling. Would probably help keep grit out of the latches and extend their life as well.

Have any of you done something like this?
 
bumperm

bumperm

Well-Known Member
May 7, 2021
1,902
6,783
113
Gardnerville, NV
Ownership

  1. 1000-5
On a brand new '21 P1000-5 SE, factory bolts way too tight! While installing the rear door storage mod, I did the right side first. The round head 5mm hex drive bolts were overly tight but no problem removing them. On the left side, the guy must have had his driver adjusted to "strip the threads" mode. I didn't notice that the bolt heads had been slightly damaged by the 5mm bit at assembly - it appeared the driver bit was either not seated all the way or was pulled out while the tool was still impacting. They were exceptionally tight. I used an impact driver with a new 5mm bit, but didn't notice the damage that prevented the bit from seating fully. Three of the bolts head hexes were stripped out with enough damage I couldn't get a bit fully seated - had to slot them with a Dremel and use a flat blade driver and an adjustable wrench as a cheater.

Went together well, though. Used an oscillating multi-tool to "shave off" some of the thickness of the color panel on the inside so the retainer nut on the push button hood pin would fully engage the threads on the button (this also allow the color panel to sit closer to the door.
 
bumperm

bumperm

Well-Known Member
May 7, 2021
1,902
6,783
113
Gardnerville, NV
Ownership

  1. 1000-5
I put storage in one of my small bed panels tonight as a trial run.

One of the things I think could be improved: There is no buffer between the latch and the inside body panel. It's hard surface meets hard surface. This means you have to get the stud depth near perfect to get a solid connection between panels. I found that a quarter-turn adjustment of the stud was the difference on getting a good fit.

I'd like to see something with some give between them, so I'm thinking maybe soft neoprene washers glued to the inner panel, around the stud. Then, when you push the panel on you'd get a little resistance before the "click."

Seems it would improve fit and finish, and reduce the chance of rattling. Would probably help keep grit out of the latches and extend their life as well.

Have any of you done something like this?

Remove enough material from the backside of the panel, so the push button threads protrude enough for the mounting nut to be screwed on all the way (or nearly so) so the inside of the button is flush with nut. This will allow the panel to be as close to the door as possible. It will also allow you to use a #3 O-ring on the locking ball shaft. This O-ring will slip over the ball and be retained. On the inside of the button there's an inside taper to aid in getting the button over the ball. The O-ring fits partially into this taper to seal out dirt and dust from the mechanism, but stays proud enough to act as the anti-vibration or rattling issue. It also helps the button's spring a bit to kick the button out when you push the button.

20210707 175448


Shows how close the panel is to the door when back side of color panel has material removed for full nut engagement.
20210707 180053


Modeling clay is used to determine how thick foam weather strip needs to be to seal door opening from dust.
20210707 175851


BTW, the only way I found to adjust the ball end engagement distance was to chuck it in my portable drill. I have a collet that would work nicely in my machine shop - (which is not a lot of help as that's 10 miles away in my hangar). How do others turn the ball end to adjust?
 
501Pioneer

501Pioneer

Member
Jul 6, 2021
12
29
13
Beebe, AR
Ownership

  1. 1000-5
I’m going to make this easy for anyone interested in doing it... These just came in today and they’re the same thread pattern as the panel nuts. The only modification I can see is the color panels will need the holes expanded to a 3/4 hole for the push button threaded shaft. You’ll need 12 in total but this is as cheap as I could find them. I’ll update after I get the rest in and do the cutting. Also, NOTE.. they only come as single units even though the pic shows 2!

View attachment 77247

Black Universal Push Buttons Billet Hood Pin Lock Clips Kit Auto Car Quick Latch 692464666344 | eBay
Doing this mod now. Did you drill out the factory holes for the new pins?
 
  • Like
Reactions: Lady01
bumperm

bumperm

Well-Known Member
May 7, 2021
1,902
6,783
113
Gardnerville, NV
Ownership

  1. 1000-5
Doing this mod now. Did you drill out the factory holes for the new pins?

There's no need to drill out the factory threaded inserts for the new pins, they are the same thread but are not deep enough due to a thin layer of plastic on the inside. To install, insert the threaded "ball end" pin in your drill. Run the thread in and the threaded pin will push the plastic out of the way. For the two bottom row, center pins, I cut them shorter to about 3/4 to 7/8" long, this way the extra threaded shaft won't interfere with using the storage opening.

On the color panel, I used a 3/4" hole saw to make the hole for the push button part. Then, as explained in my previous post, I used an oscillating multi-tool with saw blade to remove material on the inside of the color panel to allow the nut to fully engage the button threads - you don't need to do this, but it gets the panel mounted about as close to the door as it was originally.
 
advertisement

About us

  • Our community has been around for many years and pride ourselves on offering unbiased, critical discussion among people of all different backgrounds. We are working every day to make sure our community is one of the best.

User Menu

Buy us a beer!

  • Lots of time and money has gone into making sure the community is running the best software, best designs, and all the other bells and whistles. Care to buy us a beer? We'd really appreciate it!

    Beer Fund!

    Club Membership!