D
I got my S&B Particle Separator up and running. Turned out to be a very easy install.
At least if you have a welder and a way to cut and drill metal.
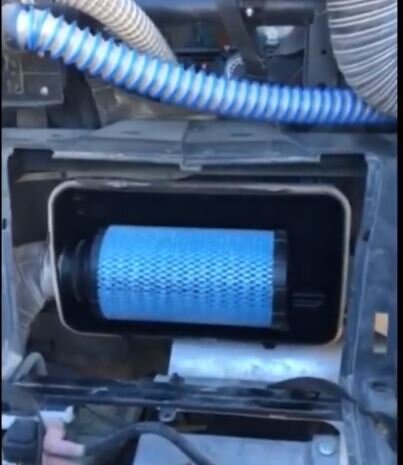
 This was my air filter after approximately 300 miles of desert riding and I was not following anyone. Stock system, no Particle Separator.
I had posted in a earlier post about my fuel mileage dropping to 14.3 mpg and not knowing why.
This explained it.
 Front view showing unit as low as possible.
 I have a rear full safety glass window, so there is no roll bar to mount the S&B to. I used a length of 1" x 2" rectangular tubing welded to the down sloped roll bar for mounting the unit.
 This view you can see the mounts I made to connect the unit to the cross bar. I used 3/16" plate steel and cut them out. I welded the mount bracket to the cross bar and used the screws from the S&B kit to mount it.
The S&B Particle Separator kit I used for this was #76-2001

 This ABS 3" reducer was needed to connect the 3 1/2" flex hose to the air box on the Talon.
 Once the stock air intake unit was removed from the air box, leaving the rubber coupler attached, I slid the ABS reducer over it. It is a tight and secure fit, that did not need anything to secure it. I then was able to slide the 3 1/2" flex pipe onto it and clamp in place.
 You will need to cut a 4" hole in the top of the panel. I did not have a 4" hole saw and used a 4 1/8" which is just a little big, but okay.
I secured the flex pipe with a wire tie to the plastic skirt by drilling two holes in it.
 To dress up the hole cut out and protect the S&B flex pipe. I used 3/8" wire flex tubing.
 To keep the S&B low and as close to the front as possible and look right. I had to cut out the top to match the dust exhaust port of the S&B. This keep the unit outside of the cab area and retained the look and integrity of the plastic top with the exhaust outlet under the roof line.
 To give more rigidity to the S&B flex tube ( not sure it's needed ) I added a support and used the velcro straps from the kit.
The kit came with a 39" length of flex tube which was the perfect length.
For the electrical harness install, I used a toggle switch between the hot lead to further control the unit and found my own key on activation point from the Honda accessory wiring harness.
 So far I have about 100 miles on it but have not checked the filter.
I am going to run it awhile first.
The whole key to this was the ABS bushing to mount the S&B flex tube to the air box. With that anyone could make the unit work.
With my rear window I was able to keep water ect. out of the cab area with unit mounted in what I think was the best location.
For those without a front windshield, you could use the supplied roll bar mounting clamps and mount the unit under the top. Just make sure the unit you order has the 2" mounting hardware for the roll bar size of the Talon.
Any question I will try and help.
At least if you have a welder and a way to cut and drill metal.
This was my air filter after approximately 300 miles of desert riding and I was not following anyone. Stock system, no Particle Separator. I had posted in a earlier post about my fuel mileage dropping to 14.3 mpg and not knowing why.
This explained it.
Front view showing unit as low as possible. I have a rear full safety glass window, so there is no roll bar to mount the S&B to. I used a length of 1" x 2" rectangular tubing welded to the down sloped roll bar for mounting the unit. This view you can see the mounts I made to connect the unit to the cross bar. I used 3/16" plate steel and cut them out. I welded the mount bracket to the cross bar and used the screws from the S&B kit to mount it.The S&B Particle Separator kit I used for this was #76-2001
This ABS 3" reducer was needed to connect the 3 1/2" flex hose to the air box on the Talon. Once the stock air intake unit was removed from the air box, leaving the rubber coupler attached, I slid the ABS reducer over it. It is a tight and secure fit, that did not need anything to secure it. I then was able to slide the 3 1/2" flex pipe onto it and clamp in place. You will need to cut a 4" hole in the top of the panel. I did not have a 4" hole saw and used a 4 1/8" which is just a little big, but okay. I secured the flex pipe with a wire tie to the plastic skirt by drilling two holes in it.
To dress up the hole cut out and protect the S&B flex pipe. I used 3/8" wire flex tubing. To keep the S&B low and as close to the front as possible and look right. I had to cut out the top to match the dust exhaust port of the S&B. This keep the unit outside of the cab area and retained the look and integrity of the plastic top with the exhaust outlet under the roof line. To give more rigidity to the S&B flex tube ( not sure it's needed ) I added a support and used the velcro straps from the kit.The kit came with a 39" length of flex tube which was the perfect length.
For the electrical harness install, I used a toggle switch between the hot lead to further control the unit and found my own key on activation point from the Honda accessory wiring harness.
So far I have about 100 miles on it but have not checked the filter.I am going to run it awhile first.
The whole key to this was the ABS bushing to mount the S&B flex tube to the air box. With that anyone could make the unit work.
With my rear window I was able to keep water ect. out of the cab area with unit mounted in what I think was the best location.
For those without a front windshield, you could use the supplied roll bar mounting clamps and mount the unit under the top. Just make sure the unit you order has the 2" mounting hardware for the roll bar size of the Talon.
Any question I will try and help.