Talon Hometeam's Blue X

PaulF

PaulF

/\/\/\/\/\/\/\/\/\/\/\/\
Lifetime Member
Jul 1, 2019
1,462
4,807
113
Utah
Ownership

  1. Talon R
First off, you are talking about an X and they sit a little lower.

You are going to get answers all over the place.
My R sits at 14" with 30's as set by Weller Racing.
ST says 13 Front, 12.5 Rear with stock tires so with ~31.4" tires that would be 14.7 and 14.2 respectively.

I would call GForce and ask them what a stock tire setup is supposed to be set at and add 1.7"
 
Hometeam

Hometeam

Well-Known Member
Lifetime Member
Nov 26, 2015
922
3,579
93
Normal, IL
First off, you are talking about an X and they sit a little lower.

You are going to get answers all over the place.
My R sits at 14" with 30's as set by Weller Racing.
ST says 13 Front, 12.5 Rear with stock tires so with ~31.4" tires that would be 14.7 and 14.2 respectively.

I would call GForce and ask them what a stock tire setup is supposed to be set at and add 1.7"

Yep I got a call into them about it. I figured answers would be all over the place but I was curious what other people were running. I remember G-Force saying in the beginning when we were talking about ride height that he says that to be somewhat personal opinion.
 
Hometeam

Hometeam

Well-Known Member
Lifetime Member
Nov 26, 2015
922
3,579
93
Normal, IL
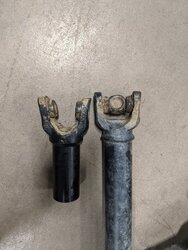
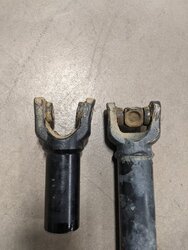
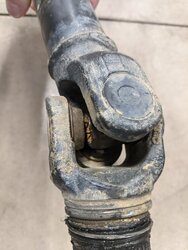
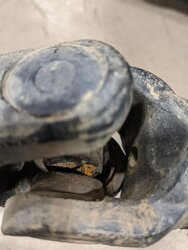
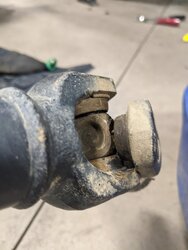
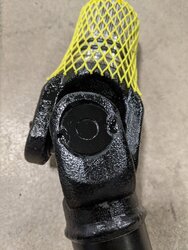
Well I had my first break....my fault! Sent it up a climb and had to stay in it or else I came back down backwards. Landed on power and front got traction....snap went my U-joint. Actually both of them!!) My kids the second they see my wife: "Mom something broke on our trip and it wasn't us....dad broke his machine mom not us!!!!" 😂 🤓

PXL 20210124 201520622PXL 20210124 201533243PXL 20210124 201600527PXL 20210124 201609939PXL 20210124 201629721PXL 20210124 204727978PXL 20210124 204738672

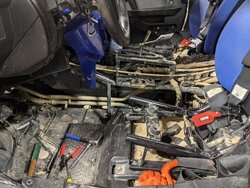
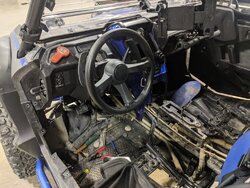
If the fully assembled drive shaft goes in as easy as that one came out this is actually a pretty easy thing to fix overall. The hardest part was getting the driver's side floorboard out and for some reason my drive shaft collar was a little seized on the sub transmission output shaft. Had I doused it with some lube first I think it would have came out easier. The only thing I have done so far with the front diff is take the three bolts out and it had enough forward play to get the old one out. Hopefully there will still be enough room to get the new one in.
 
CID

CID

Well-Known Member
Lifetime Member
Supporting Member
Oct 27, 2019
4,997
22,282
113
SE Denver-ish
Ownership

  1. Talon R
fwiw: the spec chart shows the X ground clearance at 12.7" + the 1.7" Paul mentioned above puts your target GC at 14.4"

I'm envious of your G-Force shock work. :eek:
 
Hometeam

Hometeam

Well-Known Member
Lifetime Member
Nov 26, 2015
922
3,579
93
Normal, IL
fwiw: the spec chart shows the X ground clearance at 12.7" + the 1.7" Paul mentioned above puts your target GC at 14.4"

I'm envious of your G-Force shock work. :eek:

Sorry, not sure I'm following? Or are you referring to earlier post when I was talking about my shock setup?
 
Hometeam

Hometeam

Well-Known Member
Lifetime Member
Nov 26, 2015
922
3,579
93
Normal, IL
fwiw: the spec chart shows the X ground clearance at 12.7" + the 1.7" Paul mentioned above puts your target GC at 14.4"

I'm envious of your G-Force shock work. :eek:

I read your last comment wrong! Lol I thought it said nervous but it said envious! I have absolutely loved my machine with the suspension work done. It is a lot of fun to drive in all terrains. I can't say enough good things about Gary at G-Force! Just got done talking to him the other day about the suspension on my son's YXZ and suspension on my next machine!
 
Hometeam

Hometeam

Well-Known Member
Lifetime Member
Nov 26, 2015
922
3,579
93
Normal, IL
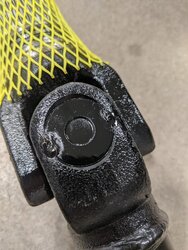
New drive shaft ready to go in. I spot welded the caps on before I put it in. I figured I'd eliminate the potential of them pushing their way out. My broken drive shaft seemed to have all the caps intact but I have heard that some have had an issue with them coming out.
PXL 20210203 000147512PXL 20210203 000130703
 
Hometeam

Hometeam

Well-Known Member
Lifetime Member
Nov 26, 2015
922
3,579
93
Normal, IL
Well you definitely don't need to follow the service manual on how to replace your front prop shaft / drive shaft. I replaced mine with my machine sitting in the shed. I did not jack it up or remove any wheels or axles. Once you get the floor board and side cover off on the driver side, which feels like it has 9,000 plastic rivets! :) At that point all's you need to do is remove the two safety loops and the three bolts that hold in the front diff. With the three bolts removed on the front diff that gives you enough play to remove the drive shaft. You will need to remove the front portion from the front diff first. It is shorter than the rear and you will have enough room with the play in the front diff to pull it out. The retaining clip on the front diff is a pain and was the hardest part of the easy job. If you didn't have to remove the plastics to access the drive shaft it would take less than an hour to do. Hope that helps if anyone has to do their own drive shaft.
 
Smitty335

Smitty335

Well-Known Member
Lifetime Member
Supporting Member
Oct 3, 2016
35,368
208,011
113
NWA Arkansas
Ownership

  1. 1000-3

  2. 1000-5
Well you definitely don't need to follow the service manual on how to replace your front prop shaft / drive shaft. I replaced mine with my machine sitting in the shed. I did not jack it up or remove any wheels or axles. Once you get the floor board and side cover off on the driver side, which feels like it has 9,000 plastic rivets! :) At that point all's you need to do is remove the two safety loops and the three bolts that hold in the front diff. With the three bolts removed on the front diff that gives you enough play to remove the drive shaft. You will need to remove the front portion from the front diff first. It is shorter than the rear and you will have enough room with the play in the front diff to pull it out. The retaining clip on the front diff is a pain and was the hardest part of the easy job. If you didn't have to remove the plastics to access the drive shaft it would take less than an hour to do. Hope that helps if anyone has to do their own drive shaft.
Pics?
 
  • Like
Reactions: Mopower58
PaulF

PaulF

/\/\/\/\/\/\/\/\/\/\/\/\
Lifetime Member
Jul 1, 2019
1,462
4,807
113
Utah
Ownership

  1. Talon R
If you didn't have to remove the plastics to access the drive shaft it would take less than an hour to do.
Would you think it can all be done from the bottom if you remove all the skids? Or is it impossible to get the driveline loops out from the bottom?
 
Hometeam

Hometeam

Well-Known Member
Lifetime Member
Nov 26, 2015
922
3,579
93
Normal, IL
Would you think it can all be done from the bottom if you remove all the skids? Or is it impossible to get the driveline loops out from the bottom?

I actually thought about that after I got it in and buttoned up!:confused: But when I looked at it from the shifter area that's the way I would try it next time. I think you could get to those bolts. After it's out it snakes through the passenger rear wheel well.... Or at least that's the way I took it in and out.
 
PaulF

PaulF

/\/\/\/\/\/\/\/\/\/\/\/\
Lifetime Member
Jul 1, 2019
1,462
4,807
113
Utah
Ownership

  1. Talon R
I actually thought about that after I got it in and buttoned up!:confused: But when I looked at it from the shifter area that's the way I would try it next time. I think you could get to those bolts. After it's out it snakes through the passenger rear wheel well.... Or at least that's the way I took it in and out.
I will try. I am going to replace my joints with greaseable units and tack weld them in for "just in case" like you did. Too many of them have just come apart for no reason for me to be comfortable riding alone like I do sometimes. Plus, I want to get my driveshaft balanced (she vibrates a tiny bit at higher speeds and I'm pretty sure it is the driveshaft).
 
Hometeam

Hometeam

Well-Known Member
Lifetime Member
Nov 26, 2015
922
3,579
93
Normal, IL
I will try. I am going to replace my joints with greaseable units and tack weld them in for "just in case" like you did. Too many of them have just come apart for no reason for me to be comfortable riding alone like I do sometimes. Plus, I want to get my driveshaft balanced (she vibrates a tiny bit at higher speeds and I'm pretty sure it is the driveshaft).
Awesome. I will be interested to hear if it works from underneath. It is hard for me to document my work at times..... I have three very active boys and our electrical company has been blessed to be one of the companies doing a lot of the electrical work at the new Rivian Electric truck and suv manufacturer! So I get 15 and 30 minute intervals at a time to work on the machines! 🤪
 
  • Like
Reactions: Smitty335
PaulF

PaulF

/\/\/\/\/\/\/\/\/\/\/\/\
Lifetime Member
Jul 1, 2019
1,462
4,807
113
Utah
Ownership

  1. Talon R
Awesome. I will be interested to hear if it works from underneath. It is hard for me to document my work at times..... I have three very active boys and our electrical company has been blessed to be one of the companies doing a lot of the electrical work at the new Rivian Electric truck and suv manufacturer! So I get 15 and 30 minute intervals at a time to work on the machines! 🤪
You can in fact remove the driveline from the bottom and it only took me an hour to figure it out. I can probably do it in 30 minutes next time...

  1. Remove Skid Plate.
  2. Remove LF lower fender thing (not sure what it is called but it gives you clear access to the clip holding the driveline in the front clutch).
  3. Unclip the LF Speed Sensor wire from the frame (2 places).
  4. Remove the rear drive line loop. Not sure you really need to do this but I thought the driveline would come out the back as noted by other. Turns out there is enough room and the driveline comes out the bottom very easily.
  5. Remove the front driveline loop bolts. Use 3/8 drive and you will need a u-joint or wobbly socket. Slightly pry the driver floorboard to give clearance for the socket. Once loose, you can use 1/4 drive air ratchet to remove.
  6. Split the loop apart and take it completely out.
  7. Turn the drivetrain until the release clip on the front clutch faces left. Use some good flat/parallel style snap ring pliers to release the front yoke from the front diff clutch. It will only come out about 1/4" at this point until you remove the diff bolts.
  8. Remove the 3 bolts holding the front diff in place.
  9. Although not necessary, it helps a lot to remove the RIGHT 4 lower engine mount bolts and use a ratchet strap and pull the right side of the entire engine assembly back about 1/2". This makes the driveline removal and install much easier.
  10. Carefully pry the diff forward, pull the driveline back, rotate the void where the clip resides upward and wiggle the driveline up and over the diff.
  11. Pry the drive line forward off the O-rings on the rear spline and push the driveline forward and up.
  12. Pull driveline out the bottom at the back.
  13. DONE!!!
 
Last edited:
Hometeam

Hometeam

Well-Known Member
Lifetime Member
Nov 26, 2015
922
3,579
93
Normal, IL
I thought I would share that I have recently sold this Talon X. It was a great machine and it was a tank for me!! It will be missed. The only reason for selling it was I wanted to match machines with the Talon R for spare parts and whatnot.
 

About us

  • Our community has been around for many years and pride ourselves on offering unbiased, critical discussion among people of all different backgrounds. We are working every day to make sure our community is one of the best.

User Menu

Buy us a beer!

  • Lots of time and money has gone into making sure the community is running the best software, best designs, and all the other bells and whistles. Care to buy us a beer? We'd really appreciate it!

    Beer Fund!

    Club Membership!