P500 Little Red Moose build

R

railrunner

Active Member
Oct 5, 2019
33
168
33
Winnipeg, Manitoba
Ownership

  1. 520
Hello,

Well finally it's starting to warm up around here and time to get installing the goodies it got for the 520. I started today with the Torq Locker....

My Thoughts:
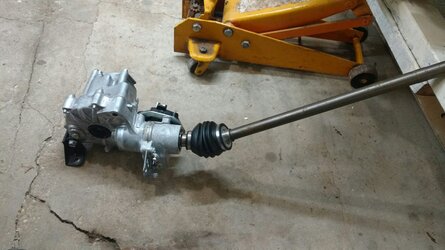
  • Pretty easy to do, splitting the cases and installing the locker was very straight forward, the worst part was getting the drive shaft and gearbox back in because I was alone, driveshaft kept falling under the middle cross member....I did manage but much easier with a second set of hands to push the gearbox in once the driveshaft is lined up by the person under the SXS.
  • Drain the oil really well it saves a mess, I took off the wheels and lowered the front end before draining, I think it really helped, not much oil left when I split the cases.
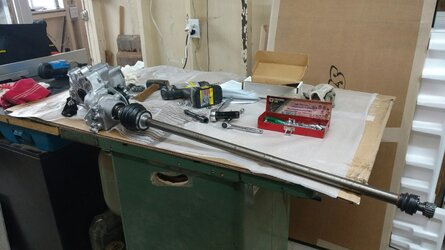
  • You will need a 1/8 pin punch to remove the pin holding the shaft in place and a 5/32 drill bit to remove the punch marks holding it in. The pin does not need to be taken all the way out just enough to release the shaft, saves the hassle of trying to restart it again.
  • Lay the gear carriage on its side when you install the springs in the locker, in my opinion easier to do like this as the locker does not want to close all the time, use a small flat head screwdriver to finish prying springs into place.
  • Lock the first spring in place right away this will keep locker open for the second spring and prevent loss of the first one

Will be completing the front end install this week temp/time permitting and then moving on to the power steering, cab heater (Inferno) and winch

Stay Tuned...

Railrunner
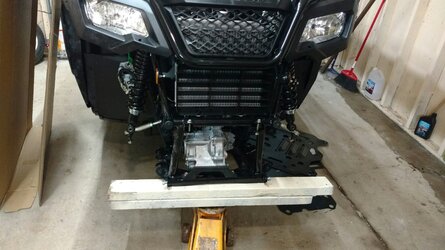
Gearbox removal Gearbox dissasembly Gearbox1
 
Last edited:
Kkettlebell

Kkettlebell

Well-Known Member
Apr 1, 2022
114
475
63
Nova Scotia
Ownership

  1. 500
Hello,

Well finally it's starting to warm up around here and time to get installing the goodies it got for the 520. I started today with the Torq Locker....

My Thoughts:
  • Pretty easy to do, splitting the cases and installing the locker was very straight forward, the worst part was getting the drive shaft and gearbox back in because I was alone, driveshaft kept falling under the middle cross member....I did manage but much easier with a second set of hands to push the gearbox in once the driveshaft is lined up by the person under the SXS.
  • Drain the oil really well it saves a mess, I took off the wheels and lowered the front end before draining, I think it really helped, not much oil left when I split the cases.
  • You will need a 1/8 pin punch to remove the pin holding the shaft in place and a 5/32 drill bit to remove the punch marks holding it in. The pin does not need to be taken all the way out just enough to release the shaft, saves the hassle of trying to restart it again.
  • Lay the gear carriage on its side when you install the springs in the locker, in my opinion easier to do like this as the locker does not want to close all the time, use a small flat head screwdriver to finish prying springs into place.
  • Lock the first spring in place right away this will keep locker open for the second spring and prevent loss of the first one

Will be completing the front end install this week temp/time permitting and then moving on to the power steering, cab heater (Inferno) and winch

Stay Tuned...

Railrunner
View attachment 327854 View attachment 327855 View attachment 327856
Great info thanks…getting ready to do this soon
 
R

railrunner

Active Member
Oct 5, 2019
33
168
33
Winnipeg, Manitoba
Ownership

  1. 520
Update:

Finished the Locker install over the weekend. Suggest the following
  • When reinstalling the differential/driveshaft it really helps to have two people, one person under the SXS to line the driveshaft up with the transmission, don't forget the spring and another person to support the differential and push it in once every thing is lined up.....of course I was by myself and when I pushed the assembly in towards the transmission the driveshaft would fall down under the center cross member....I had the bright idea to go under the SXS and try to push it back a bit to raise it above the crossmember, well I pushed it back a little to far and the differential fell off the other end of the drive shaft. I needed support in front and decided to take one of my floor jacks and rest a piece of plywood on it and the sxs frame giving me a place to put the differential/driveshaft on, I went back under and with one hand on the differential pushing and the other to line up driveshaft I got it back together, oh yeah when the differential fell off it bent the vent tube some, not happy but left it that way, it still works but not taking the chance of trying to bend back and breaking it off, live and learn. This part of the install was the most challenging for me, would have been easy with another person
  • The kit came with new circlips, please ensure to use them as manufacturer suggests, if not the originals may bind in the locker if you ever need to remove the axles again for servicing/replacement.
I also Installed the power steering kit from RUGGED, it went well with the following suggestions
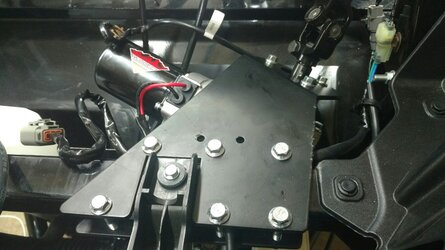
  • Once you get to the rack and pinion linkage/motor installed dry fit the motor mount bracket it will give you a good idea on how the motor position is oriented.
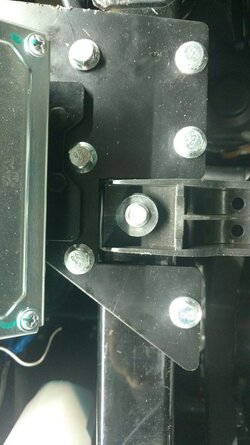
  • I removed the front left shock to gain access to install the bottom mounting plate and bolts, once the bolts are hand tight install the motor in the bracket and push mounting bracket as far right as possible (see pic) for linkage to clear brake reservoir.

Power steering bracket spacing Motor orientation
 
R

railrunner

Active Member
Oct 5, 2019
33
168
33
Winnipeg, Manitoba
Ownership

  1. 520
Update:

Finished the Locker install over the weekend. Suggest the following
  • When reinstalling the differential/driveshaft it really helps to have two people, one person under the SXS to line the driveshaft up with the transmission, don't forget the spring and another person to support the differential and push it in once every thing is lined up.....of course I was by myself and when I pushed the assembly in towards the transmission the driveshaft would fall down under the center cross member....I had the bright idea to go under the SXS and try to push it back a bit to raise it above the crossmember, well I pushed it back a little to far and the differential fell off the other end of the drive shaft. I needed support in front and decided to take one of my floor jacks and rest a piece of plywood on it and the sxs frame giving me a place to put the differential/driveshaft on, I went back under and with one hand on the differential pushing and the other to line up driveshaft I got it back together, oh yeah when the differential fell off it bent the vent tube some, not happy but left it that way, it still works but not taking the chance of trying to bend back and breaking it off, live and learn. This part of the install was the most challenging for me, would have been easy with another person
  • The kit came with new circlips, please ensure to use them as manufacturer suggests, if not the originals may bind in the locker if you ever need to remove the axles again for servicing/replacement.
I also Installed the power steering kit from RUGGED, it went well with the following suggestions
  • Once you get to the rack and pinion linkage/motor installed dry fit the motor mount bracket it will give you a good idea on how the motor position is oriented.
  • I removed the front left shock to gain access to install the bottom mounting plate and bolts, once the bolts are hand tight install the motor in the bracket and push mounting bracket as far right as possible (see pic) for linkage to clear brake reservoir.

View attachment 329380 View attachment 329381

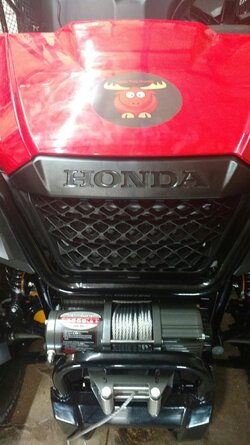
I also installed my winch, went well, just need to complete electrics for both components Winch/Power Steering

Winch
 
The Green Goat

The Green Goat

LGBTQ Compliance Officer -Lotta gays in this place
Lifetime Member
Supporting Member
Sep 7, 2020
2,251
16,620
113
Ohio
Ownership

  1. 520
Have you met your mom yet....not sure if I want to know, lol. The things that happen in the heat of the moment!!!
That moment when you meet what appears to be your bastard child and you think back to that time in your early 20s when you were drunk AF and thought it would be a good idea to raw dog some mud cricket you met out on the trail.

Screenshot 20220413 192135
 
  • Like
Reactions: crewcabrob
advertisement
R

railrunner

Active Member
Oct 5, 2019
33
168
33
Winnipeg, Manitoba
Ownership

  1. 520
Well....back at it, got some Elka Stage one shocks on the way for next Monday.

So far following installed
Worth every Penny:
Torq Locker, Power Steering and 4000 lb winch, and 9x27 inch tires

Good: with some quality and installation concerns
Super ATV flip up windshield, Super ATV clear roof and mirrors

Not So Good
Inferno Cab Heater.... it appears due to the heater core size when moving at higher speeds the antifreeze flow is elevated not allowing the heater core to warm coolant enough to provide decent heat, I have a buddy who installed one as well same issue and there is no air in the system. I have been checking it this summer as well and the only time I have noticed sufficient heat is when during a ride you come to a stop and idle then the heat really picks up but at idle the motor cools down quickly and then back to much cooler temps from the heater.....Winter is coming will put it through it paces, may trade it in for a glove box...lol

Work done so far


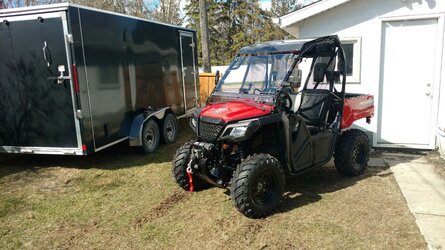
520 outside home pic after mods
 
R

railrunner

Active Member
Oct 5, 2019
33
168
33
Winnipeg, Manitoba
Ownership

  1. 520
You install a diverter valve?
There is no provision to add a diverter per manufacture instructions nor have I seen anything posted online, the output coming from the engine is plumbed directly to the heater coils and then to the radiator and finally returning to the engine completing the cycle. Manufacture also states our machines cooling system operates at a low pressure which reduces the ability to produce heat....great for the engine and what makes our buggies run forever

I will bleed the system once again, not that I think it needs it but want to ensure all bases are covered.
A few posts I have read advised putting cardboard in front of the radiator to obtain a bit more heat, my buddy tried it back east in milder weather and reported somewhat of a temp rise on the move until he was at idle again ....not something I am willing to do in case of engine issues.

I will be contacting the company this week and provide a follow up, Heater in Canada was $725,

Railrunner
 
R

railrunner

Active Member
Oct 5, 2019
33
168
33
Winnipeg, Manitoba
Ownership

  1. 520
Put the Elka's on last night, went for a ride today....what a difference in handling, the ride was a lot smoother a lot of the feeling of tipping was gone on inclines due to the suspension following the terrain a lot better than stock setup. the shocks were bolted on as ordered from vendor, no further adjustments needed, for those on the fence about which version to buy I have the stage ones, and for the capabilities of our buggies stage 2 and up in my opinion are overkill. there was 600 pounds at one point in the SXS....suspension handled it well and also when I was riding alone.

When I ordered the suspension from Elka I was asked a series of questions about ride type, tires and anticipated total weight of occupants and gear, the shocks were built according to specs provided, appropriate spring rate is used and preload set at factory. I don't assume I will need any further adjustments.

I did notice the springs are wound much more progressively than stock to absorb bumps as effectively as possible,
One singular spring on the rear shocks and two on the front shocks with a spacer in between

Final thoughts: other than the power steering....shocks next best upgrade

Railrunner
 

About us

  • Our community has been around for many years and pride ourselves on offering unbiased, critical discussion among people of all different backgrounds. We are working every day to make sure our community is one of the best.

User Menu

Buy us a beer!

  • Lots of time and money has gone into making sure the community is running the best software, best designs, and all the other bells and whistles. Care to buy us a beer? We'd really appreciate it!

    Beer Fund!

    Club Membership!