P500 P500 windshield build

Bastardchild

Bastardchild

Well-Known Member
Nov 3, 2016
1,978
7,250
113
Orange Heights, fl
Ownership

  1. 500

  2. 1000-5
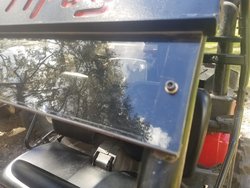
I got out there and continued on the windshield build a little today. I ended up clamping the bottom part of the windshield, the part that contours to the hood, between 2 long pieces of angle iron and heating all that up to get the contoured part back in line. I put it to the windshield frame and heated it until it followed the bars. I welded 2 pieces of angle iron upside down at the bottom of the front rollcage to hold the bottom of the windshield. I have to notch the windshield a bot where it sits on the angle to get it to slide down a little and meet the hood. I trimmed the sides also, but its just a rough trim, i think i will end up smoothing the sides out some when its all done. Im going to cut about 3" or so off the top of the windshield also. Im going to order another piece and come down from the top. The 2 pieces will have about a 3 or 4" gap between them . I think the top of the bottom windshield, and the bottom of top windshield will be resting on 1/4" angle iron to keep it straight. I think im going to drill through the bottom windshield on both sides into the rollcage, then tap the hole in the rollcage tube for the little wingnut things i was talking about. Oh well, blah, blah. Heres some pics

20180212 125221 20180212 125236 20180212 125247 20180212 125251 20180212 125306
 
Bastardchild

Bastardchild

Well-Known Member
Nov 3, 2016
1,978
7,250
113
Orange Heights, fl
Ownership

  1. 500

  2. 1000-5
Im just about done with the windshield build. I guess i forgot to take pics of me working on the top part of the windshield. All i lack is the little black weatherstrip that goes between the windshield bottom and the hood, and i think im gonna put a thumbscrew thingy with the brass gromets on each side of the top windshield like i did the bottom. I will get those tomorrow and drill and tap the rollbars like i did the bottom. Today i welded pieces of 1/2" angle iron across the front of the rollbars, framing in the top of the bottom windshield, and the top and bottom of the top windshield. I drilled and tapped the rollbars 1/4-20 and put the little wingnut thumbscrew thingys through the windshield into the rollbars. I got little 1/2" diameter brass grommets with a 1/4" hole through the middle and drilled 1/2" holes in the windshield and sank the grommets in. There is a little lip on the grommet so it wont push through. I trimmed a little off of the grommet to where i can tighten the windshield up to the rollbar without crunching the plexi, it tightens against the grommet first. Anyway, ill pull the windshields off tomorrow and drill and tap the top, put the grommets in, blah, blah. You get it. Then finish paint it all gloss black. Heres some pics.

20180218 124219 20180218 124543 20180218 124702 20180218 130202 20180218 130240 20180218 130336 20180218 130500 20180218 132106 20180218 132333 20180218 132427 20180218 132957 20180218 133004 20180218 133015 20180218 154822 20180218 154835 20180218 154841 20180218 154854 20180218 155333
 
HUCK

HUCK

Well-Known Member
Lifetime Member
Jun 21, 2016
1,047
2,314
113
ARIZONA
Ownership

  1. 500

  2. Talon X
Im just about done with the windshield build. I guess i forgot to take pics of me working on the top part of the windshield. All i lack is the little black weatherstrip that goes between the windshield bottom and the hood, and i think im gonna put a thumbscrew thingy with the brass gromets on each side of the top windshield like i did the bottom. I will get those tomorrow and drill and tap the rollbars like i did the bottom. Today i welded pieces of 1/2" angle iron across the front of the rollbars, framing in the top of the bottom windshield, and the top and bottom of the top windshield. I drilled and tapped the rollbars 1/4-20 and put the little wingnut thumbscrew thingys through the windshield into the rollbars. I got little 1/2" diameter brass grommets with a 1/4" hole through the middle and drilled 1/2" holes in the windshield and sank the grommets in. There is a little lip on the grommet so it wont push through. I trimmed a little off of the grommet to where i can tighten the windshield up to the rollbar without crunching the plexi, it tightens against the grommet first. Anyway, ill pull the windshields off tomorrow and drill and tap the top, put the grommets in, blah, blah. You get it. Then finish paint it all gloss black. Heres some pics.

View attachment 65511 View attachment 65512 View attachment 65513 View attachment 65514 View attachment 65515 View attachment 65516 View attachment 65517 View attachment 65518 View attachment 65519 View attachment 65520 View attachment 65521 View attachment 65522 View attachment 65523 View attachment 65524 View attachment 65525 View attachment 65526 View attachment 65527 View attachment 65528
You are quite a craftsman . Nice work and very creative .
 
  • Like
Reactions: Bastardchild
Bastardchild

Bastardchild

Well-Known Member
Nov 3, 2016
1,978
7,250
113
Orange Heights, fl
Ownership

  1. 500

  2. 1000-5
A little update. I wasnt really digging the little metal thumbscrew things after i put them on, so i found some plastic ones like i originally invisioned at Lowes in the hardware isle and got them. Also got some 1" long 1/4-20 alan head bolts for holding the top windshield in. I drilled and tapped dead center of the plexi on each side and tightened them down on the little brass grommets like on the bottom windshield. I think the plastic thumbwheels look a little more factory made, instead of backyard made lol. I also wire brushed and painted all the metal i welded on yesterday. Now i just gotta get the weather stripping to go between the hood and the bottom of the plexi and its done. I guess next weekend ill mount a couple of black ammo cans in the bed for taking tools, balljoints, brakelines, oil, etc out on the trails at Takeover! Yall have a good one!

20180219 121301 20180219 121309 20180219 123754 20180219 125754 20180219 125802 20180219 130903 View attachment 65619
 

Attachments

  • 20180219_123744.jpg
    20180219_123744.jpg
    136.1 KB · Views: 81
SXSHP500CO

SXSHP500CO

Pounding - Beaver
Lifetime Member
Dec 2, 2017
232
331
63
Northglenn Colorado
Ownership

  1. 500
You need to use polycarbonate not Plexiglas, It cost more but it won't break or crack ,I cut mine with a jigsaw and used 4 Honda quick clamps to hold it on.
What size was the piece and how much did you spend

Thanks
 

About us

  • Our community has been around for many years and pride ourselves on offering unbiased, critical discussion among people of all different backgrounds. We are working every day to make sure our community is one of the best.

User Menu

Buy us a beer!

  • Lots of time and money has gone into making sure the community is running the best software, best designs, and all the other bells and whistles. Care to buy us a beer? We'd really appreciate it!

    Beer Fund!

    Club Membership!