BOX1

P700m4 PlastiDip Black Pioneer

I just finished spraying it with PlastiDip.
I personally think it looks really good.

Photo 3 Photo 4 Photo 1 Photo 2
 
ohanacreek

ohanacreek

My EcoBoost has I4WD
Moderator
Lifetime Member
Jul 25, 2013
11,346
32,041
113
Shelby County, Alabama
Ownership

  1. 1000-5
Added the front doors, hard mid-panel, glass windshield, wiper, washer, heater, A-Arm Guards, Skid plate, and Honda ROPS bag.

A0ff595ca7ad7bf4f57b3f797afceb22

All I have left are the Rear doors and Power steering.
 
ohanacreek

ohanacreek

My EcoBoost has I4WD
Moderator
Lifetime Member
Jul 25, 2013
11,346
32,041
113
Shelby County, Alabama
Ownership

  1. 1000-5
Thanks, not sure if you've been welcomed to the forum but glad to have you.
 
ohanacreek

ohanacreek

My EcoBoost has I4WD
Moderator
Lifetime Member
Jul 25, 2013
11,346
32,041
113
Shelby County, Alabama
Ownership

  1. 1000-5
So I have pretty much finished mine...

Going to add fender flares as soon as I can.

9936450c41504c574377cf6ca5e767c4
Skids and Front A-Arms guards, and 1-¼" spacers.

D025d080cee57ba54f323b521d541ae9
Rear A-Arm Guards and a 2-D tip from Ebay
https://vimeo.com/118648416
Video only because a sound clip was hard to upload.

F58f97c176929b2daad33ea639baa324
All my accessories are wired here (knob is 3-speed Summit heater, outlet in and under dash)

57380450c8e7af1a81e63d8ccd528cf3
Ddf815bde496493e9500c1bec375b13c
60amp relay feeds the fuse panel.
Hella relay next to it is a 0-900sec delay so I can leave the radio on for 15 mins after I've turned the ignition off.

1c6d0b96109e7a4d137c8e03e8e1fa07
Optima battery under drivers seat
0f25b070fcf4e2f0b4eab898d8cecb5c
Buss points where factory battery was.


E4b3f7f75073fe2e74e7600f8febbbf1
Honda Wiper and Amazon washer kit.
Wired to my switch panel.
(Honda Glass windshield and Hard mid-panel)

279d417c7e559dcc9075fb292853d7d0
Summit Heater

386607afb39450f5ef48f2ef255f00b3
Heater control valve lets me turn flow off in summer or warm weather.
5ae79c791e9fdd6957ded684618ee0b9
Pull for valve behind drivers side of seat.

9fffc1fcace5c9c2df7a0ae9055320ef
Sealed the cab as well as I could to prevent dust from getting in and Heat getting out.
04c75835e13c640e68aa58bb9d2b0320
16a90959bd2aa27b8c541934beded54d

D6ad1c06a49dd80d2ea2773bc5ca5530
Radio and Garmin Zumo 550 I kept off my Valkyrie( somehow I have lifetime XM they never turned it off even after I asked)

981ec1a1699f25e6f0d90713d4c78aab

Ddfaaf7531646575b54be98e01c10e4e
MSA 17 Elixir rims and GBC Dirt Devil tires 27x10-12 Front and 27x12-12 Rear
Next time I'll go with 28x11-12 al four corners.

E4569de113992216fd1a716fdb43fe85
12" and 24" lights bars from Amazon I took them apart and sealed the mating surfaces with black silicon.
Light up the night!


Start
2071f506fe8f71dac61df43629194c4e


Finish!
81ff6b1f60cb8b27f9bc0b6450e2ad61

Note: I have the Soft rear doors and soft rear panel for the very back, but haven't needed them yet so they are still in the boxes in my garage.
 
  • Like
Reactions: Superfan75
Sxsnewbie

Sxsnewbie

Active Member
Lifetime Member
Jan 28, 2015
298
103
28
Eastern Connecticut
How did you mount your 24" light bar? It's obviously on the roof but is it rigid enough? My light bar should be here tomorrow and I'm still deciding on how to mount it. Any suggestions?
Great job on your ride! You really made it your own.
 
ohanacreek

ohanacreek

My EcoBoost has I4WD
Moderator
Lifetime Member
Jul 25, 2013
11,346
32,041
113
Shelby County, Alabama
Ownership

  1. 1000-5
24" is just a ¾ diameter washer on the bottom side of the roof... The 12" has a 3" long piece of 1/8" aluminum flat bar behind it, the plastic was too thin, it shook all over the place. Used stainless fasteners so I didn't have rust issues later.
 
Sxsnewbie

Sxsnewbie

Active Member
Lifetime Member
Jan 28, 2015
298
103
28
Eastern Connecticut
Did you run the wiring in the roll cage? or zip tied down? Just curious as to what it took to drill the cage if that's what you did.
 
ohanacreek

ohanacreek

My EcoBoost has I4WD
Moderator
Lifetime Member
Jul 25, 2013
11,346
32,041
113
Shelby County, Alabama
Ownership

  1. 1000-5
Zip tied in wire loom, I wrapped it every 6-10" with black electrical tape to help keep it together, liked the idea of running it through the cage but didn't want to create holes for water to get in or to weaken the cage and then something happen and Honda be able to get out of it because I modified the safety gear.
 
Sxsnewbie

Sxsnewbie

Active Member
Lifetime Member
Jan 28, 2015
298
103
28
Eastern Connecticut
Thanks for the info. I noticed a couple stock holes on my P5 but they're not in the best locations. Once this snow melts I'm headed to my local custom audio shop to see if they are interested in taking on a little project. They should have some good ideas on hiding wires, light placement and give me some ideas for my audio setup. Gonna ask em about alternate power sources as well.
Your accessories have me itching to get stuff done!
 
ohanacreek

ohanacreek

My EcoBoost has I4WD
Moderator
Lifetime Member
Jul 25, 2013
11,346
32,041
113
Shelby County, Alabama
Ownership

  1. 1000-5
1-¼" spacers did the trick! Running these with ⅝" before I rarely was able to hit 2nd gear without bottoming out.

I was occasionally hitting 3rd and didn't bottom out once!

http://youtu.be/S_0bA6_TErQ
 
bobbyhill

bobbyhill

Pay to Play and I'm broke all around!
Junior Moderator
Lifetime Member
Supporting Member
Club Contributor
Apr 8, 2015
1,271
952
113
Smithfield, VA
Ownership

  1. 700-4
i like the look but i see that this is two years old how did it hold up in the woods?
 
ohanacreek

ohanacreek

My EcoBoost has I4WD
Moderator
Lifetime Member
Jul 25, 2013
11,346
32,041
113
Shelby County, Alabama
Ownership

  1. 1000-5
The edges feathered away from the plastic on the edges of the fenders. My fault I didn't make it thick enough so about 6 months after I sprayed it I pealed it off and redid it. It holds up really well unless you hit something sharp and it digs into it... Thing is you can fix it really easy with some paint thinner and an additional can just feather the edge down where it's torn and spray the area with several coats to bring the thickness up.

The plastic underneath looks like the day it came off the showroom floor really protects it.
 
ohanacreek

ohanacreek

My EcoBoost has I4WD
Moderator
Lifetime Member
Jul 25, 2013
11,346
32,041
113
Shelby County, Alabama
Ownership

  1. 1000-5
Apparently I'm not done, needed lights for my tractor so I reallocated my small light bar and after Windrock and the 180 turns that I could not see I added some side lights. Amazon light bars are such a steal. $80 for a 40"

Before
56bd2e28539834c8ebec4766dff7f62e

No lights
4397969154c080fcca769b94dec73f86

Bars
74a6c4d833d8f86fe9726db808fb669a

40" was heavy and needed support so I added a stabilizer bracket.
5308ea7c0833520b71973f0871c4f2cd

Side lights
E309d4fdbda3775b5eaca6198522428e
 
joeymt33

joeymt33

i4WD=imitated 4WD
Moderator
Lifetime Member
Supporting Member
Club Contributor
Mar 17, 2015
11,092
39,078
113
Guntersville, AL
Ownership

  1. 1000-3

  2. 1000-5
Wow, that should light up the trail! I've got a 40" KC light bar on my truck and it's crazy bright. I can't imagine something that bright on a pioneer. How's the current draw with those on?


Sent from my iPhone using Tapatalk
 
ohanacreek

ohanacreek

My EcoBoost has I4WD
Moderator
Lifetime Member
Jul 25, 2013
11,346
32,041
113
Shelby County, Alabama
Ownership

  1. 1000-5
I put 10ga wire, el cheapo lead it came with was 14ga, the voltage drop was incredible when I checked it on the bench. (14ga is not rated for 18 amps which is 240watts (40" alone) at 13.8 volts)

I have a SPDT switch ordered so I can set up on my switch panel where I can only have one or the other of the bars on. The 24" is 120watts @9amps at 13.8v and the cubes are 18watts each(little over an amp)

The 24" drops it about a .7 volts on a digital voltmeter and the 40" drops it about 1.2 so I guess the 40" is a bit more efficient of a Chinese diode. The Cubes dont even register a drop. With them all on its a 2volt drop, I don't know if that is helped by the 48ahr Optima or not.


Definitely bright took it out for a ride tonight and tried it with all of them on. It's like driving the sun!

The headlights are utterly pointless with LEDs They're like peeing in the ocean and trying to measure the rise in sea level.
 
bobbyhill

bobbyhill

Pay to Play and I'm broke all around!
Junior Moderator
Lifetime Member
Supporting Member
Club Contributor
Apr 8, 2015
1,271
952
113
Smithfield, VA
Ownership

  1. 700-4
thanks man looks great!
 
ohanacreek

ohanacreek

My EcoBoost has I4WD
Moderator
Lifetime Member
Jul 25, 2013
11,346
32,041
113
Shelby County, Alabama
Ownership

  1. 1000-5
IMG 0813
IMG 0814
IMG 0815
IMG 0813
IMG 0814
IMG 0815
IMG 0816


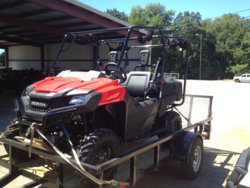
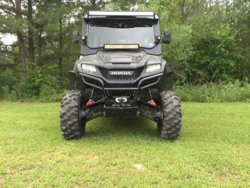
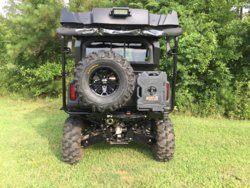
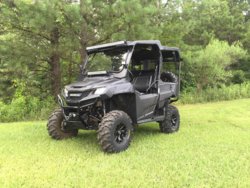
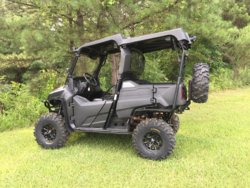
Added 28x10x12 Blackwater Evolutions all the way around as I wanted a taller tire, the same size and unidirectional so I could use one spare, and a narrower rear tire for thick gooey mud(easier to sling the mud out of the tread)

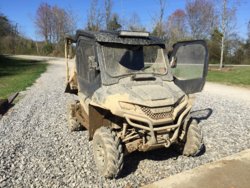
Spare tire and tool carrier because I have started carrying 3+ people and need room for them and/or a cooler. The tools and spare took up the bed and didn't let me carry 3+.
I have two RotoPax
One containing Recovery Gear: Block, tree saver strap, (2) D-Rings, 50' synthetic winch cable extension, collapsing shovel, hand chainsaw, and winch remote.
The other containing tools: Tire repair kit with plugs, patches and a mini compressor, folding lug wrench and splined lug nut adapter,ratchet with standard and metric, allen wrenches, hammer, 8-1 Kline screwdriver, electrical tape, butane soldering iron and solder, wire dikes, zipties, black RTV silicon, waterproof matches, ratchet strap(to reseat a tire if it comes off), and the most important of them all toilet paper in a ziplock bag.

More details on the tire carrier here http://hondasxs.com/threads/spare-tire-carrier-w-recovery-gear.2397/#post-16203 and will soon be available for sale here https://www.redmountainproducts.net


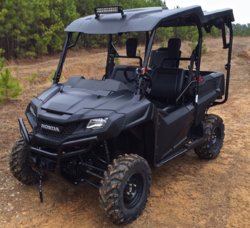
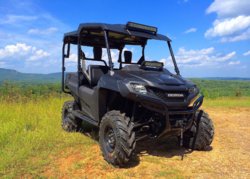
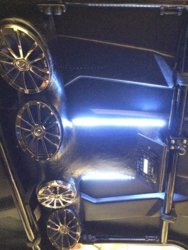
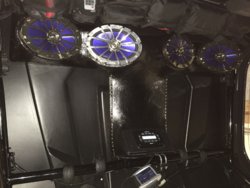
I played musical light bars and added some cubes, I needed lights for my tractor and the 12" was perfect, since Amazon has such great deals on LED bars I bought a 42" for @$60 and (2) 6 watt cubes for side lights for about $20 (the night ride at Windrock was "illuminating" as to the fact in tight turns I had no light to see where I was going.) I moved the 24" to the dash braced behind it with 3" long piece of aluminum flatcar to keep it from shaking hardly at all and mounted the 42" to the roof, its braced off the windshield using the screws that secure the windshield to the quick release clamps, doesn't even think about a wiggle.

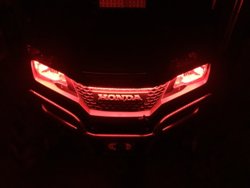
LED light strip instead of the headlights, with the light bars I don't need them anyway, the el cheapo headlights I could find locally kept blowing and I had extra RGB led strip from another project, stuck it on. When I turn the headlight switch on my switches light up and the LED strip is powered.

ImageUploadedByTapatalk1432088536764473

ImageUploadedByTapatalk1432088553316761

ImageUploadedByTapatalk1432088571484088

ImageUploadedByTapatalk1432088588086007

ImageUploadedByTapatalk1432088606270823


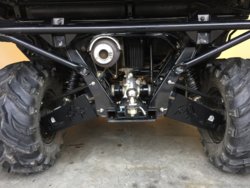
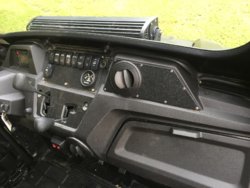
Also re-installed my power steering and re-plumbed the heater so I can replace the heater valve with an electronic version that hopefully will not be under water like I had it previously.

The present valve does not seal off the heater well enough either and as it's gotten warmer the heat that comes out of the vents is a bit much. I want to use the fan as just that a fan.

Which I also relocated the second vent from under the dash to into the dash above the map compartment so it could serve as a defogger if needed, because after I hit a mud hole it's like a steam bath in the cab.

ImageUploadedByTapatalk1432089319269025


SuperATV was nice enough to send me cable extensions so that I could use the power steering and the heater. So the second picture with the control box mounted to the fender is current the first is just to show the power steering unit itself. Power steering is freaking awesome, way easier for my wife to drive it around(may have been a mistake installing it, I get to drive less now) see this thread for more details http://hondasxs.com/threads/power-steering-and-heater.2544/#post-17122

Install Instructions http://www.superatv.com/instructions/IN-PS-3-37.pdf

ImageUploadedByTapatalk1432088136803025

ImageUploadedByTapatalk1432088149700300


Added 2015 Dual rate shocks, better ride, copied @RunningBear, they work well. See this thread for more details http://hondasxs.com/threads/2014-honda-shocks-vs-2015-honda-dual-rate-shocks.2399/#post-17385

You can see the difference here (dual rate on the left)
ImageUploadedByTapatalk1432088868971517


Better ride not quite Fox Shocks but also about 1/10th the price, but with all the adds and without the 1-¼" spacer the 28" Evos rub now.

My next add which is being powder coated right now is a custom 4" lift front and rear based off a strong made design (not getting 16" of clearance because of all the weight in accessories) only getting 3" in the front but it's enough to not rub a hole in the floorboards.


Also added USB ports for my phone and to power my GoPros
ImageUploadedByTapatalk1432089764516803


And I was cleaning up the shotgun shells after a particularly vigorous day of skeet shooting when I decided to do this just for fun.
ImageUploadedByTapatalk1432089412878504


Stay tuned more is on its way. IMG 0820 IMG 0821 IMG 0822 IMG 0823 IMG 0830
 
BOX2
box3

About us

  • Our community has been around for many years and pride ourselves on offering unbiased, critical discussion among people of all different backgrounds. We are working every day to make sure our community is one of the best.

User Menu

Buy us a beer!

  • Lots of time and money has gone into making sure the community is running the best software, best designs, and all the other bells and whistles. Care to buy us a beer? We'd really appreciate it!

    Beer Fund!

    Club Membership!