Front Shock Spacer - Walk Through

Hondasxs

Hondasxs

Club Founder
Staff member
Lifetime Member
Supporting Member
Feb 13, 2013
18,511
67,234
113
Charlotte, NC
HondaSxS.com
Ownership

  1. 1000-5

  2. Talon R
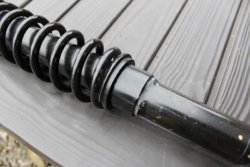
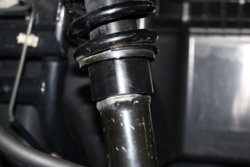
The front shock spacer is a simple cheap mod that most anyone can do to there Honda Pioneer 700 in order to give it a bit more shock stiffness and a bit of extra ground clearance.

BIG THANK YOU to Spifyd for being the first to identify this easy mod in this topic HERE.

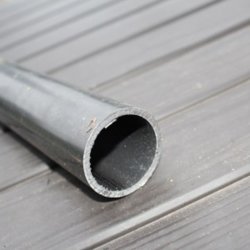
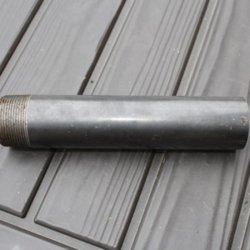
First, you need to head over to the Home Depot and buy a 1.5" x 10" galvanized schedule 40 water pipe nipple. The length does not really matter, I found 10" gives you enough hold to keep the pipe straight when cutting and some extra in case you mess up or need to re-cut.
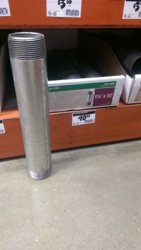
Full
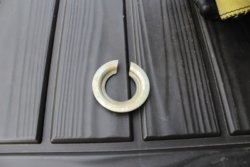
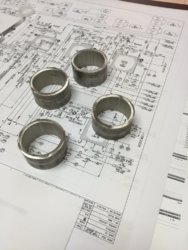
Pipe after it was cut
3724 677f8014a37d500a03d267ed852e18563723 9db25f2097672aac802ca2f73010e61f

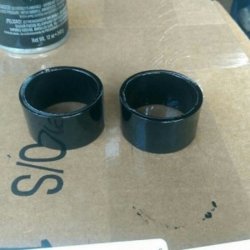
Next, decide on the dimensions you want the spacer to be. I chose 1" spacers and so far I have not bottomed out but the side effect is added stiffness. Others went with 5/8" and 3/4" and reported it worked for their needs with only occasionally bottoming out on the more aggressive spots. Be sure to cut them nice and straight. Once cut, clean them up and give them a nice paint job.
3699 161e090a73aea1c71e7f604f8c6481af

The next step is to remove the shock from the Pioneer. This is easy to do with only 2 bolts holding it on. Once done just set the shock somewhere clear with lots of work room.

It is recommended that you use a shock compressor to disassemble the shock from the spring. But since I do not have one available I will use the ratchet strap method!
CAUTION - This method can be dangerous if not done correctly.
CAUTION - Straps can break and cause serious injury.
CAUTION - Wear eye protection and gloves.
CAUTION - It is advised to have a second person help with this process.
NOTICE - This is posted for informational purposes ONLY!
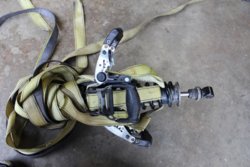
Locate 4 ratchet straps, hook-less is best if you happen to have a 4 of them. We are using 4 "normal" straps. Wide and thin straps are the best to use. Now pay attention to how the strap is threaded. This is important as we will not be using the hooks at all. In fact, we will only be using the adjustable strap and not the strap connected to the ratchet.

I will try my best to explain how this was done. If you have a question just ask.
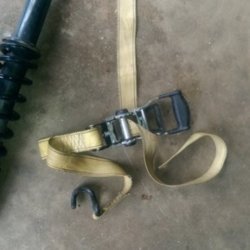
Thread the strap through the ratchet turnbuckle.
3703 90b3511a6f82154098ddfe6dc15ef522
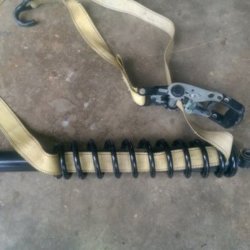
Then thread it into the spring as shown.
3704 59a75783ee13f57e6b3ba09a47dcbff5
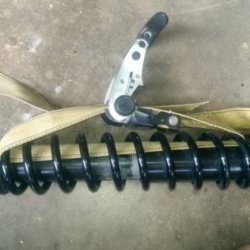
Now thread the end back through the ratchet turnbuckle and ratchet it snug with the ratchet centered as shown.
3705 c4ac5e3ffa53d6e78dc1b6c1c5ee0af33706 be3ce6bc117083444447c1eaa05b745a
Repeat with the 2nd, 3rd, and 4th ratchet, only tightening them enough to hold.
Now you are ready to ratchet them. Only ratchet them 1-2 clicks at a time. Try to ratchet opposite from each other keeping the shock load balanced. Good luck on keeping the loose straps out of the way as you can see I didn't do such a good job going through the rotations of ratcheting them.
3707 d0878e81401e592bacaa7c39e607ba64FullFull
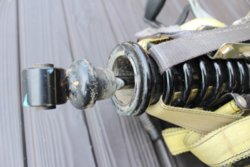
Once you get fairly tight you need to slow down to 1-2 clicks per rotation. Continue ratcheting them until there is enough of the rod extended for the spacer plus 1/4 inch. Pay attention to the inner cover. You see it road up and I over ratcheted by almost a 1/2 an inch. A tap with a hammer will push it back down. As you are ratcheting you can remove the C-clip, this is what holds the spring in place.
3719 e5b0cf72a98110003c2f2ee8f7613be0 FullFull
Once the C-Clip is removed the shock will slide out. Now you must remove the spring retainer. To remove just tap it with a hammer, once loose it will slide off, be sure not to damage the shock housing any.
FullFull
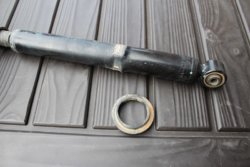
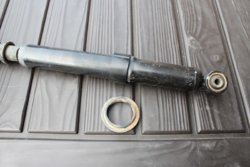
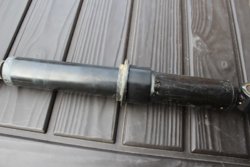
Now slide the new shock spacer on the shock placing the retainer on top.
FullFullFull
Slide the shock back through the spring installing the C-Clip retainer. This may require a few more clicks on the straps to get the clearance needed for the C-clip. Note: be sure the shock rod is fully extended.
Full
Next, release the straps a few clicks at a time, one strap at a time. Make sure you watch the loose strap tails as they will get caught between the rod head and the C-clip. Once loose remove the straps and you're done! Re-install the shock and you're ready to ride.
FullFullFull

We are interested in hearing feedback on the walk-through.
Post below!

* Just a note here about the shock and some confusing with several people thinking there's was bad because it did not extend on its own. This "shock" is only a dampener. The spring provides all the push. Once the spring is removed the shock will stay in or out depending on where it gets pushed.

Thanks.
 
Last edited:
S

SkyPup

Member
Lifetime Member
May 30, 2014
151
14
18
Very nice write up!
 
Gator

Gator

The Most Unknown Member
Lifetime Member
Sep 16, 2015
2,488
10,464
113
Louisiana
Ownership

  1. 700-2
Any idea how much ground clearance you gained?
 
Hondasxs

Hondasxs

Club Founder
Staff member
Lifetime Member
Supporting Member
Feb 13, 2013
18,511
67,234
113
Charlotte, NC
HondaSxS.com
Ownership

  1. 1000-5

  2. Talon R
Any idea how much ground clearance you gained?
Not exactly, but it was a decent amount. I ordered the 2015 dual rate shocks and decided to install a spacer because I lost GC.
 
Gabriel727

Gabriel727

Member
May 12, 2016
53
22
8
Tampa bay area,fl
The front shock spacer is a simple cheap mod that most anyone can do to there Honda Pioneer 700 in order to give it a bit more shock stiffness and a bit of extra ground clearance.

BIG THANK YOU to Spifyd for being the first to identify this easy mod in this topic HERE.

First, you need to head over to the Home Depot and buy a 1.5" x 10" galvanized schedule 40 water pipe nipple. The length does not really matter, I found 10" gives you enough hold to keep the pipe straight when cutting and some extra in case you mess up or need to re-cut.
View attachment 12172
Pipe after it was cut
View attachment 12174View attachment 12175

Next, decide on the dimensions you want the spacer to be. I chose 1" spacers and so far I have not bottomed out but the side effect is added stiffness. Others went with 5/8" and 3/4" and reported it worked for their needs with only occasionally bottoming out on the more aggressive spots. Be sure to cut them nice and straight. Once cut, clean them up and give them a nice paint job.
View attachment 12176

The next step is to remove the shock from the Pioneer. This is easy to do with only 2 bolts holding it on. Once done just set the shock somewhere clear with lots of work room.

It is recommended that you use a shock compressor to disassemble the shock from the spring. But since I do not have one available I will use the ratchet strap method!

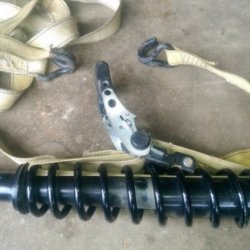
Locate 4 ratchet straps, hook-less is best if you happen to have a 4 of them. We are using 4 "normal" straps. Wide and thin straps are the best to use. Now pay attention to how the strap is threaded. This is important as we will not be using the hooks at all. In fact, we will only be using the adjustable strap and not the strap connected to the ratchet.

I will try my best to explain how this was done. If you have a question just ask.
Thread the strap through the ratchet turnbuckle.
View attachment 12177
Then thread it into the spring as shown.
View attachment 12178
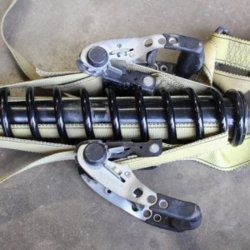
Now thread the end back through the ratchet turnbuckle and ratchet it snug with the ratchet centered as shown.
View attachment 12179View attachment 12180
Repeat with the 2nd, 3rd, and 4th ratchet, only tightening them enough to hold.
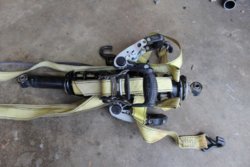
Now you are ready to ratchet them. Only ratchet them 1-2 clicks at a time. Try to ratchet opposite from each other keeping the shock load balanced. Good luck on keeping the loose straps out of the way as you can see I didn't do such a good job going through the rotations of ratcheting them.
View attachment 12181View attachment 12182View attachment 12183
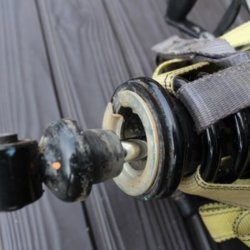
Once you get fairly tight you need to slow down to 1-2 clicks per rotation. Continue ratcheting them until there is enough of the rod extended for the spacer plus 1/4 inch. Pay attention to the inner cover. You see it road up and I over ratcheted by almost a 1/2 an inch. A tap with a hammer will push it back down. As you are ratcheting you can remove the C-clip, this is what holds the spring in place.
View attachment 12171 View attachment 12184View attachment 12185
Once the C-Clip is removed the shock will slide out. Now you must remove the spring retainer. To remove just tap it with a hammer, once loose it will slide off, be sure not to damage the shock housing any.
View attachment 12186View attachment 12187
Now slide the new shock spacer on the shock placing the retainer on top.
View attachment 12188View attachment 12189View attachment 12190
Slide the shock back through the spring installing the C-Clip retainer. This may require a few more clicks on the straps to get the clearance needed for the C-clip. Note: be sure the shock rod is fully extended.
View attachment 12191
Next, release the straps a few clicks at a time, one strap at a time. Make sure you watch the loose strap tails as they will get caught between the rod head and the C-clip. Once loose remove the straps and you're done! Re-install the shock and you're ready to ride.
View attachment 12192View attachment 12193View attachment 12194

We are interested in hearing feedback on the walk-through.
Post below!

* Just a note here about the shock and some confusing with several people thinking there's was bad because it did not extend on its own. This "shock" is only a dampener. The spring provides all the push. Once the spring is removed the shock will stay in or out depending on where it gets pushed.

Thanks.

Nice work. Do you know where can i buy fox or better shocks then stock shocks? For my 2016 pioneer 1000-5? For a decent price...
 
  • Like
Reactions: Smitty335
MattSadler

MattSadler

Active Member
Feb 17, 2017
88
175
33
Kentucky
Ownership

  1. 700-4
Not exactly, but it was a decent amount. I ordered the 2015 dual rate shocks and decided to install a spacer because I lost GC.
Question: does the dust boot serve any mechanical purpose? I did not put them back on. Seemed to ride fine but would like to know if they do anything other than keep stuff off the shock?
 
advertisement
bobbyhill

bobbyhill

Pay to Play and I'm broke all around!
Junior Moderator
Lifetime Member
Supporting Member
Club Contributor
Apr 8, 2015
1,271
953
113
Smithfield, VA
Ownership

  1. 700-4
Question: does the dust boot serve any mechanical purpose? I did not put them back on. Seemed to ride fine but would like to know if they do anything other than keep stuff off the shock?
@MattSadler yeah that's about it! it's Just to keep dirt off the chrome so when the shock compresses it don't drive dirt up into you seals and cause the shock to leak over time.
 
  • Like
Reactions: MattSadler
Smitty335

Smitty335

Well-Known Member
Lifetime Member
Supporting Member
Oct 3, 2016
35,445
208,730
113
NWA Arkansas
Ownership

  1. 1000-3

  2. 1000-5
Nice work. Do you know where can i buy fox or better shocks then stock shocks? For my 2016 pioneer 1000-5? For a decent price...
NO! There all high! I love my Elka Stage 5"s though!
 
Smitty335

Smitty335

Well-Known Member
Lifetime Member
Supporting Member
Oct 3, 2016
35,445
208,730
113
NWA Arkansas
Ownership

  1. 1000-3

  2. 1000-5
NO! There all high! I love my Elka Stage 5"s though!
I'm tired of getting hosed by Honda, might as well get hosed by some else and spread it around. HA!
 
Deluxe700

Deluxe700

Well-Known Member
Lifetime Member
Jul 2, 2017
856
1,101
93
Central Arkansas
Ownership

  1. 700-2
Are there any Negatives to this mod? I know it will be a stiffer ride, but any other issues on drive train or suspension..? Is this mod just as good as a suspension lift kit? Thanks
 
ohanacreek

ohanacreek

My EcoBoost has I4WD
Moderator
Lifetime Member
Jul 25, 2013
11,346
32,050
113
Shelby County, Alabama
Ownership

  1. 1000-5
Are there any Negatives to this mod? I know it will be a stiffer ride, but any other issues on drive train or suspension..? Is this mod just as good as a suspension lift kit? Thanks

Negates the benefits of dual rate springs.

But adds preload so it bottoms out less.
I came to realization it was a utility machine and I couldn't run 30mph and hit holes and not expect it to bottom out.

I had spacers on my 700 with single rate springs and it rode like a flatbed wagon.

Swapped to the dual rate and added a lift kit and was way better ride.

The jarring def sends more energy into the suspension components. What affect that has on longevity you'd have to ask Honda. I'm sure they tested that.
 
Smitty335

Smitty335

Well-Known Member
Lifetime Member
Supporting Member
Oct 3, 2016
35,445
208,730
113
NWA Arkansas
Ownership

  1. 1000-3

  2. 1000-5
Are there any Negatives to this mod? I know it will be a stiffer ride, but any other issues on drive train or suspension..? Is this mod just as good as a suspension lift kit? Thanks
Yes your check book will be lighter, but??????????????????
 
lee

lee

Village Idiot
Lifetime Member
Club Contributor
Apr 4, 2013
2,403
13,608
113
Springfield Ohio
Ownership

  1. 500
Question: does the dust boot serve any mechanical purpose? I did not put them back on. Seemed to ride fine but would like to know if they do anything other than keep stuff off the shock?

The dust boot protects the rod from getting pock marked by small rocks comming off the tires.
It dosent happen right away but over time the surface of the piston rod will get pitted and thiis will allow the oil in the shock to come out.
High end shocks like the Fox or WE will have a hard chromed piston rod with no dust boot.
 
MattSadler

MattSadler

Active Member
Feb 17, 2017
88
175
33
Kentucky
Ownership

  1. 700-4
@MattSadler yeah that's about it! it's Just to keep dirt off the chrome so when the shock compresses it don't drive dirt up into you seals and cause the shock to leak over time.
Good deal! Im going to adjust the rear shocks one rotation stiffer and see how it does. I think i might try to get some of those shock socks to put over spring and rod. Ive never seen them on these bikes but im sure u can get them on internet. Thanks
 
Smitty335

Smitty335

Well-Known Member
Lifetime Member
Supporting Member
Oct 3, 2016
35,445
208,730
113
NWA Arkansas
Ownership

  1. 1000-3

  2. 1000-5
The front shock spacer is a simple cheap mod that most anyone can do to there Honda Pioneer 700 in order to give it a bit more shock stiffness and a bit of extra ground clearance.

BIG THANK YOU to Spifyd for being the first to identify this easy mod in this topic HERE.

First, you need to head over to the Home Depot and buy a 1.5" x 10" galvanized schedule 40 water pipe nipple. The length does not really matter, I found 10" gives you enough hold to keep the pipe straight when cutting and some extra in case you mess up or need to re-cut.
View attachment 12172
Pipe after it was cut
View attachment 12174View attachment 12175

Next, decide on the dimensions you want the spacer to be. I chose 1" spacers and so far I have not bottomed out but the side effect is added stiffness. Others went with 5/8" and 3/4" and reported it worked for their needs with only occasionally bottoming out on the more aggressive spots. Be sure to cut them nice and straight. Once cut, clean them up and give them a nice paint job.
View attachment 12176

The next step is to remove the shock from the Pioneer. This is easy to do with only 2 bolts holding it on. Once done just set the shock somewhere clear with lots of work room.

It is recommended that you use a shock compressor to disassemble the shock from the spring. But since I do not have one available I will use the ratchet strap method!

Locate 4 ratchet straps, hook-less is best if you happen to have a 4 of them. We are using 4 "normal" straps. Wide and thin straps are the best to use. Now pay attention to how the strap is threaded. This is important as we will not be using the hooks at all. In fact, we will only be using the adjustable strap and not the strap connected to the ratchet.

I will try my best to explain how this was done. If you have a question just ask.
Thread the strap through the ratchet turnbuckle.
View attachment 12177
Then thread it into the spring as shown.
View attachment 12178
Now thread the end back through the ratchet turnbuckle and ratchet it snug with the ratchet centered as shown.
View attachment 12179View attachment 12180
Repeat with the 2nd, 3rd, and 4th ratchet, only tightening them enough to hold.
Now you are ready to ratchet them. Only ratchet them 1-2 clicks at a time. Try to ratchet opposite from each other keeping the shock load balanced. Good luck on keeping the loose straps out of the way as you can see I didn't do such a good job going through the rotations of ratcheting them.
View attachment 12181View attachment 12182View attachment 12183
Once you get fairly tight you need to slow down to 1-2 clicks per rotation. Continue ratcheting them until there is enough of the rod extended for the spacer plus 1/4 inch. Pay attention to the inner cover. You see it road up and I over ratcheted by almost a 1/2 an inch. A tap with a hammer will push it back down. As you are ratcheting you can remove the C-clip, this is what holds the spring in place.
View attachment 12171 View attachment 12184View attachment 12185
Once the C-Clip is removed the shock will slide out. Now you must remove the spring retainer. To remove just tap it with a hammer, once loose it will slide off, be sure not to damage the shock housing any.
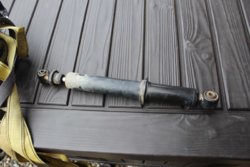
View attachment 12186View attachment 12187
Now slide the new shock spacer on the shock placing the retainer on top.
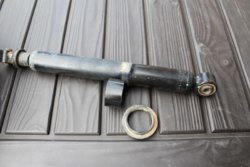
View attachment 12188View attachment 12189View attachment 12190
Slide the shock back through the spring installing the C-Clip retainer. This may require a few more clicks on the straps to get the clearance needed for the C-clip. Note: be sure the shock rod is fully extended.
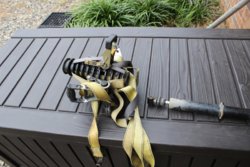
View attachment 12191
Next, release the straps a few clicks at a time, one strap at a time. Make sure you watch the loose strap tails as they will get caught between the rod head and the C-clip. Once loose remove the straps and you're done! Re-install the shock and you're ready to ride.
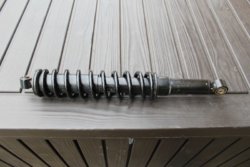
View attachment 12192View attachment 12193View attachment 12194

We are interested in hearing feedback on the walk-through.
Post below!

* Just a note here about the shock and some confusing with several people thinking there's was bad because it did not extend on its own. This "shock" is only a dampener. The spring provides all the push. Once the spring is removed the shock will stay in or out depending on where it gets pushed.

Thanks.
Has any one done this to the rear shocks, looks like it would take 2 inch pipe and how tall did you make the spacer? Thanks
 
GlockMeister

GlockMeister

The Bearded Wonder
Lifetime Member
Supporting Member
May 11, 2016
7,606
35,593
113
Greenville, Mo
Ownership

  1. 1000-5
Has any one done this to the rear shocks, looks like it would take 2 inch pipe and how tall did you make the spacer? Thanks
The rears take 3 in for the load level shocks on the 1000. I cut mine 3/4in thick on mine.
 
  • Like
Reactions: Smitty335
advertisement

About us

  • Our community has been around for many years and pride ourselves on offering unbiased, critical discussion among people of all different backgrounds. We are working every day to make sure our community is one of the best.

User Menu

Buy us a beer!

  • Lots of time and money has gone into making sure the community is running the best software, best designs, and all the other bells and whistles. Care to buy us a beer? We'd really appreciate it!

    Beer Fund!

    Club Membership!