P500 Heater installed with Pictures

MarlinWalker

MarlinWalker

Active Member
Aug 25, 2018
57
170
33
Idaho
Ownership

  1. 500
New 2018 Pioneer 500 owner here. I’ve had it for about a month now and it has been great. Here in northern Idaho the snow will keep me out of the mountains for about 3-4 months but early spring and late fall is ridable but can be downright chilly. So I set out to enclose my cab. I bought a roof, rear and front windshield and the Honda doors are in the mail. But why stop there?

I looked into heater kits and I wasn’t impressed with what you get for $400+ dollars. Doing some research I seen that some people have installed a heater in their UTV from Summit Racing that is made to put in your hot rod. I went with one from JEGS but it is the exact same one and same price as Summit. Solrus started down that path but it looks like he chose a different direction. Cattaco did get it installed but wasn’t happy with the heat output.

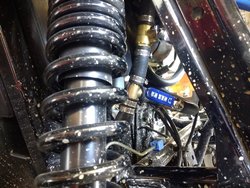
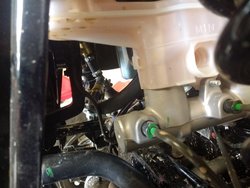
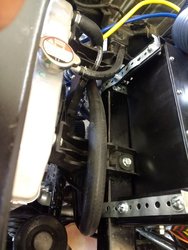
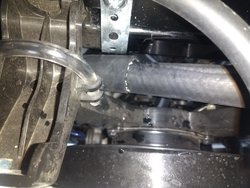
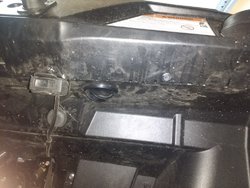
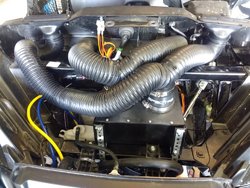
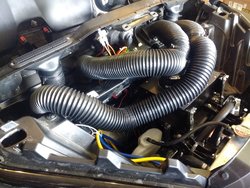
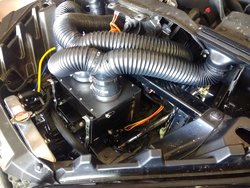
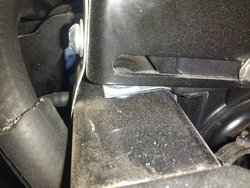
So I planned it out, ordered it and got it all installed a couple days ago. The way I mounted it was the only way that I could get it to fit and not have to make a completely custom bracket. I did have to drill two ¼” holes and then I wrapped the hanger strap around the cross member and the bolt passed through the strap on both sides. By using only two of the four holes on the brackets I was able to slide the bolts unevenly in the brackets to make the heater ride level even though the bracket is not. You’ll see what I’m talking about in the pictures.

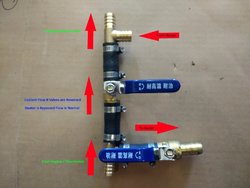
I plumbed it in-line between the engine and the radiator so coolant has to flow through the heater core before reaching the radiator. I think this is where others may have gone wrong and tapped into each side of the radiator. Then if the heater core provides more restriction to flow than the radiator the coolant will mostly flow through the radiator and very little through the heater core. Providing very little heat. My initial test of this system provided lots of heat. Of course it wasn’t very cold out so the real test will be in some sub-freezing temps.

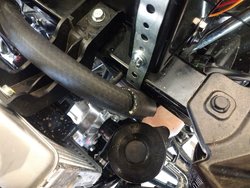
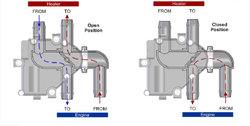
And because I wanted to be able to valve out the heater core and run directly to the radiator in summer months, I built a manifold of sorts made with brass 5/8” tees and ball valves to accomplish this. I cut a section of the upper radiator hose out that was equal length to my manifold above the bend going into the firewall and below the bend going into the top of the radiator. I found out that the heater core uses 5/8” ID hose and the radiator hose is ¾” ID. So the barb was a little loose at the top and bottom so I used two hose clamps and in cinched up fine. If one was to find tees with a 5/8 end and a ¾ end then that would be ideal.

Hoses to and from the heater to the manifold needed to be routed creatively to keep the bends large enough to not kink the hose. I used almost all of my 6 foot of hose on the project.

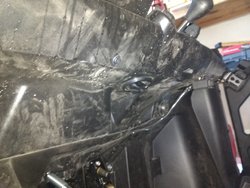
For wiring I used a splice connector and tied it into my 12v accessory plug that is already fused at 10 amp so it’s ready to go. Attached the ground to the frame. Fairly simple.

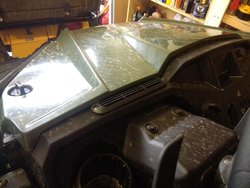
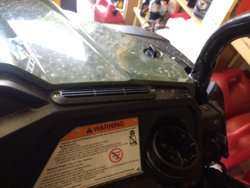
Total bill was just under $300 bucks so there is some savings over the kit but the real benefit was getting two car like defroster vents for the windshield and two 2.5 inch adjustable louvered vents for feet/legs all the while getting double the CFM compared to the pre-made kits.

I didn’t intend for this to be a step by step installation guide as I didn’t take pictures as I went but I took a bunch of the finished product and I’m going to include the links to everything I bought to make this happen. Hopefully it will be of help to someone that wants to try it.


Links Below


JEGS Auxiliary Heater Assembly 260 CFM

JEGS 70601: Auxiliary Heater Assembly 260 CFM | JEGS


JEGS Defroster Kit

JEGS 70605: Defroster Kit | JEGS


(2) Vintage Air Adjustable Ball Louver

Vintage Air 499193: Adjustable Ball Louver | JEGS


(2) Spectre Air Duct Reducer Adapts 3” to 2.5” Ducting (One replaces reducer in defrost kit)

Spectre 8751: Air Duct Reducer Adapts 3" to 2.5" ducting | JEGS


Vintage Air Duct Hose Connector

Vintage Air 49592-VUI: Duct Hose Connector | JEGS


Vintage Air Bulk Duct Hose 2.5” Dia 10ft

Vintage Air 318010: Bulk Duct Hose | JEGS


Gates 28491 Heater Hose – PolyBagged – 6ft

https://www.amazon.com/gp/product/B000C2WEIC/?tag=sxsweb24-20


Metalwork PEX Brass Full Port Shut Off Ball Valve 5/8” Barb, 2Pcs

https://www.amazon.com/gp/product/B07CM8C1SF/?tag=sxsweb24-20


(2) Dixon 179-1010 Brass Hose Splicer Fitting Tee 5/8” Hose ID Barbed

https://www.amazon.com/gp/product/B00835HVTC/?tag=sxsweb24-20


(2) Precision Brand M8S Micro Seal, Miniature All Stainless Worm Gear Hose Clamp, 7/16” – 1” 10 pieces

https://www.amazon.com/gp/product/B002086E3W/?tag=sxsweb24-20

The pipe hanger strap, hand full of bolts nuts and washers, and a few extra 14” zip ties were purchased at the local hardware store for less than 20 bucks.

Now here all the pictures promised.
Picture 1 Picture 2
Picture 3 Picture 4
Coolant Valve Manifold Re Picture 8
Picture 9 Picture 5
Picture 6 Picture 7
Picture 10 Picture 11
Picture 12 Picture 13

There you have it. If this helps you install your own and you have any questions feel free to ask. I'll do my best.

Good Luck.
 
Remington

Remington

Fife! POIDH Enforcement Officer
Lifetime Member
Supporting Member
Jul 24, 2016
20,156
115,286
113
Michigan
Ownership

  1. 1000-5

  2. Talon X
New 2018 Pioneer 500 owner here. I’ve had it for about a month now and it has been great. Here in northern Idaho the snow will keep me out of the mountains for about 3-4 months but early spring and late fall is ridable but can be downright chilly. So I set out to enclose my cab. I bought a roof, rear and front windshield and the Honda doors are in the mail. But why stop there?

I looked into heater kits and I wasn’t impressed with what you get for $400+ dollars. Doing some research I seen that some people have installed a heater in their UTV from Summit Racing that is made to put in your hot rod. I went with one from JEGS but it is the exact same one and same price as Summit. Solrus started down that path but it looks like he chose a different direction. Cattaco did get it installed but wasn’t happy with the heat output.

So I planned it out, ordered it and got it all installed a couple days ago. The way I mounted it was the only way that I could get it to fit and not have to make a completely custom bracket. I did have to drill two ¼” holes and then I wrapped the hanger strap around the cross member and the bolt passed through the strap on both sides. By using only two of the four holes on the brackets I was able to slide the bolts unevenly in the brackets to make the heater ride level even though the bracket is not. You’ll see what I’m talking about in the pictures.

I plumbed it in-line between the engine and the radiator so coolant has to flow through the heater core before reaching the radiator. I think this is where others may have gone wrong and tapped into each side of the radiator. Then if the heater core provides more restriction to flow than the radiator the coolant will mostly flow through the radiator and very little through the heater core. Providing very little heat. My initial test of this system provided lots of heat. Of course it wasn’t very cold out so the real test will be in some sub-freezing temps.

And because I wanted to be able to valve out the heater core and run directly to the radiator in summer months, I built a manifold of sorts made with brass 5/8” tees and ball valves to accomplish this. I cut a section of the upper radiator hose out that was equal length to my manifold above the bend going into the firewall and below the bend going into the top of the radiator. I found out that the heater core uses 5/8” ID hose and the radiator hose is ¾” ID. So the barb was a little loose at the top and bottom so I used two hose clamps and in cinched up fine. If one was to find tees with a 5/8 end and a ¾ end then that would be ideal.

Hoses to and from the heater to the manifold needed to be routed creatively to keep the bends large enough to not kink the hose. I used almost all of my 6 foot of hose on the project.

For wiring I used a splice connector and tied it into my 12v accessory plug that is already fused at 10 amp so it’s ready to go. Attached the ground to the frame. Fairly simple.

Total bill was just under $300 bucks so there is some savings over the kit but the real benefit was getting two car like defroster vents for the windshield and two 2.5 inch adjustable louvered vents for feet/legs all the while getting double the CFM compared to the pre-made kits.

I didn’t intend for this to be a step by step installation guide as I didn’t take pictures as I went but I took a bunch of the finished product and I’m going to include the links to everything I bought to make this happen. Hopefully it will be of help to someone that wants to try it.


Links Below


JEGS Auxiliary Heater Assembly 260 CFM

JEGS 70601: Auxiliary Heater Assembly 260 CFM | JEGS


JEGS Defroster Kit

JEGS 70605: Defroster Kit | JEGS


(2) Vintage Air Adjustable Ball Louver

Vintage Air 499193: Adjustable Ball Louver | JEGS


(2) Spectre Air Duct Reducer Adapts 3” to 2.5” Ducting (One replaces reducer in defrost kit)

Spectre 8751: Air Duct Reducer Adapts 3" to 2.5" ducting | JEGS


Vintage Air Duct Hose Connector

Vintage Air 49592-VUI: Duct Hose Connector | JEGS


Vintage Air Bulk Duct Hose 2.5” Dia 10ft

Vintage Air 318010: Bulk Duct Hose | JEGS


Gates 28491 Heater Hose – PolyBagged – 6ft

https://www.amazon.com/gp/product/B000C2WEIC/?tag=sxsweb24-20


Metalwork PEX Brass Full Port Shut Off Ball Valve 5/8” Barb, 2Pcs

https://www.amazon.com/gp/product/B07CM8C1SF/?tag=sxsweb24-20


(2) Dixon 179-1010 Brass Hose Splicer Fitting Tee 5/8” Hose ID Barbed

https://www.amazon.com/gp/product/B00835HVTC/?tag=sxsweb24-20


(2) Precision Brand M8S Micro Seal, Miniature All Stainless Worm Gear Hose Clamp, 7/16” – 1” 10 pieces

https://www.amazon.com/gp/product/B002086E3W/?tag=sxsweb24-20

The pipe hanger strap, hand full of bolts nuts and washers, and a few extra 14” zip ties were purchased at the local hardware store for less than 20 bucks.

Now here all the pictures promised.
View attachment 87326 View attachment 87327
View attachment 87328 View attachment 87330
View attachment 87329 View attachment 87334
View attachment 87335 View attachment 87331
View attachment 87332 View attachment 87333
View attachment 87336 View attachment 87337
View attachment 87338 View attachment 87339

There you have it. If this helps you install your own and you have any questions feel free to ask. I'll do my best.

Good Luck.
Very nicely done! I’ll have to look into that myself being I have a full soft inclosure and no heater. May have to ask some questions. Good job my friend.
 
  • Like
Reactions: MarlinWalker
Smitty335

Smitty335

Well-Known Member
Lifetime Member
Supporting Member
Oct 3, 2016
35,445
208,725
113
NWA Arkansas
Ownership

  1. 1000-3

  2. 1000-5
New 2018 Pioneer 500 owner here. I’ve had it for about a month now and it has been great. Here in northern Idaho the snow will keep me out of the mountains for about 3-4 months but early spring and late fall is ridable but can be downright chilly. So I set out to enclose my cab. I bought a roof, rear and front windshield and the Honda doors are in the mail. But why stop there?

I looked into heater kits and I wasn’t impressed with what you get for $400+ dollars. Doing some research I seen that some people have installed a heater in their UTV from Summit Racing that is made to put in your hot rod. I went with one from JEGS but it is the exact same one and same price as Summit. Solrus started down that path but it looks like he chose a different direction. Cattaco did get it installed but wasn’t happy with the heat output.

So I planned it out, ordered it and got it all installed a couple days ago. The way I mounted it was the only way that I could get it to fit and not have to make a completely custom bracket. I did have to drill two ¼” holes and then I wrapped the hanger strap around the cross member and the bolt passed through the strap on both sides. By using only two of the four holes on the brackets I was able to slide the bolts unevenly in the brackets to make the heater ride level even though the bracket is not. You’ll see what I’m talking about in the pictures.

I plumbed it in-line between the engine and the radiator so coolant has to flow through the heater core before reaching the radiator. I think this is where others may have gone wrong and tapped into each side of the radiator. Then if the heater core provides more restriction to flow than the radiator the coolant will mostly flow through the radiator and very little through the heater core. Providing very little heat. My initial test of this system provided lots of heat. Of course it wasn’t very cold out so the real test will be in some sub-freezing temps.

And because I wanted to be able to valve out the heater core and run directly to the radiator in summer months, I built a manifold of sorts made with brass 5/8” tees and ball valves to accomplish this. I cut a section of the upper radiator hose out that was equal length to my manifold above the bend going into the firewall and below the bend going into the top of the radiator. I found out that the heater core uses 5/8” ID hose and the radiator hose is ¾” ID. So the barb was a little loose at the top and bottom so I used two hose clamps and in cinched up fine. If one was to find tees with a 5/8 end and a ¾ end then that would be ideal.

Hoses to and from the heater to the manifold needed to be routed creatively to keep the bends large enough to not kink the hose. I used almost all of my 6 foot of hose on the project.

For wiring I used a splice connector and tied it into my 12v accessory plug that is already fused at 10 amp so it’s ready to go. Attached the ground to the frame. Fairly simple.

Total bill was just under $300 bucks so there is some savings over the kit but the real benefit was getting two car like defroster vents for the windshield and two 2.5 inch adjustable louvered vents for feet/legs all the while getting double the CFM compared to the pre-made kits.

I didn’t intend for this to be a step by step installation guide as I didn’t take pictures as I went but I took a bunch of the finished product and I’m going to include the links to everything I bought to make this happen. Hopefully it will be of help to someone that wants to try it.


Links Below


JEGS Auxiliary Heater Assembly 260 CFM

JEGS 70601: Auxiliary Heater Assembly 260 CFM | JEGS


JEGS Defroster Kit

JEGS 70605: Defroster Kit | JEGS


(2) Vintage Air Adjustable Ball Louver

Vintage Air 499193: Adjustable Ball Louver | JEGS


(2) Spectre Air Duct Reducer Adapts 3” to 2.5” Ducting (One replaces reducer in defrost kit)

Spectre 8751: Air Duct Reducer Adapts 3" to 2.5" ducting | JEGS


Vintage Air Duct Hose Connector

Vintage Air 49592-VUI: Duct Hose Connector | JEGS


Vintage Air Bulk Duct Hose 2.5” Dia 10ft

Vintage Air 318010: Bulk Duct Hose | JEGS


Gates 28491 Heater Hose – PolyBagged – 6ft

https://www.amazon.com/gp/product/B000C2WEIC/?tag=sxsweb24-20


Metalwork PEX Brass Full Port Shut Off Ball Valve 5/8” Barb, 2Pcs

https://www.amazon.com/gp/product/B07CM8C1SF/?tag=sxsweb24-20


(2) Dixon 179-1010 Brass Hose Splicer Fitting Tee 5/8” Hose ID Barbed

https://www.amazon.com/gp/product/B00835HVTC/?tag=sxsweb24-20


(2) Precision Brand M8S Micro Seal, Miniature All Stainless Worm Gear Hose Clamp, 7/16” – 1” 10 pieces

https://www.amazon.com/gp/product/B002086E3W/?tag=sxsweb24-20

The pipe hanger strap, hand full of bolts nuts and washers, and a few extra 14” zip ties were purchased at the local hardware store for less than 20 bucks.

Now here all the pictures promised.
View attachment 87326 View attachment 87327
View attachment 87328 View attachment 87330
View attachment 87329 View attachment 87334
View attachment 87335 View attachment 87331
View attachment 87332 View attachment 87333
View attachment 87336 View attachment 87337
View attachment 87338 View attachment 87339

There you have it. If this helps you install your own and you have any questions feel free to ask. I'll do my best.

Good Luck.
Looks like a very thought out install! Thats HOT!
 
  • Like
Reactions: Walrus
MarlinWalker

MarlinWalker

Active Member
Aug 25, 2018
57
170
33
Idaho
Ownership

  1. 500
Very nicely done! I’ll have to look into that myself being I have a full soft inclosure and no heater. May have to ask some questions. Good job my friend.
Thank you, and ask away when the time comes.

WOW! Excellent job! How many hours do you have into that project?
Thanks and not sure on the hours. I split it up into several sessions and there was a whole lot of head scratching as I figured out how I wanted to do it. I'm sure there was 6-8 hours total put into it but I think I could do it now in 3 - 4.

Looks like a very thought out install! Thats HOT!
A lot of making plans and then continually adjusting it along the way to make it happen. Thanks.


Well dang..... after seeing that heater I’m not so excited about my heater....
LOL
 
  • Like
Reactions: Gassygordo
Montecresto

Montecresto

Montecresto el segundo
Lifetime Member
Supporting Member
Club Contributor
Jan 17, 2016
22,584
34,172
113
Eastern oklahoma
Ownership

  1. Other Brand

  2. 500

  3. 1000-3

  4. 1000-5

  5. Talon X4
New 2018 Pioneer 500 owner here. I’ve had it for about a month now and it has been great. Here in northern Idaho the snow will keep me out of the mountains for about 3-4 months but early spring and late fall is ridable but can be downright chilly. So I set out to enclose my cab. I bought a roof, rear and front windshield and the Honda doors are in the mail. But why stop there?

I looked into heater kits and I wasn’t impressed with what you get for $400+ dollars. Doing some research I seen that some people have installed a heater in their UTV from Summit Racing that is made to put in your hot rod. I went with one from JEGS but it is the exact same one and same price as Summit. Solrus started down that path but it looks like he chose a different direction. Cattaco did get it installed but wasn’t happy with the heat output.

So I planned it out, ordered it and got it all installed a couple days ago. The way I mounted it was the only way that I could get it to fit and not have to make a completely custom bracket. I did have to drill two ¼” holes and then I wrapped the hanger strap around the cross member and the bolt passed through the strap on both sides. By using only two of the four holes on the brackets I was able to slide the bolts unevenly in the brackets to make the heater ride level even though the bracket is not. You’ll see what I’m talking about in the pictures.

I plumbed it in-line between the engine and the radiator so coolant has to flow through the heater core before reaching the radiator. I think this is where others may have gone wrong and tapped into each side of the radiator. Then if the heater core provides more restriction to flow than the radiator the coolant will mostly flow through the radiator and very little through the heater core. Providing very little heat. My initial test of this system provided lots of heat. Of course it wasn’t very cold out so the real test will be in some sub-freezing temps.

And because I wanted to be able to valve out the heater core and run directly to the radiator in summer months, I built a manifold of sorts made with brass 5/8” tees and ball valves to accomplish this. I cut a section of the upper radiator hose out that was equal length to my manifold above the bend going into the firewall and below the bend going into the top of the radiator. I found out that the heater core uses 5/8” ID hose and the radiator hose is ¾” ID. So the barb was a little loose at the top and bottom so I used two hose clamps and in cinched up fine. If one was to find tees with a 5/8 end and a ¾ end then that would be ideal.

Hoses to and from the heater to the manifold needed to be routed creatively to keep the bends large enough to not kink the hose. I used almost all of my 6 foot of hose on the project.

For wiring I used a splice connector and tied it into my 12v accessory plug that is already fused at 10 amp so it’s ready to go. Attached the ground to the frame. Fairly simple.

Total bill was just under $300 bucks so there is some savings over the kit but the real benefit was getting two car like defroster vents for the windshield and two 2.5 inch adjustable louvered vents for feet/legs all the while getting double the CFM compared to the pre-made kits.

I didn’t intend for this to be a step by step installation guide as I didn’t take pictures as I went but I took a bunch of the finished product and I’m going to include the links to everything I bought to make this happen. Hopefully it will be of help to someone that wants to try it.


Links Below


JEGS Auxiliary Heater Assembly 260 CFM

JEGS 70601: Auxiliary Heater Assembly 260 CFM | JEGS


JEGS Defroster Kit

JEGS 70605: Defroster Kit | JEGS


(2) Vintage Air Adjustable Ball Louver

Vintage Air 499193: Adjustable Ball Louver | JEGS


(2) Spectre Air Duct Reducer Adapts 3” to 2.5” Ducting (One replaces reducer in defrost kit)

Spectre 8751: Air Duct Reducer Adapts 3" to 2.5" ducting | JEGS


Vintage Air Duct Hose Connector

Vintage Air 49592-VUI: Duct Hose Connector | JEGS


Vintage Air Bulk Duct Hose 2.5” Dia 10ft

Vintage Air 318010: Bulk Duct Hose | JEGS


Gates 28491 Heater Hose – PolyBagged – 6ft

https://www.amazon.com/gp/product/B000C2WEIC/?tag=sxsweb24-20


Metalwork PEX Brass Full Port Shut Off Ball Valve 5/8” Barb, 2Pcs

https://www.amazon.com/gp/product/B07CM8C1SF/?tag=sxsweb24-20


(2) Dixon 179-1010 Brass Hose Splicer Fitting Tee 5/8” Hose ID Barbed

https://www.amazon.com/gp/product/B00835HVTC/?tag=sxsweb24-20


(2) Precision Brand M8S Micro Seal, Miniature All Stainless Worm Gear Hose Clamp, 7/16” – 1” 10 pieces

https://www.amazon.com/gp/product/B002086E3W/?tag=sxsweb24-20

The pipe hanger strap, hand full of bolts nuts and washers, and a few extra 14” zip ties were purchased at the local hardware store for less than 20 bucks.

Now here all the pictures promised.
View attachment 87326 View attachment 87327
View attachment 87328 View attachment 87330
View attachment 87329 View attachment 87334
View attachment 87335 View attachment 87331
View attachment 87332 View attachment 87333
View attachment 87336 View attachment 87337
View attachment 87338 View attachment 87339

There you have it. If this helps you install your own and you have any questions feel free to ask. I'll do my best.

Good Luck.
Now that is impressive!!!!! You’re going to have to report back and let us know how that performs when it really counts. Too bad you didn’t take pics along the way, it’s easy to get busy on the project and forget. Very helpful post MW.....
 
MarlinWalker

MarlinWalker

Active Member
Aug 25, 2018
57
170
33
Idaho
Ownership

  1. 500
Now that is impressive!!!!! You’re going to have to report back and let us know how that performs when it really counts. Too bad you didn’t take pics along the way, it’s easy to get busy on the project and forget. Very helpful post MW.....

I did take it out last Saturday with the wife and son. Brought it up on a ridge line about 5500 feet of elevation and I would estimate it was in the low 40's up there. I was freezing riding on the 4-wheeler without the proper attire while they were warm and comfortable inside. So as a tentative test it has worked well so far. Still need to see some real low temps to call it a complete success.

One thing that is apparent is that you need to be putting some load on the motor to get real hot air. When you bring it to a stop and let it idle the air output does cool down some. Not cold, but down to luke warm. Soon as you get riding again the temp jumps right back up. Not a big deal but if you were expecting to just let it idle indefinitely while you hung out in your underwear in there in the dead of winter then you would probably be disappointed lol.

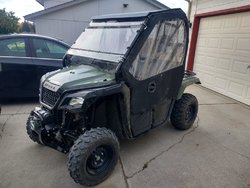
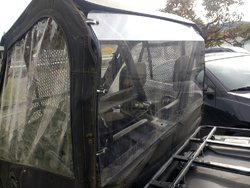
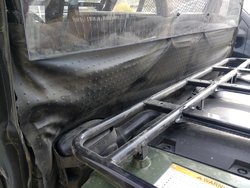
Here are some pictures of it fully enclosed. I put the 1/4" hard coat fold down windshield and 3/16 standard rear window from utvwindshieldsandaccessories.com Went with the moose racing roof and bit the bullet and bought the overpriced Honda soft doors. To seal the gap below the rear window I purchased some faux leather from a local fabric store and secured it to the frame with zip ties. Seals it up a bit more and blocks the dust from rolling in from the rear.

IMG 20181001 151958350 HDRe IMG 20181001 152027651e IMG 20181001 152041731e
 
Montecresto

Montecresto

Montecresto el segundo
Lifetime Member
Supporting Member
Club Contributor
Jan 17, 2016
22,584
34,172
113
Eastern oklahoma
Ownership

  1. Other Brand

  2. 500

  3. 1000-3

  4. 1000-5

  5. Talon X4
I did take it out last Saturday with the wife and son. Brought it up on a ridge line about 5500 feet of elevation and I would estimate it was in the low 40's up there. I was freezing riding on the 4-wheeler without the proper attire while they were warm and comfortable inside. So as a tentative test it has worked well so far. Still need to see some real low temps to call it a complete success.

One thing that is apparent is that you need to be putting some load on the motor to get real hot air. When you bring it to a stop and let it idle the air output does cool down some. Not cold, but down to luke warm. Soon as you get riding again the temp jumps right back up. Not a big deal but if you were expecting to just let it idle indefinitely while you hung out in your underwear in there in the dead of winter then you would probably be disappointed lol.

Here are some pictures of it fully enclosed. I put the 1/4" hard coat fold down windshield and 3/16 standard rear window from utvwindshieldsandaccessories.com Went with the moose racing roof and bit the bullet and bought the overpriced Honda soft doors. To seal the gap below the rear window I purchased some faux leather from a local fabric store and secured it to the frame with zip ties. Seals it up a bit more and blocks the dust from rolling in from the rear.

View attachment 89044 View attachment 89045 View attachment 89046
Really nice job you’ve done there!!!!
 
  • Like
Reactions: MarlinWalker
P

Pipeliner

New Member
Aug 29, 2018
1
0
1
Kentucky
Ownership

  1. 500
How is the heater still doing? Do you have a update on it. Im ready to order what you did and install on my p500. Have you had any trouble with overheating or anything does the engine still run as cool?
 
advertisement
Mudder

Mudder

NTC Ambassador of Walls
Lifetime Member
Oct 1, 2016
11,643
87,838
113
Georgia
Ownership

  1. Other Brand

  2. 500
New 2018 Pioneer 500 owner here. I’ve had it for about a month now and it has been great. Here in northern Idaho the snow will keep me out of the mountains for about 3-4 months but early spring and late fall is ridable but can be downright chilly. So I set out to enclose my cab. I bought a roof, rear and front windshield and the Honda doors are in the mail. But why stop there?

I looked into heater kits and I wasn’t impressed with what you get for $400+ dollars. Doing some research I seen that some people have installed a heater in their UTV from Summit Racing that is made to put in your hot rod. I went with one from JEGS but it is the exact same one and same price as Summit. Solrus started down that path but it looks like he chose a different direction. Cattaco did get it installed but wasn’t happy with the heat output.

So I planned it out, ordered it and got it all installed a couple days ago. The way I mounted it was the only way that I could get it to fit and not have to make a completely custom bracket. I did have to drill two ¼” holes and then I wrapped the hanger strap around the cross member and the bolt passed through the strap on both sides. By using only two of the four holes on the brackets I was able to slide the bolts unevenly in the brackets to make the heater ride level even though the bracket is not. You’ll see what I’m talking about in the pictures.

I plumbed it in-line between the engine and the radiator so coolant has to flow through the heater core before reaching the radiator. I think this is where others may have gone wrong and tapped into each side of the radiator. Then if the heater core provides more restriction to flow than the radiator the coolant will mostly flow through the radiator and very little through the heater core. Providing very little heat. My initial test of this system provided lots of heat. Of course it wasn’t very cold out so the real test will be in some sub-freezing temps.

And because I wanted to be able to valve out the heater core and run directly to the radiator in summer months, I built a manifold of sorts made with brass 5/8” tees and ball valves to accomplish this. I cut a section of the upper radiator hose out that was equal length to my manifold above the bend going into the firewall and below the bend going into the top of the radiator. I found out that the heater core uses 5/8” ID hose and the radiator hose is ¾” ID. So the barb was a little loose at the top and bottom so I used two hose clamps and in cinched up fine. If one was to find tees with a 5/8 end and a ¾ end then that would be ideal.

Hoses to and from the heater to the manifold needed to be routed creatively to keep the bends large enough to not kink the hose. I used almost all of my 6 foot of hose on the project.

For wiring I used a splice connector and tied it into my 12v accessory plug that is already fused at 10 amp so it’s ready to go. Attached the ground to the frame. Fairly simple.

Total bill was just under $300 bucks so there is some savings over the kit but the real benefit was getting two car like defroster vents for the windshield and two 2.5 inch adjustable louvered vents for feet/legs all the while getting double the CFM compared to the pre-made kits.

I didn’t intend for this to be a step by step installation guide as I didn’t take pictures as I went but I took a bunch of the finished product and I’m going to include the links to everything I bought to make this happen. Hopefully it will be of help to someone that wants to try it.


Links Below


JEGS Auxiliary Heater Assembly 260 CFM

JEGS 70601: Auxiliary Heater Assembly 260 CFM | JEGS


JEGS Defroster Kit

JEGS 70605: Defroster Kit | JEGS


(2) Vintage Air Adjustable Ball Louver

Vintage Air 499193: Adjustable Ball Louver | JEGS


(2) Spectre Air Duct Reducer Adapts 3” to 2.5” Ducting (One replaces reducer in defrost kit)

Spectre 8751: Air Duct Reducer Adapts 3" to 2.5" ducting | JEGS


Vintage Air Duct Hose Connector

Vintage Air 49592-VUI: Duct Hose Connector | JEGS


Vintage Air Bulk Duct Hose 2.5” Dia 10ft

Vintage Air 318010: Bulk Duct Hose | JEGS


Gates 28491 Heater Hose – PolyBagged – 6ft

https://www.amazon.com/gp/product/B000C2WEIC/?tag=sxsweb24-20


Metalwork PEX Brass Full Port Shut Off Ball Valve 5/8” Barb, 2Pcs

https://www.amazon.com/gp/product/B07CM8C1SF/?tag=sxsweb24-20


(2) Dixon 179-1010 Brass Hose Splicer Fitting Tee 5/8” Hose ID Barbed

https://www.amazon.com/gp/product/B00835HVTC/?tag=sxsweb24-20


(2) Precision Brand M8S Micro Seal, Miniature All Stainless Worm Gear Hose Clamp, 7/16” – 1” 10 pieces

https://www.amazon.com/gp/product/B002086E3W/?tag=sxsweb24-20

The pipe hanger strap, hand full of bolts nuts and washers, and a few extra 14” zip ties were purchased at the local hardware store for less than 20 bucks.

Now here all the pictures promised.
View attachment 87326 View attachment 87327
View attachment 87328 View attachment 87330
View attachment 87329 View attachment 87334
View attachment 87335 View attachment 87331
View attachment 87332 View attachment 87333
View attachment 87336 View attachment 87337
View attachment 87338 View attachment 87339

There you have it. If this helps you install your own and you have any questions feel free to ask. I'll do my best.

Good Luck.
A nomination for a Bounty How-to? @Hondasxs
WANTED, REWARD. - How-to's |Bounty List!
 
Last edited:
  • Like
Reactions: MarlinWalker
MarlinWalker

MarlinWalker

Active Member
Aug 25, 2018
57
170
33
Idaho
Ownership

  1. 500
How is the heater still doing? Do you have a update on it. Im ready to order what you did and install on my p500. Have you had any trouble with overheating or anything does the engine still run as cool?

Sorry for taking my sweet time in giving an update. My schedule tightened up quite a bit and I haven't been able to ride as much as I would like. That being said, I have been able to to do a couple rides while it was semi-cold. 32F - 35F. Still waiting on a real cold one but I think I can confidently give the project a verdict.

I should start this with saying that it is very important to seal up the cabin as best that you can. These P500s don't seal great and there is several spots on the firewall, like the reverse lever, that let cold air blow in when you are going at faster rates of speed. Also, the Honda doors don't seal that great either so a little work with pipe insulation/tape can help with that. I'm still working on a better overall cabin seal so at speeds above 30 mph I lose a noticeable amount of heat just leaking out of the cabin. At slower speeds though it holds a nice heat bubble in there. So this sealing work will be an on going project.

Since I tapped into the coolant system outside the internal thermostat loop, it takes awhile for it to heat up. I would say you need to ride for a steady 15 minutes before you start getting warm air. Engine has to get hot enough to open the thermostat significantly and then your outer coolant loop has to come up to temp before you start getting heat. And this install almost doubles the amount of coolant in your system so there is more coolant to heat up. In short, gotta work it for a bit to get some heat, its not instant. And idling doesn't cut it, have to put your foot in pedal and have some fun :)

The first ride out it worked pretty well and blew nice hot air while I was actively placing the motor under load like climbing grades and such. I did notice that if I leveled out or went down hill for several minutes that it would cool off to a luke warm heat. Overall it performed well but I wish it wouldn't cool off when I coasted down hills. I originally intended to block off the radiator entirely with cardboard. Got busy and didn't get around to it before the ride. Even though the heater core gets first dibs on the hot coolant, while moving the radiator is still dumping precious heat out into the air.

So I blocked off the radiator with cardboard before my second ride. Another 35F day. Wow BIG DIFFERENCE. Heated up a bit quicker, air was noticeable hotter, and it didn't cool down when you took the load off the motor. Long as I wasn't going over 30 mph and losing my heat through the less than perfect cabin seal, it was down right toasty :) The radiator was dumping a lot more heat into the atmosphere than I previously thought. I monitored my temp and it never raised above the normal two bars and more telling is that the radiator fan never came on. So the heater core and it's fan effectively replaced the radiator as the heat dissipating device. I could even idle for awhile and still put out good heat. I doubt you could do it indefinitely or only idle and expect real hot air but it was nice to be able to stop for a few minutes and stay nice and warm in the cab.

So my final verdict? For one, every time I ride the p500 I ask myself "Why didn't I get one of these sooner?" And two, I am well pleased with how this heater project has turned out. It has extended my riding season already and doing it in comfort. It was a well spent $300 bucks and I would highly recommend it to anyone that is a bit mechanically inclined and wants to add some heat to your ride with a twist of a knob.
 
MarlinWalker

MarlinWalker

Active Member
Aug 25, 2018
57
170
33
Idaho
Ownership

  1. 500
A single valve design with Tee, with a used auto heater core or assembly at firewall under dash? Your ingenuity got me thinking to do it also. Throttle it back as needed for heat balance.

Do you plan on placing the heater core in series with the radiator or in parallel? I know some guys that tried placing the core in parallel were less than happy as if the restriction to flow is less going the radiator route then most of your coolant flows that way and very little through the heater core. I suppose you could set it up like mine but replace the hand valves with the cable operated valves but that would take two cables then. Maybe you have a different idea.

I initially thought about buying a heater core and placing it in dash. To get any efficiency out of it you would need to mount a fan behind it some how. It definitely could work.
 
Mudder

Mudder

NTC Ambassador of Walls
Lifetime Member
Oct 1, 2016
11,643
87,838
113
Georgia
Ownership

  1. Other Brand

  2. 500
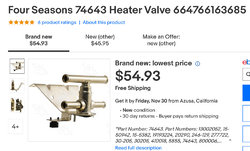
So after more research to reduce it to a single cable operated valve with limited dash space for pull knob, stumbled across the 4 way valve. Still looking. Any thoughts? Thanks.
eBay

3579EAA9 0C15 43BC A0AB F3A84540B228 B64A29D2 47DC 48A0 A2D4 086F93257BFB 31A9DE16 A1DF 430D 8176 881920D9FFA1 E26BDD85 A904 4021 883A B331A852E325 BF739EFA 06DD 4BE6 9174 95A9F6F98BB5
 
Last edited:
MarlinWalker

MarlinWalker

Active Member
Aug 25, 2018
57
170
33
Idaho
Ownership

  1. 500
So after more research to reduce it to a single cable operated valve with limited dash space for pull knob, stumbled across the 4 way valve. Still looking. Any thoughts? Thanks.

The 4-way valve would definitely be the way to go if you want a single cable and want to adjust the heat output. Profile says you are in Georgia so I take it you don't need full blown heat all the time. This setup should give you the control. I saw this as an option but figured i didn't need it. My problem here in north Idaho was to capture as much heat as I can. So hand valves work when it becomes "heater season".

Went for another ride today up in the mountains with my little guy and got to play around in the snow. Stayed nice and warm and I think he approved.
IMG 20181124 120124799
 

About us

  • Our community has been around for many years and pride ourselves on offering unbiased, critical discussion among people of all different backgrounds. We are working every day to make sure our community is one of the best.

User Menu

Buy us a beer!

  • Lots of time and money has gone into making sure the community is running the best software, best designs, and all the other bells and whistles. Care to buy us a beer? We'd really appreciate it!

    Beer Fund!

    Club Membership!