New Talon Owners - First Things to Know and Check

CID

CID

Well-Known Member
Lifetime Member
Supporting Member
Oct 27, 2019
5,492
25,271
113
SE Denver-ish
Ownership

  1. Talon R
I'm new to the SxS world - damn, there's a lot to learn, hence this thread - maybe we can make it easier for others new to the Talon and put it in one thread.

1. If you're a motorcyclist, you already know that sometimes your bike won't shift into gear at a stop without rocking the bike back and forth. Maybe you know why this happens and maybe you don't. Motorcycle transmission and our Talon use shift dogs to engage gearing. Shift forks slide the gears sideways on a shaft, engaging the dogs into slots on an adjacent gear. If the dogs don't align with their slot, the transmission WILL NOT go into gear. If you don't get the dogs engaged, the gear will spin, slamming the corners of the dogs against their slots, chipping the brittle cast corners off the dogs. This damage is permanent and progressive, when it gets bad enough, your trany will jump out of gear. Proper gear engagement depends on the square corners on the shift dogs, once they're rounded off, the sub transmission has to come out to be repaired $$$.

There's a lot of talk about shift cable adjustment and the shift gate also adding to the problem but if the dogs aren't aligned with their slots they simply can't go into gear - rocking a SxS is a lot harder than rocking a motorcycle (duh :rolleyes:). If it's possible, it might help to put the Talon into High, move 6" and try again - yes inconvenient but so is removing the sub tran for a rebuild. :eek:

The Talon has a digital gear indicator showing P-R-N-H-L. If you aren't properly in gear it will show a dash - . Learn to check that you're actually in gear before applying throttle. Some have reported that this problem is worse when cold and will lessen once warmed up. Some are trying a lighter weight oil. Also, let your foot off the brake, you might move enough to allow the dogs to align with their slots.

My point - do NOT let your gears grind/crunch, shift quickly and firmly. If there's grinding - stoppit!!

This is an internet photo showing 3 shift dogs. Ignore the damaged circlip, not our issue.
Shift Dogs


Another internet pic showing early damage
Dogs2C20chipped2C20arrows


Good, left, destroyed right. This also shows much wider shift dogs, you can see that if they don't line up with their slots, they are not going to slide into gear.
Dog comparison 25B15D


@GPR1500SC posted a photo of actual Talon sub trans shift dog damage. You can see the chipped and rounded corners showing exactly what's happening when you're hearing that grinding. This damage is permanent and progressive so avoid it at all cost.
1693680852868


This first four minutes of this video (not mine) speaks to the low range engagement issue and how to avoid it. He's able to duplicate it far more easily than either of my two Talons (only twice in 2200 miles). Note that he's using an aftermarket shift gate, there are several choices available including one from PaulF here on this site. Each design usually tries to improve on low range engagement.

Sub trans disassembly. He also did a removal video but it was a Pioneer 1000 so ...
 
Last edited:
CID

CID

Well-Known Member
Lifetime Member
Supporting Member
Oct 27, 2019
5,492
25,271
113
SE Denver-ish
Ownership

  1. Talon R
This tip came from @Lil_Steve #beers

When you get your new Talon home, remove the hood and have a look at the firewall above the passengers' knees. That gaping hole exposes the backside of the dash wiring and everything that's in there, to whatever the right front tire (or leading SxS) wants to throw up. The relatively simple fix for this is a wider firewall cover, it took me maybe 15 minutes to install, not counting the time it took to find the runaway push pins. :oops:


The opening -
I 3p4wzSF L


What it's exposing :eek: -
I xm7w6rt L


The replacement -
I MktLHPL M
 
Last edited:
Lil_Steve

Lil_Steve

Well-Known Member
May 22, 2019
544
2,109
93
Gilbert, AZ
Ownership

  1. Talon R
Great idea trying to have this important info in one place, it took me awhile to absorb a lot of this finding pieces here and there. 👍

I'll throw in "check the sub transmission oil level" as soon as you get your Talon. Mine was a little low but not as bad as some I've read about. When I first got my Talon I wasn't aware that the oil type in the sub transmission is the same as the recommended engine oil, 10W-30. When I changed my sub trans oil I used a synthetic motor oil since the sub trans does not share the same sump as the engine so no worry about it creating a slipping clutch situation. This was my own personal preference and I'm only adding this as a data point, not a recommendation.

Edit: added picture taken next to right rear shock absorber


Talon20sub20trans20dipstick XL
 
Last edited:
Hondasxs

Hondasxs

Club Founder
Staff member
Lifetime Member
Supporting Member
Feb 13, 2013
18,511
67,230
113
Charlotte, NC
HondaSxS.com
Ownership

  1. 1000-5

  2. Talon R
My point - do NOT let your gears grind/crunch, shift quickly and firmly. If there's grinding - stoppit!!
This is the best advice I have seen yet!

Quick, fast, firm but don't force it with pressure.
As soon as you hear a grind STOP.
Let the rpm's settle and try again.
 
CID

CID

Well-Known Member
Lifetime Member
Supporting Member
Oct 27, 2019
5,492
25,271
113
SE Denver-ish
Ownership

  1. Talon R
Another issue Lil_Steve brought to my attention is Honda's inexplicable reason for leaving the rear wheel wells open to the cab. These openings are directly in front of our rear tires and all y'all know how much doo doo rear tires throw forward.

Left -
I MLdt2xc L

Right -
I Dkv5bBX L

Mudbusters makes a pretty good solution.

Left -
I vszN9z5 L

Right -
I D4gCNRF L
 
Last edited:
Lil_Steve

Lil_Steve

Well-Known Member
May 22, 2019
544
2,109
93
Gilbert, AZ
Ownership

  1. Talon R
Here's another one that should be helpful, if you have a DTC (diagnostic trouble code) it will trigger a MIL (malfunction indicator light). Unless you have access to the Honda dealer diagnostic tool (they refer to it as Honda MCS) you will need a jumper wire or a Honda service connector which is basically a jumper wire that plugs into the service port (which Honda calls DLC). The option I used is a cotter pin, a paper clip should work the same.
Under the drivers seat on the 2 seat Talons (I read that the 4 seaters may have a different location) you simply unhook a rubber shield to access where the plug is. It's plugged into a dummy cap, you unhook it from the cap and use your jumper between the brown/red wire and the green wire to read and erase DTC's. A service manual is highly recommended to reference DTC's. The service manual shows out of stock right now for the 2019-20 Talon 2 seaters, here's a link. 2019-2020 SXS1000S2X/S2R Talon Service Manual

A pic of the service connector, ignore the salutation, this pic was originally sent to a friend to let him know he's #1. :cool:


IMG 20200214 120110 X2
 
CID

CID

Well-Known Member
Lifetime Member
Supporting Member
Oct 27, 2019
5,492
25,271
113
SE Denver-ish
Ownership

  1. Talon R
Our Talons are held together by push pins, these are new to me. They're fast and effective but can also be a PITA. I pull the centers out of about half that I remove, that doesn't break 'em, just push back together. I hope to get better at this. :oops:

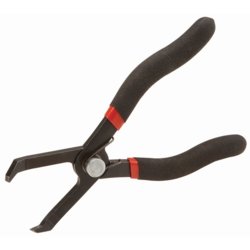
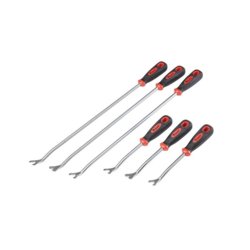
There are tools to help with their disassembly. The two shown below aren't duplicates, each has its application.

Harbor Freight push pin pliers.
I vBTgMVM L

Harbor Freight push pin tool. There are 6 in the set but only 3 different tips, 3 long, 3 short.
I hzFbvq9 L

Amazon also has a push pin kit including one screwdriver type puller but there are too many pieces I have no use for, maybe you do. Search Push Pin Kit. Curious, I cropped this but my photo host sees the original? It's voodoo to me. :eek:

1581958292292
 
Last edited:
CID

CID

Well-Known Member
Lifetime Member
Supporting Member
Oct 27, 2019
5,492
25,271
113
SE Denver-ish
Ownership

  1. Talon R
What's under the driver's seat. The seat belt interlock will limit your speed to 15 mph if the belt isn't fastened, this can be bypassed if you choose - adding a 5 point harness for instance. Hondasxs club has a ready made shorting plug or you can make your own. The DLC is how to retire failure codes, again with a shorting tool or wire. The chassis ground has been found to be loose on occasion..

I XjFXqP5 X2
 
Last edited:
advertisement
CID

CID

Well-Known Member
Lifetime Member
Supporting Member
Oct 27, 2019
5,492
25,271
113
SE Denver-ish
Ownership

  1. Talon R
The Talons' introduction at Sand Hollow, old now but pretty good. And who doesn't love southern Utah's red sandstone desert. 😎

 
Last edited:
CID

CID

Well-Known Member
Lifetime Member
Supporting Member
Oct 27, 2019
5,492
25,271
113
SE Denver-ish
Ownership

  1. Talon R
highpocket74 found his aircleaner gasket dislocated so check yours. There are two, one on the outer cover and another under the air filter.
1588261510420


AJMX824 found the same thing. (top right)
1588262505787


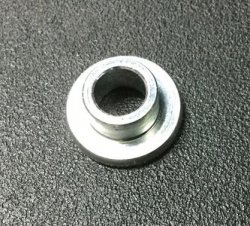
The aircleaner screws use hat washers to prevent pinching the plastic edges of the aircleaner, they aren't captured and will drop down into the engine, so pay attention.
I DsvfNrc S

:oops:
1588261816313


Lil_Steve has a good idea for catching the washers. He also mentioned that he doesn't use the Dewalt driver for assembly. :eek:
1588261906371


1588261988855
 
Last edited:
CID

CID

Well-Known Member
Lifetime Member
Supporting Member
Oct 27, 2019
5,492
25,271
113
SE Denver-ish
Ownership

  1. Talon R
fwiw: check your battery terminals, mine weren't very tight. Battery problems cause weird side effects like the electronically controlled power steering going wacko. :oops:

The Talon's hour meter runs whenever the key is on and it's inevitable that I'm going to do that, repeatedly. :rolleyes: So I decided to add an hour meter that only runs when the engine is running and added one for a motorcycle. The lead is barely long enough to reach the front spark plug but now I'll have an accurate hour meter regardless of 'key on' time.

Simple angle bracket and double stick tape - ETA: the double stick failed twice even though it was very clean, I had to remove the red console piece and add two #6 screws with nylocks.
I 8zVFtNN L


I KmgWFHZ L


I SmZtDmG M
 
Last edited:
CID

CID

Well-Known Member
Lifetime Member
Supporting Member
Oct 27, 2019
5,492
25,271
113
SE Denver-ish
Ownership

  1. Talon R
I wouldn't do this with any expensive machine but others think it's great fun. I was surprised the Talon 'jumped right in' (literally) and did so well. If you aren't interested in door lower installation or adding 32" mud tires, jump ahead to 15 minutes. Lite mud starts at 18:00 and the deep doo doo starts at 20:40. :oops:

 
Last edited:
  • Like
Reactions: Ugly and PaulF
CID

CID

Well-Known Member
Lifetime Member
Supporting Member
Oct 27, 2019
5,492
25,271
113
SE Denver-ish
Ownership

  1. Talon R
Crossover rings and tender spring info -

Although not as 'firm' as the X (which has no crossover rings), the R won't be accused of being undersprung. Without buying new springs we can back off (raise) the crossover rings, keeping us on the softer tender springs longer. I've seen that we have up to 25 turns before the tender springs start to coil bind and we don't want that to happen, it kills springs. (Note: the next post shows that 20 turns up on the rear crossover rings is max for my unit) Although I bought the Talon to explore the desert, Covid kept me home, my initial rides have been in the ROCKY :oops: Mountains and why a more compliant suspension became a higher priority than my previous experiences in the desert.

So, after initial break in and getting bounced around a bit, I decided to raise the crossover rings 10 turns on the front and 15 rear to start. After a successful 40 mile trial decided to go up another 5 turns at each end - so I'm at 15 turns front and 20 rear. I like it and it 'seems' to ride better.

How to know if we're coil binding? Put a zip tie around an individual spring coil on all 4 tenders. If you cut or dent that zip tie, you've gone too far.

Be sure to mark each crossover ring before you start so you can count turns. Mark them full width as it's hard to see between the spring coils - I used a gray felt tip for good contrast. Be sure to clean the shock body threads well, they're aluminum and galling will ruin your day - I used an air compressor after a good hosing.

I'm pretty sure I don't have 25 turns available in the rear, there's only about 1/8" left before the top crossover will bottom against the top of the shock (about 2 turns). There's about 1/4" remaining on the fronts. Note that these two dimensions have nothing to do with coil bind, I don't know when that might happen - it might not on my unit, I may run out of 'up' before coil bind.

If I've made a mistake or someone would like to add more information, please feel free to do so. I'm pretty new to SxSs and didn't see much info on the crossovers and tender springs, a quick look through the service manual showed nothing about either. 🤔

An important note - doing this might increase bucking up in the rear, so proceed at your own risk. If you're a high speed rider this might not work as well for you as it does at my lower velocities. :eek:

ETA (edited to add) - zip tied tender spring coil and gray felt tip marked crossover ring (the gray goes across both rings) - you can also see that there's about 1/4" left before the crossover ring tops out (right front).
1590868263687


I have the design prints directly from Fox for the Talon. Here are the factory measurements...

Front...
1610166265699


Rear...
1610166295039
 
Last edited:
CID

CID

Well-Known Member
Lifetime Member
Supporting Member
Oct 27, 2019
5,492
25,271
113
SE Denver-ish
Ownership

  1. Talon R
Crossover ring follow up and basic sway bar info.

Answering a question elsewhere, I said that removing the sway bar would soften the suspension 'some' because the sway bar ties the left and right suspension together, both spring rate and shock valving, in effect making both stiffer/firmer. Since the Talon will never be accused of being plush or supple, a light went on, an AHA moment. So last night I removed both SB links and tied the bar up to the frame. Note that you can't just remove one link, the loose SB end will contact the upper trailing arm(?) during articulation.

I'm happy to report it did exactly what I'd hoped - my R rides much better and compared to stock, is 'nearing' plush. Perfect, no, of course not, but noticeably softer than with the sway bar connected.

Note that I don't drive like my hair's on fire, so the minimal lean resulting from disconnecting the SB won't affect my riding. If you DO ride like your hair's on fire (you KNOW who you are 😱), this probably isn't something you should consider. This experiment is FREE and I can always go back.

Also note that I have my rear crossover rings raised 20 turns (15 on the fronts) and on my Talon is as far as I can go. This means I use as much travel as possible while on the softer tender springs before crossing over to the stiffer mains. This may also mean that I'll get a worse rear bucking on harder hits, not sure. :( ETA: I've raised the fronts to 17 turns, almost topped out against the preload ring and at <500 miles, the zip ties are still intact.

You can see that there's still a bit of clearance left, before coil bind, on the left rear but not much. If that zip tie gets cut from pinching, 20 turns will prove to be too many. Both sides are pretty much the same. (ETA: several hundred miles later and all 4 zip ties are still intact with the front cross over rings raised 15 turns and the rears raised 20 turns)
1593743969935


How to compress to check? Park across a rut, opposite corners. For the curious, I completely forgot to look at the fronts. 🤫
1593744157669


1593744216321


Sway bar tied up to frame on both sides with bungee cords. You can see the upper trailing arm (with brake line) that the sway bar end will hit if it isn't tied up.
I 9P5S7w3 M


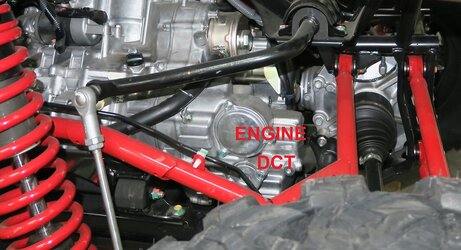
This shows how close the end of the SB is to the upper trailing arm and why both SB links have to be removed on an R. The X doesn't have this interference and, I think, you can simply remove one link to run without the SB. It also shows the location of both the engine and DCT oil filters (they share the same oil).
I WNT4zQw XL
 
Last edited:
CID

CID

Well-Known Member
Lifetime Member
Supporting Member
Oct 27, 2019
5,492
25,271
113
SE Denver-ish
Ownership

  1. Talon R
My Talon's left front differential seal started leaking at about 300 miles. :( Turns out this is a common issue, Honda screwed up so many installs that I waited 5 weeks because the seals were on backorder. it's since been learned that it probably wasn't an assembly error (cutting the seal with the axle splines) as suspected.

The whole story is here, including the video:

PaulF posted -
He (the tester in the video) removed the stock hose from the front diff and applied vacuum and it held (it should not). That shows that there is a plug somewhere in the vent line and it has been verified MANY times that the plug is at the nipple that goes into the frame (too much glue applied at the factory). Not sure why the dealers are not aware of this, it has been discovered by many owners and unplugging the nipple has proven to slow and even stop seal leaks (both front and rear). Honda just keeps replacing seals, they have even released an "updated" seal and not having the dealers check this simple problem. Mind boggling!!!

1593880304055


The vent line terminates in the frame rail, right front, and where the glue plug is on many of them. I ran the largest drill bit I had that would fit in the nipple to make sure it was clear - spinning the bit with my fingers. I didn't think to hook up the vacuum gauge first so I'll never know if it was plugged.
I VvD9MKq L


As seen from the RF tire.
I cjmnjmn L


If you want to check yours for vacuum as shown in the video, the vent line is on the left side of the front diff above the filler nut.
I V42bqgj L
 
Last edited:
CID

CID

Well-Known Member
Lifetime Member
Supporting Member
Oct 27, 2019
5,492
25,271
113
SE Denver-ish
Ownership

  1. Talon R
Honda blew it with the Talon's air intake location, it's under the right rear fender and although behind an inner fender, that inner isn't sealed so a LOT of dirt enters the air horn. Honda's intent was for the intake to be the two side vents but they're in direct line of the RF tire. To add to those mistakes, Honda decided to use a pleated paper air filter which is, for the most part, not reusable/cleanable like the foam filters used in dirt bikes and they're ~$45. It's common for them to be filthy at 200 miles. :oops: I got this done before the first mile.

fwiw: 🤔
i-RQXGgdW-X2.jpg


The following idea is copied directly from @hondabob , the only difference is that I didn't run my filter up to the roof like his version. I chose his idea over an aftermarket snorkel kit like the SYA Warrior because Bob's idea keeps the goofy looking air intake chamber and the SYA kit replaces it. I think the stock chamber is either for tuning or noise control and that's why I wanted to keep it, goofy doesn't bother me.

Here's the intro - (all info came from Bob's 2500, 6000 and 10,000 mile reports in the General Talon forum. All the pics you need are there.). The 3" plastic tube is the belt drive intake tube from the first year Teryx 4 seater (2012?), Part # 14073-0716. If you want to run up to the roof, you might need two of them at <$20 each + shipping; depending on where you want the filter (bottom photo shows one tube). The 3" rubber connecting hose is a NAPA turbo hose, part # 8907 at $55-$60. It has a 90* bend that can be used at the roofline.

Final result with a Uni 3" pod filter (UP-6300ST)
1593882114317


The rubber connection is cut from NAPA part #8907 which has a 90* bend that can be used if you run your filter up under the roof.
1593882210104


The stock air intake, photo thx to Lil_Steve. The 'hat' is held on with one push pin. You can see the wire lying on the hat that you don't want to cut when drilling for the snorkel riser.
I JxZSRKM XL


The air horn, visible above, has to be trimmed down to 3". This is HondaBob's photo - the plastic is very pliable and unlikely to break so using snips works well for the initial down sizing. I used a drum sanding wheel in my Dremel to do the final trim - note that you'll be removing almost all of the air horn.
I mBmNtFz S


Partially cut -
I z7D3DrK S


This is showing the web, on the left and right, that will need to be 'lowered' to give room for the clamp. I ended up notching the hose a bit on the left since the hose is tipped that direction.
I LHVBQcM M


The money shot, note that you don't have to remove the fender; it's quite complicated and I'm not sure it's worth the effort given that the photos show everything.
I T4FfTzf XL


Filthy dirty at 1066 miles but I imagine the stock filter still looks like new. I ride solo so your results may vary.
1593882441833


This is the Teryx belt drive intake tube showing how I cut mine to make two passenger seat snorkels. It's from the first year 4 seat Teryx (2012) part # 14073-0716.
I 24pSRr7 L


The hole through the body was defined by the 3 edges marked by arrows. The tube barely fit and why I didn't use a hole saw which would have been a bit too large IMO. Done 'properly' (crowding the edges at the two lower arrows), you'll have about 1/8" at the top arrow before cutting through that edge.
I CMJfXgJ XL


How I got there using a rasp bit in a drill, carefully - taped, used the Teryx tube to locate hole, marked, drilled, rasped. As slow and crude as this was, I was able to position the hole exactly where I wanted it, a fraction at a time. Caution - there's a wire under there, don't cut it.
I R5KVWnT M


Rasp bit used but any abrasive bit will probably work just fine.
i-hZgkGhP-M.jpg


Another HondaBob photo showing how he ran his up to the roof line, safe from rain. He has since moved on to a pleated filter. It also shows the 8907 Napa hose, also used at the air box connection, out of sight.
I nrHq6rn M


PhilCod found straight 3" hose if you don't need the 90* bend of the NAPA 8907.
3" Inch ID 12" LONG STRAIGHT 3-PLY 3PLY SILICONE COUPLER PIPE/TUBE HOSE BLACK | eBay
 
Last edited:
CID

CID

Well-Known Member
Lifetime Member
Supporting Member
Oct 27, 2019
5,492
25,271
113
SE Denver-ish
Ownership

  1. Talon R
After saying "but I imagine the stock filter still looks like new" in the above post, I decided to look. I had checked it earlier when I was checking the two large air box o-rings but forgot to take pics. These are at 1137 miles, all of them with the 3" Uni pod prefilter shown (filthy) above and not cleaned until 1066 miles. So now instead of yapping about the snorkel conversion, I haz photos - kudos to Hondabob for the most excellent idea. #beers :cool:

Large pics so you can zoom in if you'd like -
I cC2r3Xx XL


I 2fqCwcL XL


The two air horns are spotless -
I 62SwsPH X2


and so is the dirty side of the airbox. The top and bottom surfaces aren't dusty, that's just the lighting.
I pzZqzZr XL


The airbox lives in a terrible environment - :oops:
I kP7SpPc L


I'm not bashful about oiling the foam element, that's what makes them work after all. They're open cell foam so any excess oil just drains out the bottom over a few days/weeks - I did squeeze the hell out of it but ... The pic was taken after cleaning the filter and wiping down the vertical plastic tube, the left half was covered in drained oil, that's how it got where it did.
I 87j8PhL L
 
Last edited:
H

HondaTech

Guest
After saying "but I imagine the stock filter still looks like new" in the above post, I decided to look. I had checked it earlier when I was checking the two large air box o-rings but forgot to take pics. These are at 1137 miles, all of them with the 3" Uni pod prefilter shown (filthy) above and not cleaned until 1072 miles IIRC. So now instead of yapping about the snorkel conversion, I haz photos - kudos to Hondabob for the most excellent idea. #beers :cool:

Large pics so you can zoom in if you'd like -
View attachment 210843

View attachment 210844

The two air horns are spotless -
View attachment 210845

and so is the dirty side of the airbox. The top and bottom surfaces aren't dusty, that's just the lighting.
View attachment 210846

The airbox lives in a terrible environment - :oops:
View attachment 210847

I'm not bashful about oiling the foam element, that's what makes them work after all. They're open cell foam so any excess oil just drains out the bottom over a few days/weeks - I did squeeze the hell out of it but ... The pic was taken after cleaning the filter and wiping down the vertical plastic tube, the left half was covered in drained oil, that's how if got where it did.
View attachment 210848

Interesting enough, Hess motorsports isn't running the Jackson airbox, they've installed a Donaldson airbox in its place.
 
advertisement

About us

  • Our community has been around for many years and pride ourselves on offering unbiased, critical discussion among people of all different backgrounds. We are working every day to make sure our community is one of the best.

User Menu

Buy us a beer!

  • Lots of time and money has gone into making sure the community is running the best software, best designs, and all the other bells and whistles. Care to buy us a beer? We'd really appreciate it!

    Beer Fund!

    Club Membership!