J
10-4 buddy! Thanks. Didnt mean to come across gruff there.
All good, FB sucks at times but full of good info.
Sent from my iPhone using Tapatalk
10-4 buddy! Thanks. Didnt mean to come across gruff there.
The poly bushings is fantastic info! Would you mind posting this stuff in the P500 - P-500 Air Suspension Mod- JWB Mod thread? I'll start putting links to the new air shock thread in here so if anyone wants to do the air shock mod, they can find all this fantastic information in one place!That's good input @JWB. I honestly thought about it but figured it would be fine so I'm glad you spoke up. Thanks!
I got all the stock bushings out of the Hijackers and installed Energy Suspension 9.8116 poly bushings. They are exact-fit replacements. I should have gotten the split ES bushings. But anyway, should have the air ride soon! Tomorrow if I get to it before Vikings. Priorities. Just starting out with 2 valves to combine front and rears, plan is to go to on-board compressor and multi-valves if works out. Again I like the fact it requires minimal mods to install. I also made bushings to accommodate stock diameter bolts (12mm x 140 rear, 10mm x 130 front). Trying to keep it real!
Also, You have no idea how many times this week I tried to think how I could "burn" out the molded rubber bushings and install poly bushings with floating bearing-inserts. LOL!!!!
About the 'two valves' thing. I may be misunderstanding this, but you can't combine the front and rear systems together. If you do, the rear will drop, and the front will immediately top out, as rear pressure needs to be (I'm guesstimating) about 140psi, and the front about 75psi (average light load) The front and rear have to be isolated from each-other. However, you can join the rear, side to side, or the front, side to side. Not both at the same time though, cuz the machine will have zero 'roll' resistance, and will just lean stupidly to the heavy side. Unfortunately, if you do four corner air shocks, I think you have to have four separate valves minimum if you have a single fill point. I have six valves on mine. I'm going to go do a video to show just how I have done this to make it clearer, but it doesn't mean my way is the only way. There are different types of valves that can do multiple functions.That's good input @JWB. I honestly thought about it but figured it would be fine so I'm glad you spoke up. Thanks!
I got all the stock bushings out of the Hijackers and installed Energy Suspension 9.8116 poly bushings. They are exact-fit replacements. I should have gotten the split ES bushings. But anyway, should have the air ride soon! Tomorrow if I get to it before Vikings. Priorities. Just starting out with 2 valves to combine front and rears, plan is to go to on-board compressor and multi-valves if works out. Again I like the fact it requires minimal mods to install. I also made bushings to accommodate stock diameter bolts (12mm x 140 rear, 10mm x 130 front). Trying to keep it real!
Also, You have no idea how many times this week I tried to think how I could "burn" out the molded rubber bushings and install poly bushings with floating bearing-inserts. LOL!!!!
Yup I meant tie the fronts together side to side, and tie the rears together side to side. But fronts and rear will never see each other. Basically doing what you started out as. And I'll go ahead and post part numbers and what I'm doing in your Air Suspension Mod.About the 'two valves' thing. I may be misunderstanding this, but you can't combine the front and rear systems together. If you do, the rear will drop, and the front will immediately top out, as rear pressure needs to be (I'm guesstimating) about 140psi, and the front about 75psi (average light load) The front and rear have to be isolated from each-other. However, you can join the rear, side to side, or the front, side to side. Not both at the same time though, cuz the machine will have zero 'roll' resistance, and will just lean stupidly to the heavy side. Unfortunately, if you do four corner air shocks, I think you have to have four separate valves minimum if you have a single fill point. I have six valves on mine. I'm going to go do a video to show just how I have done this to make it clearer, but it doesn't mean my way is the only way. There are different types of valves that can do multiple functions.
Here's the video about the control valves:Yup I meant tie the fronts together side to side, and tie the rears together side to side. But fronts and rear will never see each other. Basically doing what you started out as. And I'll go ahead and post part numbers and what I'm doing in your Air Suspension Mod.
LMAO!! Just hadn't thought of it... seems wrong on so many levels, buuut........I am somewhat disappointed that you do not already have train horns... Jus sayin
Thanks for the help with the new thread!Yup I meant tie the fronts together side to side, and tie the rears together side to side. But fronts and rear will never see each other. Basically doing what you started out as. And I'll go ahead and post part numbers and what I'm doing in your Air Suspension Mod.
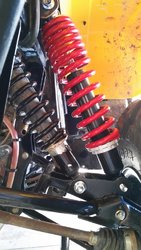
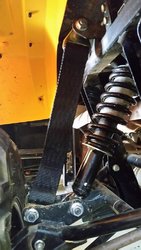
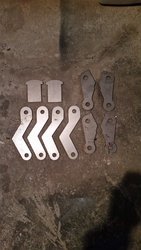
@JWB I still have some of the shock mounting brackets that I had made when I was trying to use the Progressive shocks on the rear of my machine. I think these would work great for your application to mount the dual air shocks on the rear.I want to share the experience I'm having with the new "delco" shocks. I've put about 120 miles on them in various terrain- mostly the mountain trails in VA. and WV. First thing I've noticed is that they seem to ride a little better than the previous set, but that may be because they're new. The second thing is that they don't seem to have the same load lifting power as the previous set, particularly in the rear, and mostly on the passenger side. With me and the Princess, and full tank of gas, 4 gallons of gas in the box, it will not pick up the passenger side rear. The fronts will still lift the machine quickly all the way to the top of their travel. This set up has always required more pressure in the rear due to rear shocks having more angle, and as the shocks compress, the angle increases, and makes the situation worse. The fronts will still 'jump' up even when the machine is loaded and going down a very steep slope. I'm still not comfortable with the limit strap set-up, but so far they are working fine, and haven't affected the performance of the machine in any noticeable way. We've got another day of riding, but when I get the machine home, I've got to figure out why the passenger side is so weak, and I think I want to move the mount points to make the shock angles on the rear the same as the fronts- if that's possible to do without over extending the control arms. If I can do this, it would lower the air pressure needed on the rears substantially, and solve the load carrying capacity issue that the other guys who've done the four corner set up have mentioned as well. As an added bonus, lowering the average pressure would also help in keeping the shocks from ripping themselves apart on full extensions...


@Chooglin ! I totally forgot you had made those mounts..Those may be the ticket! Heading home in the morning, but probably won't do anything with the machine till next wknd- it's gonna be a busy week@JWB I still have some of the shock mounting brackets that I had made when I was trying to use the Progressive shocks on the rear of my machine. I think these would work great for your application to mount the dual air shocks on the rear.
p5 suspension
View attachment 88650
View attachment 88646
View attachment 88648
I just found this thread, and have gone through it. It contains some great info. I know there are some issues with the arm bushings and have started looking into modifying the upper and lower arms by cutting the bushing off, welding a threaded bung on each tube. This would allow the use of a Currie Johnny Joint to replace the bushing. The JJ's are used a lot in the Jeep Wrangler world for suspension arms. I have them on my Wrangler, and they provide excellent flex and adjustability to the suspension. They also help with binding etc. The frame mount might need to be changed also, due to the size of the joint, but that would not be all that difficult. Currie makes several size JJ's and am sure one could be adapted to work with the P5. Any input from you guys would be greatly appreciated because I am sure I have missed something.
You will only have bushing issues if you do the air-shock set up due to the dramatic increase in suspension travel that the contol arm bushings were not designed to deal with. Check out this link- you'll see why, and some other good information in regards to the control arm bushingsMine has been great with the mods that I have made. I dont drive underwater or mud up to the roof. I drive in rocky, mountain land. It was a question about suspension travel, and someone in a thread mentioned having issues with the joints. Now how true that is I dont know, as I have only had mine a year. I also know that adding a JJ would not mod it until it brakes. They are some of the most proven joints available and have been proven over many years in the offroad world. There are many cars that run them at King of the Hammers event every year. I know that they will allow for more suspension flex, and with that you could add additional travel.

