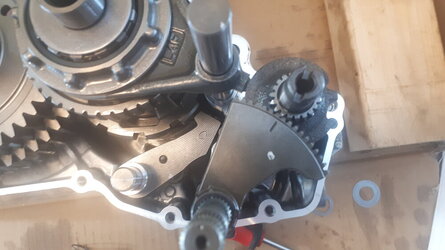
P1000 Sub-Transmission Service

ch33br0h

ch33br0h

Well-Known Member
Lifetime Member
Jul 7, 2018
130
369
63
Jardín, Antioquia - Colombia, South America!
Ownership

  1. 1000-5
It's not in the service manual. I posted it above.
It's possible you may have something out of order, or backward, or perhaps the wrong washer in the wrong place in your reassembly.

Look at each item in the parts diagram carefully. If you use Partzilla to look at each part individually, they often give dimensions for washers and such. Check them with a caliper.

@P1K5Dave
a quick note to say thank you here on the continued support!
I will soon be taking a one week vacation from work to give myself plenty of time to tackle this sub transmission gear change/fix and all this info helps.

@Chunk4546
let us know how it goes,
 
A

aspire

Member
Sep 14, 2020
27
50
13
ottawa
Ownership

  1. 1000-3
On second thought, I need to re-read this and check the diagrams. It was the spring at the front diff that I'm referring to.
On my 2020 Honda Pioneer 1000-3 EPS, I do not have a joint spring where the sub trans meets the propeller shaft. I do however, have a spring present on the front differential side. This is consistent with the parts diagram. Oddly, the same diagram does not show a spring on the sub trans side despite specific steps in the manual to install/remove the "joint spring". On my unit, the front differential spring is providing good tension on the propeller shaft so am not stressing over it. Perhaps the older models had a spring on the sub trans side only? The dealer stated the steps in the manual may not apply evenly to 2016-2020. It is also possible my unit is an outlier and I should have a sub trans spring :). The manual should have been crystal clear on this.
 
Last edited:
A

aspire

Member
Sep 14, 2020
27
50
13
ottawa
Ownership

  1. 1000-3
For me, the most confusing part of reassembly comes at the top of page 12-19 (PDF 389) in the Service Manual. It took me a while to figure this out, so hopefully I can save someone the trouble here:

View attachment 226575

First of all, there will be no white paint. It's been in a bath of oil, and it's gone.

BEFORE you put the gearshift arm in, you'll need to rotate the shift drum 180 degrees, THEN you'll put the gearshift arm in so that the index line points at the center of the gear on the drum.

I still don't see where the manual tells me this. it says "make sure that she sub-transmission is in the "N" postion by rotating the output shaft," but I don't know where the "N" position is, nor have they previously referenced the output shaft. I think this is where it's telling you to rotate the shift drum 180 degrees.

You'll check this when you slide the cover back on, at the bottom of page 12-19, as follows. Make sure these line up:


View attachment 226576

Note that now your sub-trans is reassembled in the Neutral position. That means you'll be going to your dash and moving your gear shifter to the Neutral position before you re-attach the shift cable to the subtrans.

The elusive white paint on the shift drum gear was barely visible on my unit :) . After following this guide, going into low is now buttery smooth with no chattering or loud metal slap as received from the dealer. Reverse is also easier with less gas pedal needed in those tight spaces. A very worthwhile mod to do. Thanks for taking the time to document it.

20210119 142712
 
Last edited:
A

aspire

Member
Sep 14, 2020
27
50
13
ottawa
Ownership

  1. 1000-3
there is no marking in the gear itself. I looked at my receipt and it say it is the 23691-HL6. But im worried that isnt what i got. See attached picture the gear doesnt go up to the flat part. Does anyone have a picture of theirs in the same angle.

View attachment 260994
I just completed replacing my reverse and reverse idle gears with talon equivalents. I don't have a picture, but the gear teeth lining up (or not) should give a good indication of fit. I think that is the correct pictured Talon gear because the stock gear does not have that center strip line down the middle ( my talon gear did ). When I went to put the cover side case back on, it would not seat correctly. I had to put a little pressure on the the shift drum and fork with a screw driver and then all was well. Hope you figure this out.
 
ch33br0h

ch33br0h

Well-Known Member
Lifetime Member
Jul 7, 2018
130
369
63
Jardín, Antioquia - Colombia, South America!
Ownership

  1. 1000-5
@P1K5Dave
random funny question, you think its possible to pull out the sub-trans without removing the skid plate?

I did things ass backwards...
up on blocks, no shocks, doors, panels, seats all removed... as I was pulling out the front floor panel is when I realized the horror of having to negotiate a lift to remove the skid plate underneath.....

ugh.
 
P1K5Dave

P1K5Dave

Well-Known Member
Lifetime Member
Club Contributor
Jul 11, 2020
2,247
8,430
113
Petoskey, MI
Ownership

  1. 1000-5
@P1K5Dave
random funny question, you think its possible to pull out the sub-trans without removing the skid plate?

I did things ass backwards...
up on blocks, no shocks, doors, panels, seats all removed... as I was pulling out the front floor panel is when I realized the horror of having to negotiate a lift to remove the skid plate underneath.....

ugh.
Not sure on that. Maybe if you get the floor panels out and such? I can't remember what may have been in the way of you getting it thru the top. I have no skid plate at all, courtesy of the previous owner. One of my next expenditures...
 
ch33br0h

ch33br0h

Well-Known Member
Lifetime Member
Jul 7, 2018
130
369
63
Jardín, Antioquia - Colombia, South America!
Ownership

  1. 1000-5
Not sure on that. Maybe if you get the floor panels out and such? I can't remember what may have been in the way of you getting it thru the top. I have no skid plate at all, courtesy of the previous owner. One of my next expenditures...
thanks for the reply,
I'm gonna see how things develop!
 
  • Like
Reactions: Biteme and Lady01
ch33br0h

ch33br0h

Well-Known Member
Lifetime Member
Jul 7, 2018
130
369
63
Jardín, Antioquia - Colombia, South America!
Ownership

  1. 1000-5
Were you able to get it out from above?
although I would say that "technically" it could be removed with the skid plate in place, its only a few minutes to take it off and comes with great benefits.
It only took about 11 minutes to raise the Honda up again, move the blocks, remove skid plate and bring back down. The final wiggle to separate the sub I did while laying below, that and the famous 3rd short bolt... both would have been much tougher with only access from above.

Next I start cracking open that case,
 
advertisement
ch33br0h

ch33br0h

Well-Known Member
Lifetime Member
Jul 7, 2018
130
369
63
Jardín, Antioquia - Colombia, South America!
Ownership

  1. 1000-5
For me, the most confusing part of reassembly comes at the top of page 12-19 (PDF 389) in the Service Manual. It took me a while to figure this out, so hopefully I can save someone the trouble here:

View attachment 226575

First of all, there will be no white paint. It's been in a bath of oil, and it's gone.

BEFORE you put the gearshift arm in, you'll need to rotate the shift drum 180 degrees, THEN you'll put the gearshift arm in so that the index line points at the center of the gear on the drum.

I still don't see where the manual tells me this. it says "make sure that she sub-transmission is in the "N" postion by rotating the output shaft," but I don't know where the "N" position is, nor have they previously referenced the output shaft. I think this is where it's telling you to rotate the shift drum 180 degrees.

You'll check this when you slide the cover back on, at the bottom of page 12-19, as follows. Make sure these line up:


View attachment 226576

Note that now your sub-trans is reassembled in the Neutral position. That means you'll be going to your dash and moving your gear shifter to the Neutral position before you re-attach the shift cable to the subtrans.


@P1K5Dave

I'm right at this point!
Stopping for the night and will pick up back up again tomorrow afternoon.
But I'm 100% stuck.

How did you rotate the shift drum?
as hard as I try it won't turn even a hair for me.
I get the idea as a quick placement of the case cover shows that my shift drum is not lined up with index marks on case, but can't wrap my head around on how to turn it.
And I can't freely spin the output shaft and that kinda also tells me that I'm def not in neutral.


also this part from the manual;
"the punch mark of the control shaft end aligns with the index mark on the case cover"
My shaft does not have an index mark like in the pic, instead I have two dot marks


any advice greatly appreciated!!!

I can't believe I've made it this far!!!!


---EDIT----

Dunn & Done!
just had to raise the forks to spin the drum and wooosh.
Tomorrow I'll take a run at the control shaft.


---Second Edit ---
My physical manual states that when the drum and shaft are properly lined up its actually in Park.
But that makes zero sense as its so dam clear how when you are Truly in Park the Parking brake is engaged.
Without a doubt that last part is super confusing and very glad to have had this guide along with me to help.
I was also tempted by the idea of putting the case back together while in Park, but the tension of the parking brake release spring was quick to toss things out of line, so i went back to neutral!
 
Last edited:
P1K5Dave

P1K5Dave

Well-Known Member
Lifetime Member
Club Contributor
Jul 11, 2020
2,247
8,430
113
Petoskey, MI
Ownership

  1. 1000-5
@P1K5Dave


Dunn & Done!
just had to raise the forks to spin the drum and wooosh.
Tomorrow I'll take a run at the control shaft.


---Second Edit ---
My physical manual states that when the drum and shaft are properly lined up its actually in Park.
But that makes zero sense as its so dam clear how when you are Truly in Park the Parking brake is engaged.
Without a doubt that last part is super confusing and very glad to have had this guide along with me to help.
I was also tempted by the idea of putting the case back together while in Park, but the tension of the parking brake release spring was quick to toss things out of line, so i went back to neutral!
Sorry man, I just got by again to read. I'll set it up so I get emails when this thread gets a post so I don't leave you guys hanging.

Great to see that it's coming along! And good to see more and more of you tackling this job and saving yourselves about a grand or more vs. having a dealership do it...

Please try to add detailed instructions and pictures to this thread wherever I didn't cover enough, to make it better for everyone else!
 
P1K5Dave

P1K5Dave

Well-Known Member
Lifetime Member
Club Contributor
Jul 11, 2020
2,247
8,430
113
Petoskey, MI
Ownership

  1. 1000-5
Looking into it, it seems like I am set up to receive emails, but I haven't gotten any from hondasxs in quite some time. Shouldn't I get an email when someone replies to a subscribed thread? It seems like I used to...
 
ch33br0h

ch33br0h

Well-Known Member
Lifetime Member
Jul 7, 2018
130
369
63
Jardín, Antioquia - Colombia, South America!
Ownership

  1. 1000-5
Looking into it, it seems like I am set up to receive emails, but I haven't gotten any from hondasxs in quite some time. Shouldn't I get an email when someone replies to a subscribed thread? It seems like I used to...
appreciate it but at the same time it also forced me to spend more time looking at it and understanding how it all works!

Once I cracked open that case, things got hairy/greasy so I never grabbed the phone again to take pics, but it sure was awesome to have this guide printed out next to me.


re: notifications,
I believe the system is enabled in a way to not overwhelm our inbox with alerts.
 
  • Like
Reactions: Biteme and Lady01
ch33br0h

ch33br0h

Well-Known Member
Lifetime Member
Jul 7, 2018
130
369
63
Jardín, Antioquia - Colombia, South America!
Ownership

  1. 1000-5
Being deep in the mountains its best to over estimate and I went in with the expectation to replace;
  • reverse/low collar
  • final drive low
  • low/reverse shift fork
  • update to Talon Reverse and Talon reverse idle
found plenty of metal shavings, the famous internal magnet and then was in Awe to see that all the components are in gorgeous condition, Minus that reverse/low collar.

I have over-abused this machine with Heavy loads and excessive trailer weight as its used to simply move construction material over extreme terrain, 99% going uphill.
The cost of the purchase was simply going to be a "construction expense".

Now, I'm simply blown away by how well the Pioneer has survived it all and I'm starting to believe its going to stay with us for several more years.

Huge part of that is having access to this forum as a tremendous resource of knowledge!


Pics here of the confusing statement in my physical manual stating that the P condition, when its really N,
Then the collar.


20210418 091302

20210418 091412
 
P1K5Dave

P1K5Dave

Well-Known Member
Lifetime Member
Club Contributor
Jul 11, 2020
2,247
8,430
113
Petoskey, MI
Ownership

  1. 1000-5
Interesting. Our manuals are different. Here is the same section from my electronic version:

Capture
 
  • Like
Reactions: TripleB and Lady01
P1K5Dave

P1K5Dave

Well-Known Member
Lifetime Member
Club Contributor
Jul 11, 2020
2,247
8,430
113
Petoskey, MI
Ownership

  1. 1000-5
So, yeah...for anyone taking on this project, your service manual may be WRONG on the shift position of your subtrans when you put it back in. The subtrans is in Neutral when re-assembled, and your shifter on the dash should be moved to the Neutral position before you reattach the shift cable to the subtrans.
 
advertisement

About us

  • Our community has been around for many years and pride ourselves on offering unbiased, critical discussion among people of all different backgrounds. We are working every day to make sure our community is one of the best.

User Menu

Buy us a beer!

  • Lots of time and money has gone into making sure the community is running the best software, best designs, and all the other bells and whistles. Care to buy us a beer? We'd really appreciate it!

    Beer Fund!

    Club Membership!